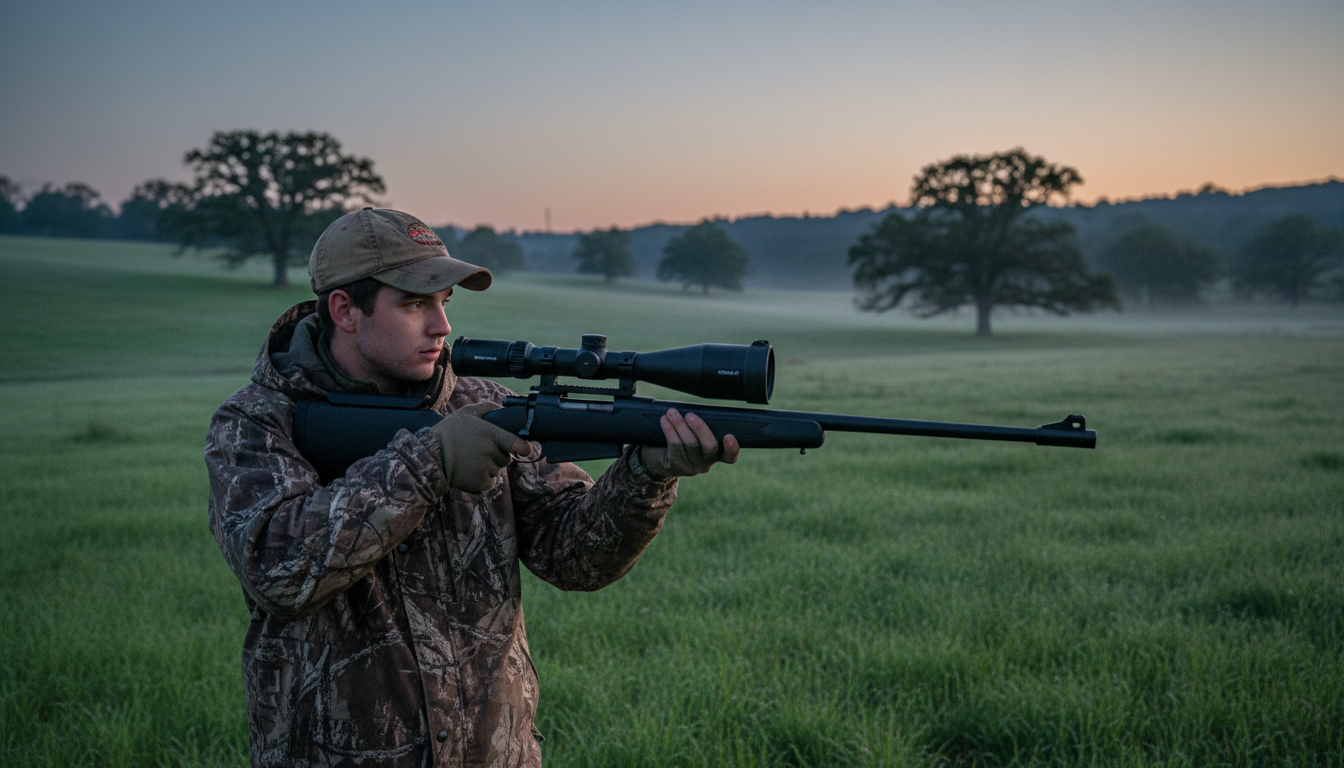
Picking your first thermal scope feels overwhelming. We get it—there’s a ton of technical jargon, wildly different price points, and everyone seems to have a strong opinion about which features matter most. But here’s the thing: you don’t need a $7,000 flagship model to start seeing heat signatures at night. You just need the right scope that matches what you’ll actually be doing in the field.
We’ve spent time researching beginner-friendly thermal scopes, talking to hunters who made the jump, and breaking down what really matters when you’re just getting started. Whether you’re hunting hogs, calling coyotes, or protecting livestock from predators, this guide will help you find a scope that fits your budget and gets the job done.
Why Thermal Instead of Night Vision?
Before we talk specific scopes, let’s clear up a common question: should you go thermal or night vision for your first night optic?
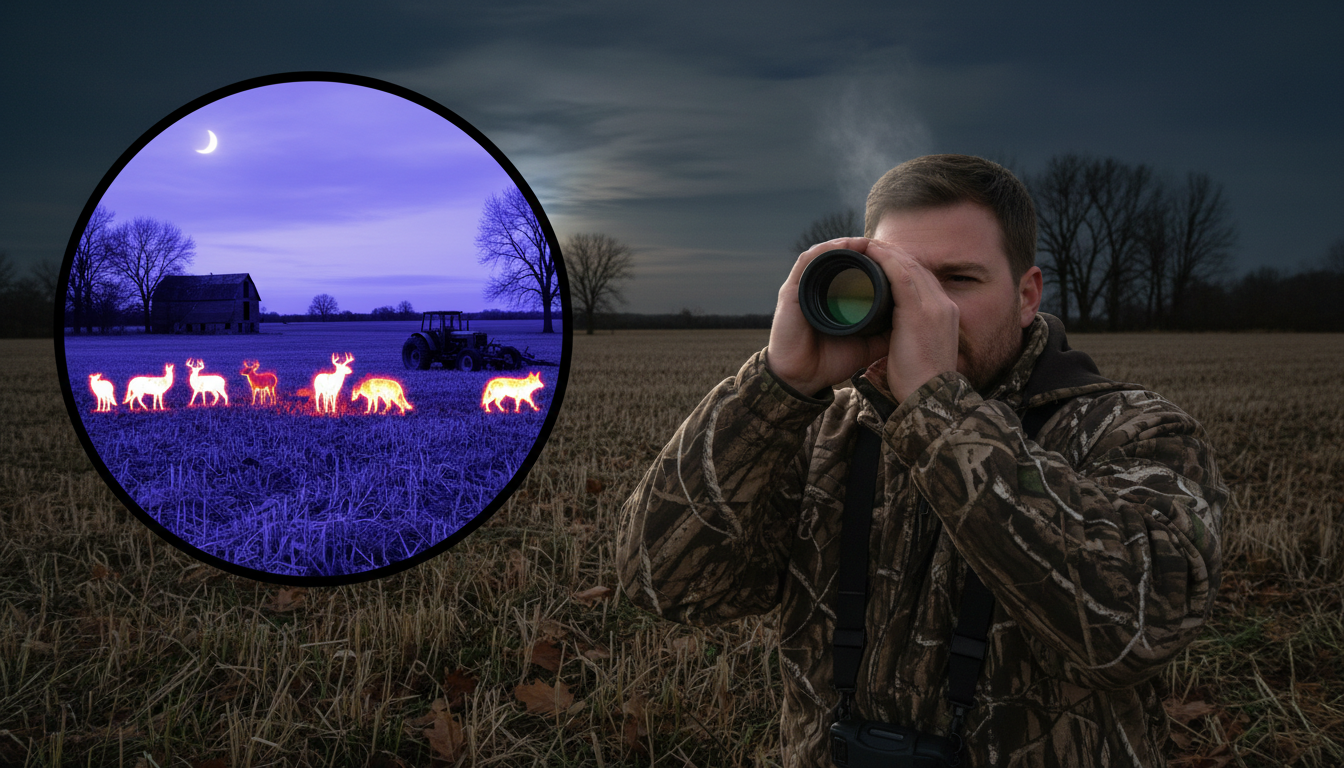
Thermal scopes detect heat signatures—they see the warmth that animals give off. Night vision amplifies existing light from the moon, stars, or an infrared illuminator. Both work, but thermal gives you some real advantages when you’re starting out.
You can use thermal in complete darkness, fog, light rain, and even see through tall grass and brush. Night vision needs some ambient light to work well, and it struggles when there’s fog or thick cover. And here’s a big one: muzzle flash won’t blind your thermal scope between shots. With night vision, that flash can knock out your view for a second or two—not ideal when you’re trying to take a follow-up shot on a group of hogs.
Thermal monoculars and scopes also excel at detection. You’ll spot animals faster because they stand out as bright heat signatures against cooler backgrounds. Night vision gives better detail for identification at close range, but thermal wins for finding targets in the first place.
What Resolution Do You Actually Need?
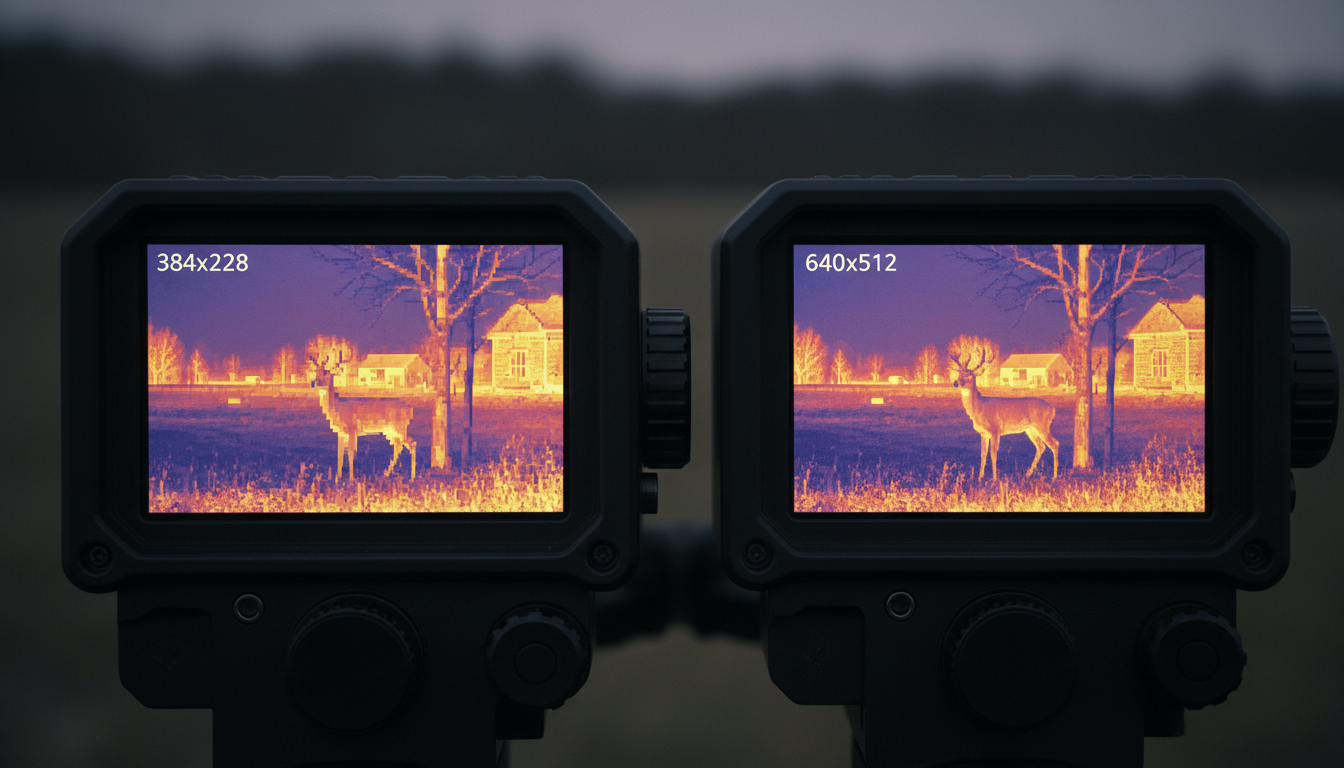
Sensor resolution is probably the spec you’ll see mentioned most. It’s written as two numbers—like 256×192, 384×288, or 640×512. Higher numbers mean more pixels, which translates to sharper images and better detail at distance.
For beginners, we recommend starting with at least 384×288 resolution. You can find 256×192 scopes for less money, but they’re best suited for very close work under 100 yards. At 384×288, you’ll be able to detect hog-sized targets out to 250 yards and identify what you’re looking at well enough to take ethical shots.
If your budget allows, 640×512 resolution is a noticeable step up in image clarity. But don’t feel like you need it right away. Plenty of hunters have taken hundreds of animals with 384×288 scopes. Focus on getting something you can afford that meets the minimum specs, then upgrade later if you want more range or detail.
The pixel pitch (measured in microns) also matters. Most modern scopes use 12-micron sensors, which is the current standard. Older 17-micron sensors are less sensitive but still work fine for basic hunting.
Detection vs Identification Range
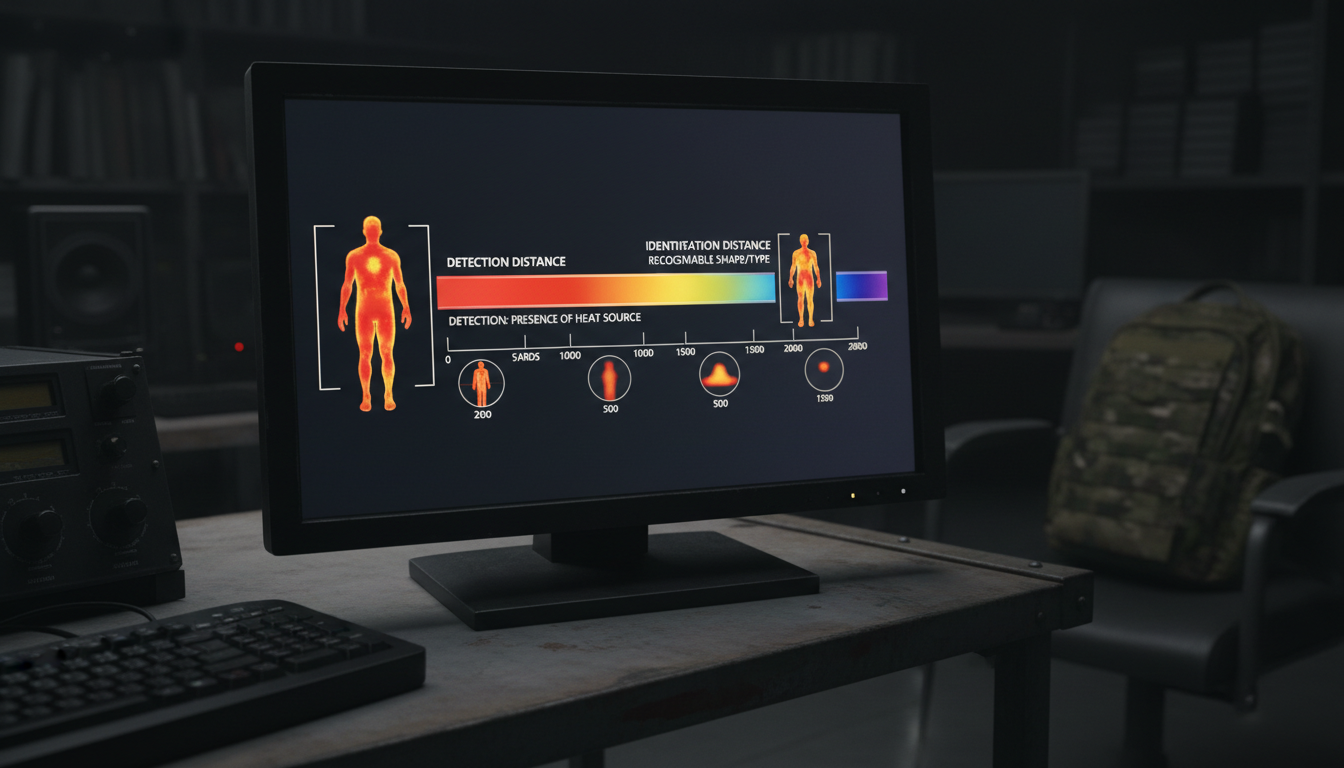
Scope manufacturers love to advertise detection ranges—sometimes claiming you can spot targets 1,800 yards away or more. But there’s a huge difference between detecting something and actually identifying what it is.
Detection range means you can see that something is there—a heat signature appears on your screen. Identification range is the distance where you can tell if that signature is a coyote, a dog, a hog, or a stump that’s still warm from the sun.
For most entry-level scopes with 384×288 resolution, realistic identification range on coyote-sized targets is around 150-200 yards. For larger animals like hogs or deer, you might push that to 250 yards. Detection might happen at 400+ yards, but you won’t be able to tell what you’re looking at.
This is why we always say: buy for your typical shooting distances, not the maximum detection spec. If you’re mostly hunting within 200 yards, a solid 384×288 scope will serve you well.
Features That Matter for Beginners
Beyond resolution, several other features affect how well a thermal scope works in real-world hunting:
Refresh rate is measured in Hertz (Hz) and tells you how many times per second the image updates. Most modern scopes offer 50Hz or 60Hz, which looks smooth and natural. Avoid anything under 30Hz—the image will look choppy and laggy when tracking moving animals.
Battery life varies wildly between models. Some scopes run 4-5 hours, others can go 10+ hours. Check what type of batteries the scope uses. USB-rechargeable batteries are convenient, but keep a backup power bank in your kit. CR123A batteries are easy to find and swap in the field.
Mounting is usually straightforward. Most thermal scopes mount in standard 30mm rings, just like traditional rifle scopes. The eye relief tends to be shorter than you’re used to—often around 1.8 inches—so you might need a cantilever mount to position the scope correctly.
Digital zoom is handy for getting a closer look, but don’t confuse it with optical magnification. Digital zoom just enlarges the pixels you already have—it doesn’t add detail. A 2x base magnification with 4x digital zoom gives you 8x total, but the image will look more pixelated at higher zoom levels.
Recording capability lets you capture video of your hunts. It’s not necessary, but it’s fun to review shots and share your experiences. Some scopes have recoil-activated recording that starts automatically when you pull the trigger.
Budget Breakdown: What to Expect at Different Price Points
Thermal scopes have gotten way more affordable in recent years, but you still need realistic expectations at each price tier.
Under $1,000: You’ll find basic 256×192 scopes that work for close-range applications under 100-150 yards. These are fine for backyard pest control or tight cover hunting, but limited for most coyote or hog hunting scenarios.
$1,000-$2,000: This is the sweet spot for beginners. You’ll get 384×288 resolution, 50Hz refresh rates, video recording, and detection ranges suitable for most hunting situations. Scopes like the ATN ThOR LTV series fall into this category and offer solid performance without breaking the bank.
$2,000-$3,000: You start seeing 640×512 resolution options, better sensors with lower NETD (higher sensitivity), and features like built-in laser rangefinders. If you’re serious about night hunting and can stretch your budget, this tier offers noticeable improvements in image quality.
Above $3,000: These are premium scopes with 640×512 or higher resolution, top-tier sensors, advanced ballistic calculators, and professional-grade build quality. Great if you hunt often and want the best, but not needed to get started.
Start with what you can afford in the $1,500-$2,500 range if possible. You’ll get a capable scope that won’t leave you feeling limited, and you can always upgrade later if you catch the thermal bug.
Practical Tips for First-Time Thermal Users
Once you get your scope, here are a few things we’ve learned that’ll help you get up to speed faster:
Practice during the day first. Most thermal scopes work in daylight, and it’s way easier to learn the controls and menu system when you can see what you’re doing. Familiarize yourself with how to adjust brightness, switch color palettes, and activate recording before you head out at night.
Learn your color palettes. White hot (warm objects appear white) and black hot (warm objects appear black) are the most common. Try both and see which one your eyes prefer. Some hunters like white hot for scanning, black hot for shooting.
Zero at your typical range. Many thermal scopes have one-shot zeroing features that make sighting-in quick. If you’re usually shooting inside 150 yards, zero there. The digital reticle makes holdovers easy for longer shots.
Scan with purpose. Don’t just sweep back and forth randomly. Glass the same way you would with binoculars—systematically work an area from near to far, checking likely travel routes and bedding areas.
Mind the weather. Thermal works great in most conditions, but extreme heat can reduce contrast. When everything is hot, the difference between an animal and the background gets smaller. Early morning when animals are warm and the ground is cool offers the best contrast.
How to Make the Purchase Decision
So which scope should you actually buy? That depends on your specific situation, but here’s our general advice:
If you’re hunting hogs or coyotes at typical ranges (100-200 yards) and want to keep costs reasonable, look for a 384×288 scope with 50Hz refresh rate in the $1,500-$2,000 range. You’ll find options from reputable manufacturers like ATN, AGM, and Pulsar that meet these specs.
If you hunt more open terrain or want room to grow, stretch for a 640×512 scope if your budget allows. The image clarity is noticeably better, especially when trying to identify targets at distance.
Don’t get hung up on every single spec and feature. A solid scope with good basics will serve you far better than a feature-packed scope with a poor sensor. Focus on resolution, refresh rate, and detection range first. Everything else is secondary.
And remember—your first thermal scope probably won’t be your last. Most hunters upgrade after a year or two once they figure out exactly what they need. That’s totally normal. Start with something that gets you in the game, learn what you like and don’t like, then make a more informed decision on your next purchase.
Getting Started with Pixfra
If you’re ready to explore thermal technology, we’ve got options that make sense for hunters just getting into night vision. Our Sirius HD thermal monocular is a great way to experience thermal imaging before committing to a rifle scope. You can use it for scouting, scanning fields before a hunt, or even finding downed animals—all without mounting anything to your rifle.
Want to learn more about how thermal works in real hunting scenarios? Check out our guide on professional hunting with thermal monoculars where we break down practical applications and techniques that’ll make you more effective in the field.
Conclusion
The best beginner thermal scope is the one that fits your budget, meets the minimum specs for your hunting style, and gets you out there using it. You don’t need top-tier resolution or every fancy feature to be successful. You need 384×288 resolution (minimum), 50Hz refresh rate, decent battery life, and a scope that’s built to handle recoil.
Start there. Learn the technology. Figure out what you love about thermal hunting and what limitations bug you. Then you’ll know exactly what to look for in your next upgrade.
The hardest part isn’t picking the perfect scope—it’s pulling the trigger on that first purchase. Once you see how much easier thermal makes night hunting, you’ll wonder why you waited so long to make the switch.
FAQs
What’s the minimum resolution I should buy for my first thermal scope?
We recommend starting with at least 384×288 resolution. While 256×192 scopes cost less, they’re really only suitable for very close range work under 100 yards. At 384×288, you’ll be able to detect and identify hog or coyote-sized animals out to 200-250 yards, which covers most hunting scenarios. If your budget allows, 640×512 offers better clarity, but 384×288 is a solid entry point that won’t leave you feeling limited.
Can I use a thermal scope during the day for zeroing?
Yes, most thermal scopes work during daylight hours, which actually makes zeroing much easier than trying to sight in at night. The scope detects heat differences, so your target will show up as long as there’s some temperature variation. Many hunters prefer to zero during the day using regular targets, then verify at night. This is one advantage thermal has over traditional night vision, which needs darkness to function.
How long do batteries last on entry-level thermal scopes?
Battery life varies widely, but most entry-level scopes run 4-8 hours on a single charge or set of batteries. Higher-end models with larger battery packs can go 10+ hours. The actual runtime depends on settings like brightness, recording use, and refresh rate. Always carry backup batteries or a USB power bank—there’s nothing worse than having your scope die mid-hunt. Some hunters keep the scope off until they’re ready to scan or shoot to conserve power.
Is thermal better than night vision for beginners?
For most beginners, yes. Thermal works in total darkness without needing any light source, sees through fog and light brush, and isn’t affected by muzzle flash between shots. Night vision requires ambient light or an IR illuminator and struggles in poor weather. Thermal also excels at detection—you’ll spot animals faster. The tradeoff is that night vision provides better detail for identification at close range. But for versatility and ease of use, thermal is usually the better choice for someone just getting started with night hunting.
What’s a realistic budget for a good beginner thermal scope?
Plan to spend $1,500-$2,500 for a quality entry-level thermal scope that won’t disappoint. You can find cheaper options under $1,000, but they often have 256×192 resolution which limits your effective range significantly. The $1,500-$2,500 range gets you 384×288 or even 640×512 resolution, 50-60Hz refresh rates, recording capabilities, and sufficient detection range for most hunting. It’s enough to be effective without overspending on features you might not need yet.