Thermal for cold-storage & refrigerated logistics helps you find the warm air paths and insulation defects that make refrigeration systems work harder: torn gaskets, warped doors, wet panels, cracked foam, failed trailer seals, and dock gaps. Use it as a fast building-envelope check, then confirm food temperatures with probes, data loggers, and your normal HACCP or FSMA records.
Thermal for cold-storage & refrigerated logistics is a surface-temperature inspection method for cold rooms, freezers, reefers, and loading docks. It doesn’t prove product safety by itself. It shows where heat is entering, where cold is escaping, and where insulation may be wet, crushed, detached, or bridged by metal.
A good scan starts with a temperature difference. If your cooler is at 38°F and the dock is at 72°F, leaks draw themselves on the screen. If the dock and room are both cold after a long winter night, thermal contrast drops and small defects disappear. Wait for a real load condition: doors cycling, evaporators running, forklifts moving, people rushing because the 6 a.m. route is already late.
Use thermal imaging for the shell. Use calibrated contact tools for the food. The FDA Food Code 2022 sets 41°F or less as the cold-holding benchmark for many time/temperature control for safety foods at retail and foodservice, but a thermal camera sees apparent surface temperature. A box of chicken under film wrap, a stainless table, and a shiny trailer liner can all mislead the image.
| Area | Thermal clue | Likely cause | Best follow-up |
|---|---|---|---|
| Door gasket | Thin warm line around edge | Torn vinyl, weak latch, ice buildup | Close on paper strip, adjust latch, replace gasket |
| Panel seam | Warm vertical or ceiling stripe | Failed sealant, foam gap, thermal bridge | Inspect joint, check fasteners, reseal |
| Floor-wall joint | Warm band near cove | Damaged curb, forklift impact, moisture | Probe for water, inspect kick plates |
| Trailer rear doors | Bright edge at hinge side | Worn compression seal, bent door | Check cam locks, hinge pins, gasket crush |
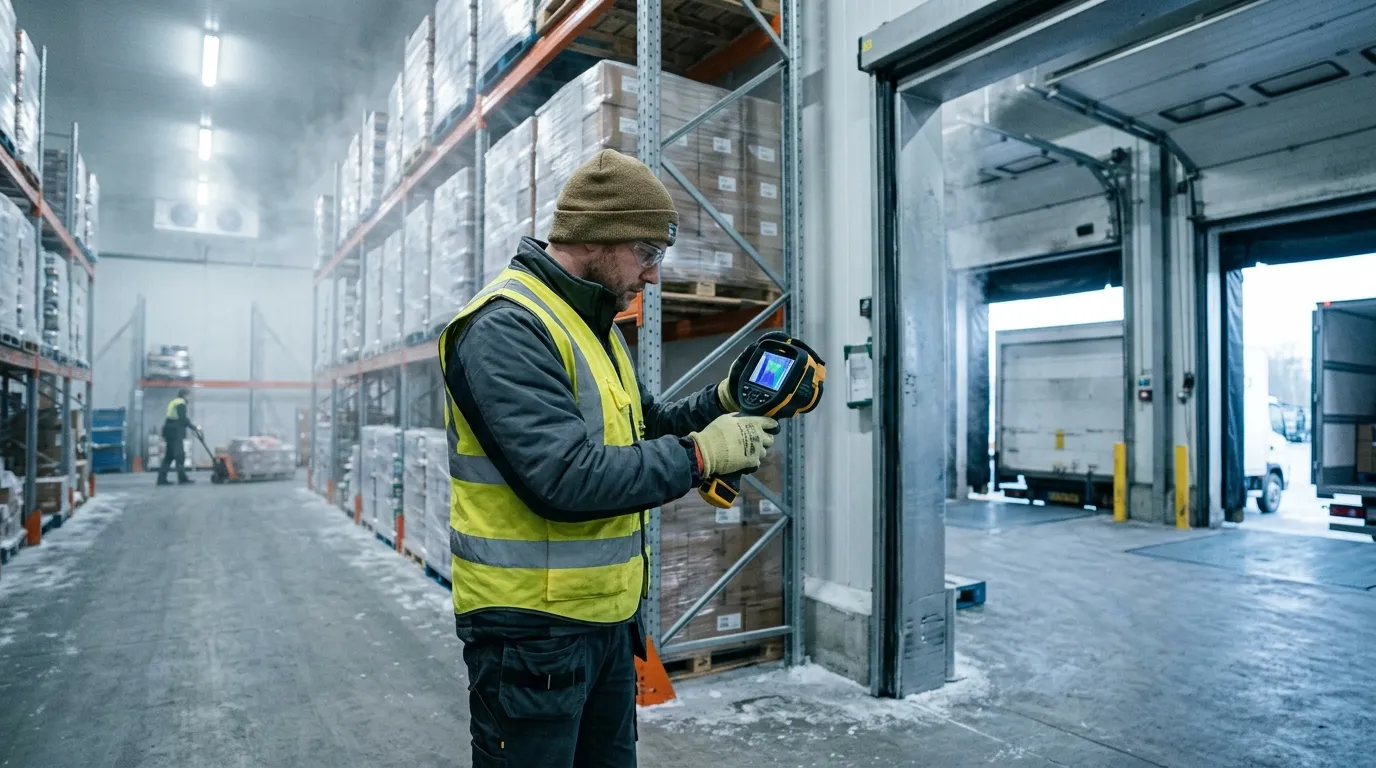
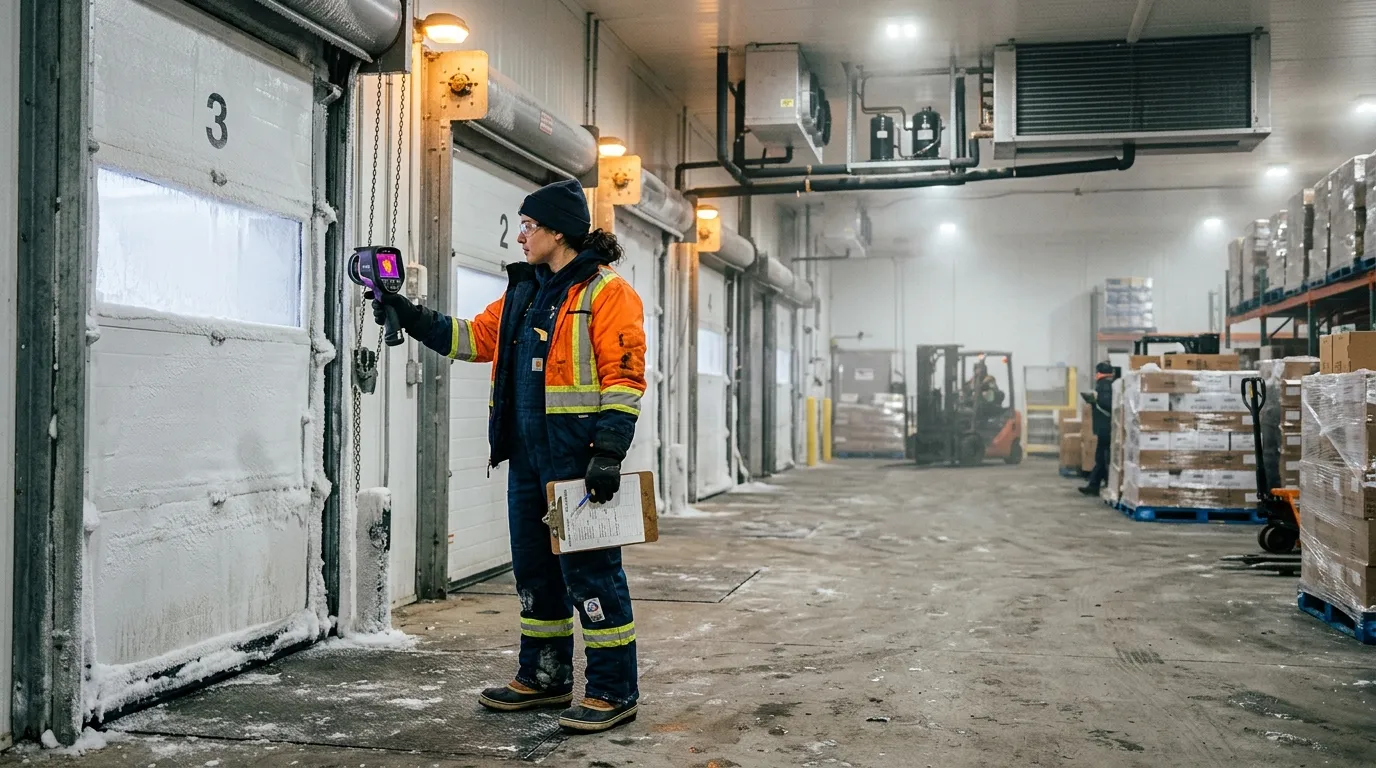
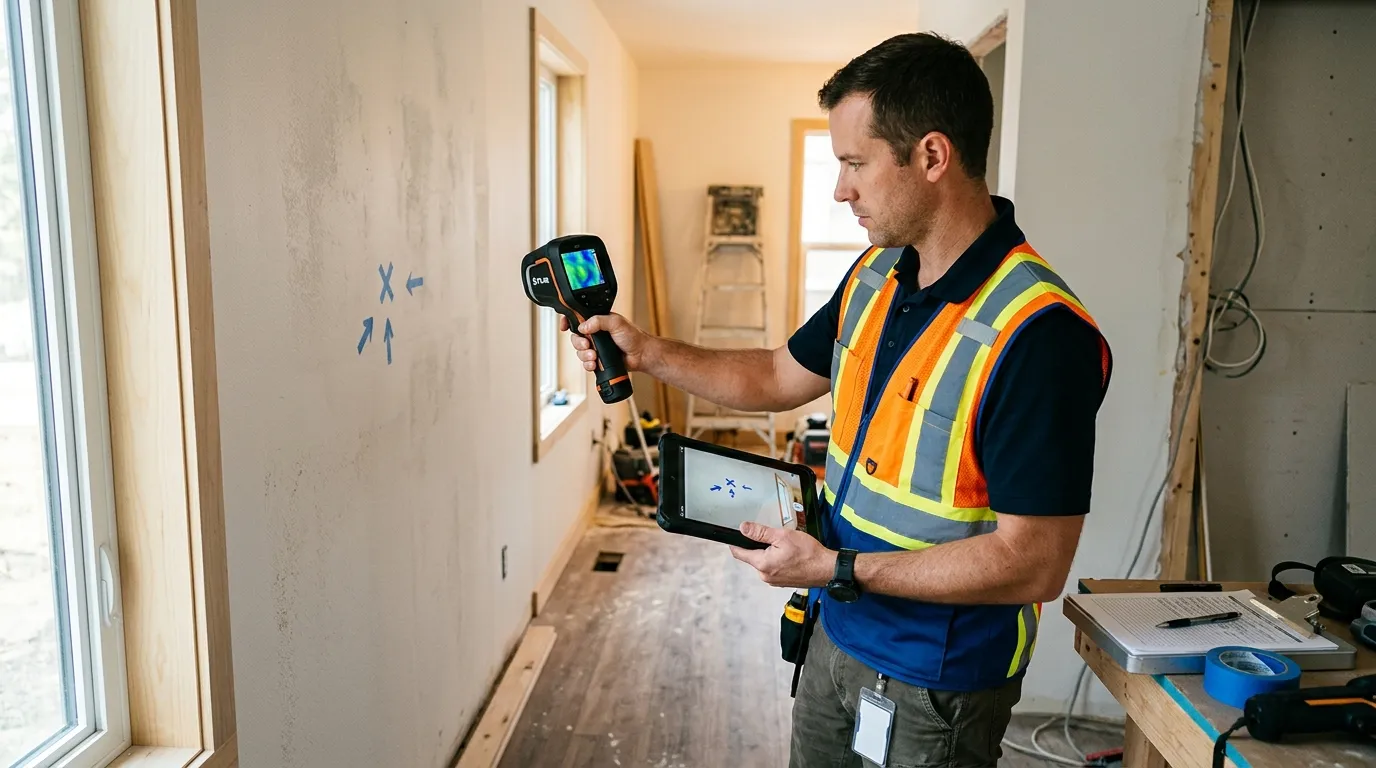
The best time to scan a walk-in freezer is after it has been under load for at least 20 to 30 minutes. You want the system working. A perfectly empty box that has sat closed all night can look clean even when the door sweep leaks during shift change. Scan from inside and outside when you can, because a warm streak visible from the inside may show as a cold plume outside the door.
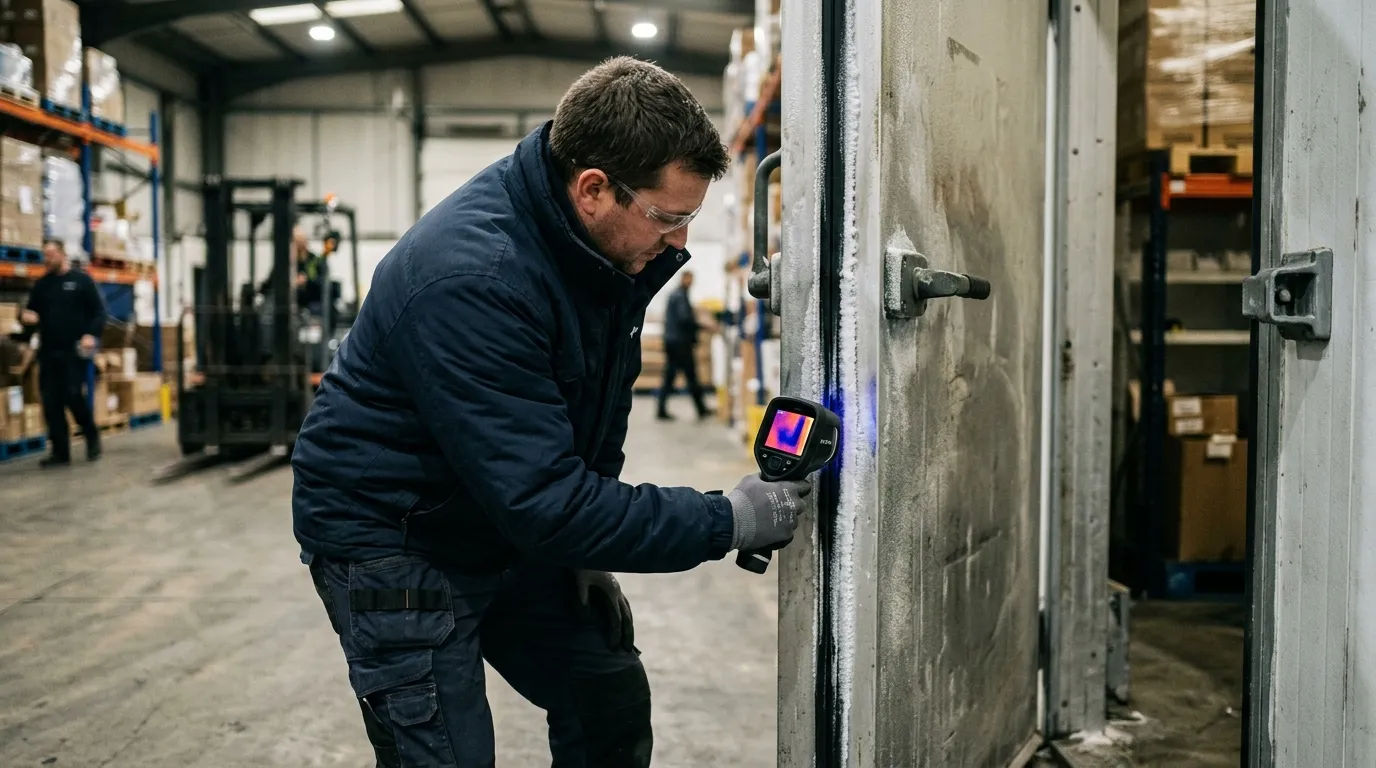
One small trick helps in cold storage: carry matte tape. Stainless steel, aluminum tread plate, and glossy FRP panels reflect the worker holding the camera. A square of black electrical tape or painter’s tape gives the thermal device a more reliable reference spot. It feels low-tech. It works.
Door problems are the first place to look because they happen every hour. A cold room door may cycle hundreds of times per day, and the gasket takes abuse from pallet jacks, washdown, ice, pressure changes, and impatient shoulders. On a thermal image, a healthy gasket usually shows a clean temperature boundary. A bad gasket shows a bright thread, a feathered plume, or a hot patch near the latch.
Don’t treat every warm edge the same. A straight warm line around the entire door often points to latch pressure or door alignment. A hot corner near the threshold often points to a torn sweep, floor heave, or ice that stops the gasket from seating. A warm oval at handle height can be nothing more than a handprint from ten seconds ago (annoying, but real).
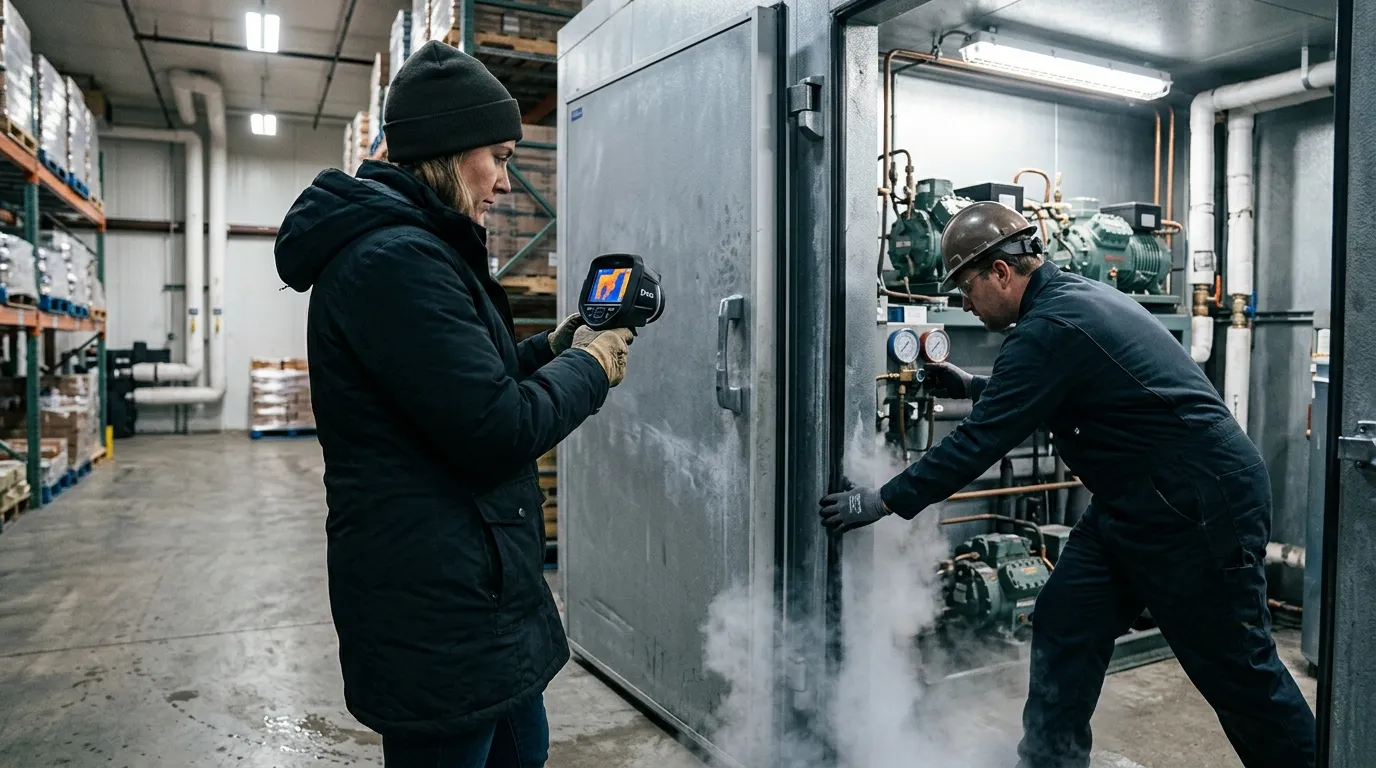
For refrigerated logistics, rear trailer doors deserve their own scan. A Thermo King Precedent S-750 or Carrier Transicold Vector 8500 can hold setpoint only if the box stops exchanging air with the yard. Scan Utility 3000R, Great Dane Everest, and Wabash refrigerated trailers at the rear frame, hinge side, lower sill, and vent door. The refrigeration unit may be fine; the leak may be a $90 gasket.
Run this quick door test before you blame the refrigeration unit:
A thermal image also helps stop guesswork between operations and maintenance. The operator says, “Freezer 2 won’t recover after lunch.” The technician sees a warm tongue under the roll-up door and a frost ridge on the threshold. Now the repair is specific: replace the bottom seal, inspect the heater wire, and retrain the team to clear ice before the dock rush.
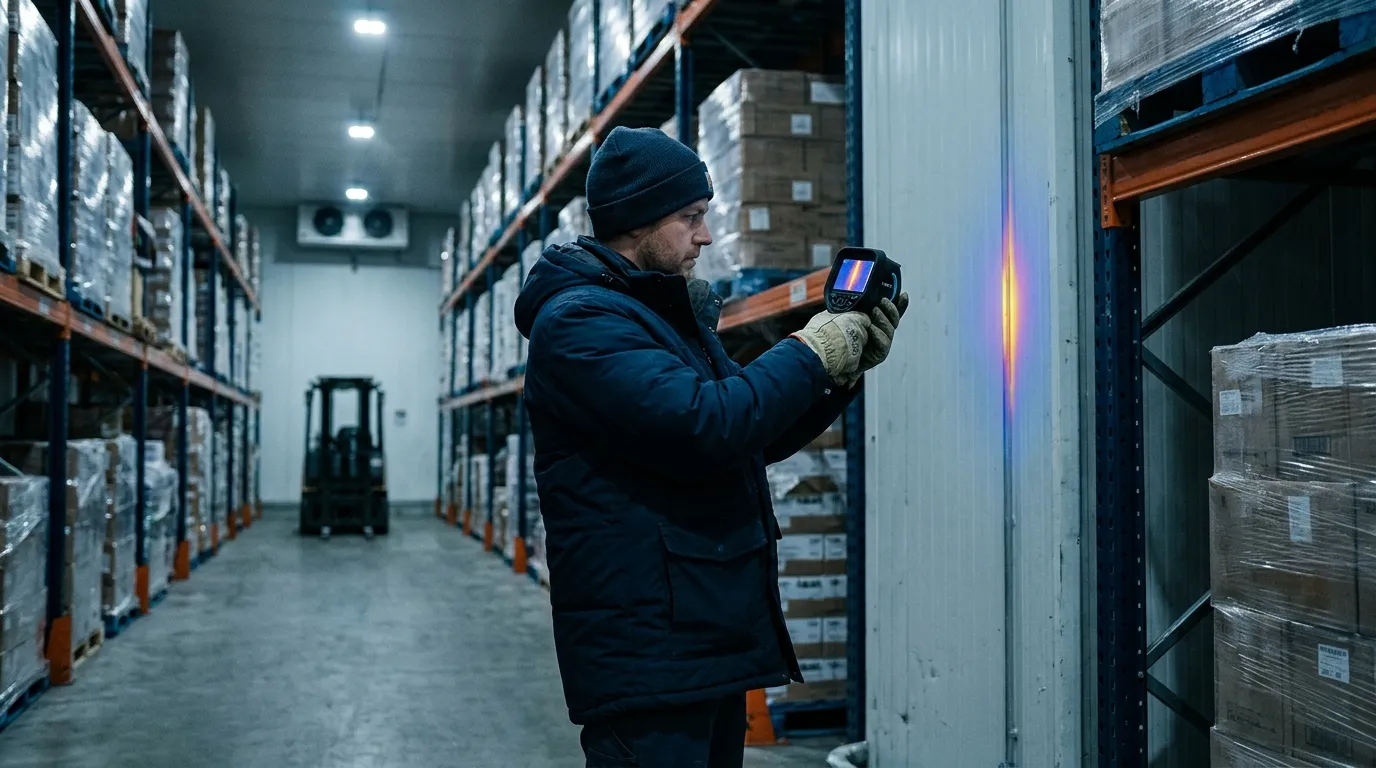
Panel failures are quieter than door leaks. They don’t whistle. They don’t slam. They sit behind product racks and slowly turn electricity into waste. A failed insulated metal panel can show as a warm rectangle, a vertical stripe, or a blotchy area that doesn’t match the panel pattern beside it.
Wet insulation is the ugly version. Once moisture enters foam or mineral wool, the panel loses thermal resistance and can stay wet for months. A thermal scan won’t tell you the moisture percentage, but it can flag the suspect bay. After that, use a pinless moisture meter where the surface allows, inspect penetrations, and check roof drainage. If this is a freezer, look for frost on the warm side too. Frost outside a freezer wall is a bill with a delay.
The same discipline used when plumbers locate slab leaks & radiant heating pipes with thermal applies inside a cold room: you aren’t hunting for the pipe or leak directly every time; you’re reading the pattern left by heat moving through material. Straight lines often mean structure. Soft patches often mean moisture. Repeating marks often mean fasteners or panel geometry.
Panel seams need special attention near evaporators, door frames, pipe penetrations, and electrical conduit. A half-inch unsealed conduit gap can matter more than a scuffed wall panel because moving air carries heat and moisture. Warm air enters, moisture condenses, ice forms, the gap grows, and then the evaporator spends more time removing a problem the wall created.
| Thermal pattern | Common location | Maintenance read | Repair priority |
|---|---|---|---|
| Sharp vertical stripe | Panel joint | Sealant failure or metal bridge | High if near product zone |
| Blotchy warm patch | Wall or ceiling panel | Wet or damaged insulation | High if spreading |
| Warm halo | Pipe or conduit penetration | Air leak around sleeve | Medium to high |
| Repeating dots | Fasteners or clips | Thermal bridging | Low unless condensation appears |
Scan panel seams at a slight angle, then straight on. Move slowly. If the pattern follows your viewing angle, reflection may be fooling you. If the pattern stays fixed on the wall, you probably have a real thermal anomaly. This is where patience beats a dramatic color palette.
Trailers add motion, sunlight, and schedule pressure. A reefer trailer can look fine at the yard and fail on a route after four door openings, one long dwell at a grocery dock, and a driver who parks the rear doors facing afternoon sun. Thermal scanning gives you a pre-trip and post-trip way to catch weak points before they become rejected loads.

Scan before loading, not after product blocks the walls. A clean trailer inspection takes five to seven minutes: rear doors, sidewalls, ceiling, floor channels, bulkhead, drain openings, chute, and unit frame. For multi-temp trailers, scan the bulkhead and movable divider after it is locked. A divider that leaks between frozen and chilled zones can make one zone overwork while the other one drifts.
A practical trailer scan has four data points attached to every image:
| Field | Example entry | Why it matters | Mistake to avoid |
|---|---|---|---|
| Setpoint | 34°F fresh, -10°F frozen | Gives context for thermal contrast | Recording only air temp |
| Ambient | 88°F sunny yard | Explains solar load | Comparing to night scans |
| Trailer ID | Wabash RF-2048 | Ties defect to asset | Using route name only |
| Door state | Closed 10 minutes | Confirms stable condition | Scanning during open-door chaos |
Sidewalls need extra caution in direct sun. Solar gain can paint a warm rectangle that looks like insulation failure. If the sun is hitting the curb side, scan the road side too. Better yet, repeat the scan in shade or indoors. This works better than arguing over one image in a maintenance meeting.
For distribution centers with cold rooms next to offices or dry storage, moisture risk can move beyond the cold envelope. After a gasket leak or wet panel is repaired, the adjacent wall cavity may still need attention; the inspection logic behind detecting hidden moisture & mold risk behind drywall with thermal fits those mixed-use areas well. Cold-chain damage often shows up first as condensation where no one expected condensation.
Thermal imaging also helps during claims. If a receiver rejects a load, your records should include reefer download data, product probe checks, trailer pre-trip notes, and any thermal images from before dispatch. Thermal evidence won’t overrule a failed pulp temperature. It can show whether the box had visible envelope defects before the load left.
Energy waste in cold storage is brutally direct. Heat leaks in. Compressors remove it. You pay twice when moisture rides with the heat, because latent load adds defrost cycles, ice, fan penalties, and labor. ENERGY STAR says certified commercial refrigerators and freezers are on average 20 percent more energy efficient than standard models, but even efficient equipment loses ground when the envelope leaks.
Compliance has a different language. The FDA FSMA Sanitary Transportation final rule, issued in 2016, requires covered shippers, loaders, carriers, and receivers to use practices that keep food safe during transport, including temperature controls when needed. A thermal image isn’t a regulatory temperature record. It is maintenance evidence that supports the control program.
Think of the record package as two folders. Folder one proves product control: calibrated probes, data logger files, reefer downloads, corrective actions, and receiving checks. Folder two proves asset condition: thermal images, gasket work orders, panel repairs, PM logs, and retest photos. Auditors and customers care about folder one first. Folder two explains why folder one stayed clean.
Use this naming format for thermal files:
2026-06-13_Freezer2_DoorA_Inside_0Fset_76Fambient_before.jpg2026-06-13_Freezer2_DoorA_Inside_0Fset_76Fambient_after.jpg2026-06-13_TrailerRF2048_RearDoor_34Fset_88Fambient_pretrip.jpg2026-06-13_Cooler5_CeilingSeam_38Fset_70Fambient_workorder8127.jpgThat level of detail feels fussy until six months later, when a customer asks why their berries warmed during a holiday weekend route. A dated image with setpoint, ambient temperature, trailer ID, and repair note is much easier to defend than “maintenance checked it.”
Don’t use thermal imaging where it doesn’t fit. If the room has no meaningful temperature difference, wait. If the target surface is mirror-like metal, add a matte reference or change your angle. If the question is “Is this pallet safe?”, use product temperature methods. If the question is “Where is heat entering this box?”, thermal earns its place.
Start with the asset list. Pick the rooms and trailers that hurt you most: high door counts, slow pull-down, repeated frost, unusual compressor runtime, rejected loads, or employee complaints about sweating walls. One freezer with a chronic ice ridge deserves attention before ten perfect coolers.
For each asset, scan the same path every time. Consistency beats drama. In a walk-in cooler, start at the main door, move clockwise around wall seams, check penetrations, scan ceiling joints, scan evaporator surrounds, then finish at the floor-wall joint. In a reefer trailer, start at rear doors, move forward along sidewalls, scan the ceiling, check the bulkhead, scan the floor channels, then finish at the unit end.
A good thermal route takes less than 15 minutes per room once the team knows it. The first pass takes longer because you are building the map and naming the assets. After that, the value comes from comparison: before repair, after repair, summer peak, winter baseline, pre-trip, post-trip.
Use a simple scoring method:
| Score | Condition | Action | Retest timing |
|---|---|---|---|
| 1 | Minor bridge, no condensation | Watch list | Next monthly scan |
| 2 | Small air leak or gasket wear | Schedule repair | Within 30 days |
| 3 | Warm seam near product or frost | Repair soon | Within 7 days |
| 4 | Major door leak, wet panel, load risk | Remove from service or restrict use | Same day |
Train two people per shift if possible. Cold-chain inspections fail when only one technician knows the camera and that person is off on inventory day. The scan path should be boring enough that a night-shift lead can repeat it without guessing.
Set the palette to something your team can read quickly. Iron and rainbow palettes make defects pop, but they can exaggerate small differences. Grayscale can be calmer for documentation. Temperature span matters more than palette choice: lock or narrow the span when comparing before-and-after images, or the camera may auto-adjust and make a repaired gasket look unchanged.
No. Thermal imaging shows surface-temperature patterns on doors, panels, floors, and trailer walls. Use calibrated probes, data loggers, and reefer downloads to document product temperature and food safety control.
A 15°F to 25°F difference between the cold space and surrounding area usually gives useful contrast. Bigger differences help, especially around gaskets, panel seams, and trailer rear doors.
Scan parked trailers with doors closed and the reefer running at setpoint. Moving scans are poor for records because airflow, sunlight, vibration, and changing backgrounds can distort the image.
Yes. Stainless steel and glossy liners reflect heat from people, forklifts, lights, and open dock doors. Change the angle or add a small matte tape reference spot before trusting the reading.
Scan high-use doors weekly, refrigerated trailers before peak routes, and full cold rooms monthly. Also scan after gasket replacement, panel repair, forklift impact, water intrusion, or any unexplained pull-down problem.
Before the next dock rush, pick one cooler and run a 12-minute Pixfra scan: door gasket, lower sill, latch side, ceiling seams, pipe penetrations, and floor-wall joint. Save one before image, fix one visible defect, then rescan the same spot under the same setpoint. That single before-and-after pair is the fastest way to turn thermal inspection from a neat picture into a maintenance habit.
Every year, American homeowners waste hundreds of dollars on energy they never actually use — all because of hidden air leaks, insulation gaps, and drafts they can’t see with the naked eye. At Pixfra, we build thermal imaging technology that makes these invisible problems visible. In this case study, we’ll walk you through exactly how thermal devices are used in home energy audits and why this simple step can save you real money.
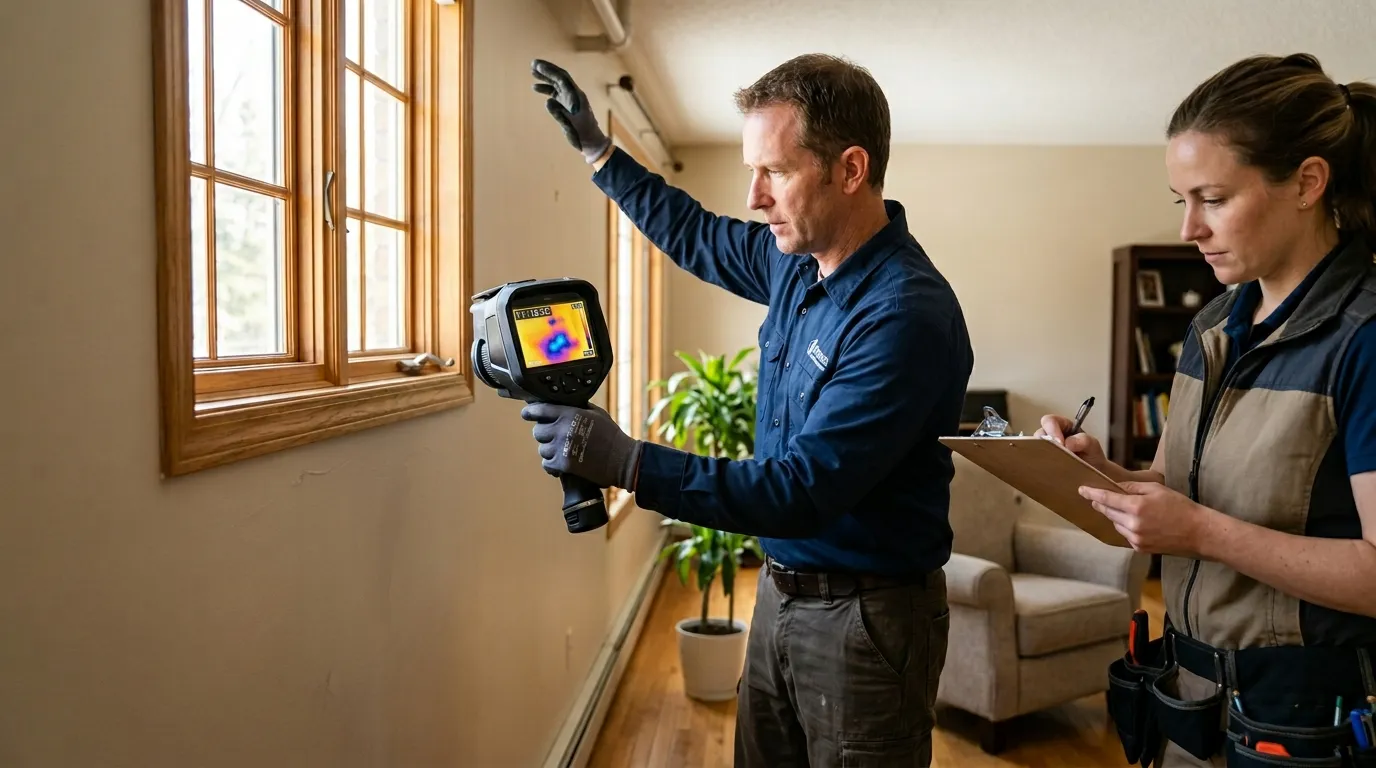
A home energy audit is a full checkup of how your house uses energy and where it wastes it. Think of it like a doctor’s visit — but for your home. A certified auditor comes in with specialized tools and examines everything from your walls and windows to your HVAC system and attic insulation. A certified pro inspects insulation, doors and windows, ductwork, and major systems — often using tools like blower doors and infrared cameras — to find where you’re wasting energy. The result is a prioritized roadmap that can lower utility bills, improve comfort, and boost indoor air quality.

The goal is simple: find out where your home is leaking energy and fix it. Making energy efficiency upgrades identified in a home energy assessment can save 5–30 percent on your monthly energy bill while also ensuring the health and safety of your house. That’s a big deal when you add it up over the course of a year or a decade. And the main tool that makes all of this possible? A thermal imaging camera.
Before we get into the details of the case study, let’s quickly talk about what makes a thermal device worth your time. If you want a deeper breakdown of the specs that actually matter, we’ve put together a full guide on the top 6 features needed in the best thermal device in 2026. It covers everything from NETD sensitivity to refresh rate — all the things that separate a good camera from one that gives you blurry, useless images.
Thermal imaging, also called infrared thermography, uses a special camera that picks up heat energy your eyes can’t see. Thermal imaging involves the use of infrared cameras to capture temperature variations in a home. These cameras detect heat emissions and create visual representations that highlight areas of energy inefficiency. Different temperatures show up as different colors on the screen — warm spots appear red, orange, or yellow, while cold areas look blue or purple. This color map lets you instantly spot where heat is escaping or cold air is sneaking in.

The process is non-invasive, which means nobody has to rip open your walls or tear up your floors. Thermal imaging is a non-invasive method for identifying energy inefficiencies. It’s a fast and efficient process that doesn’t require the removal of materials or causing any damage to your home. An auditor can scan an entire room in minutes and get a clear picture of what’s happening behind the drywall. You get results fast, and the process doesn’t disrupt your daily life at all.
For the best results, auditors typically look for a significant temperature gap between the inside and outside of your home. For reliable results, audits are usually conducted when there is a significant temperature differential (ΔT) — at least 18°F (10°C) between indoor and outdoor environments. This contrast helps reveal areas where heat is escaping or entering the building. That’s why winter and early morning are popular times for these inspections. But with the right equipment, you can run a scan at almost any time of year — especially if you pair it with a blower door test to push air through cracks and gaps artificially.
Here’s a real-world example that shows exactly why thermal devices matter for energy audits. A homeowner faced high heating bills despite installing a new furnace. A thermal imaging assessment revealed unsealed attic vents and insufficient wall insulation. After addressing these issues, the homeowner saw a 20% reduction in energy costs and significantly improved comfort during winter.
That’s the power of thermal imaging. The homeowner had already spent money on a new furnace, thinking that was the problem. But the real culprits — unsealed vents and thin insulation — were hiding behind the walls where no one could see them. A standard visual inspection would’ve missed these problems entirely. Only a thermal scan could pick up the subtle temperature differences that told the whole story.
This experience lines up with what we see across the industry. Numerous homeowners have witnessed significant improvements after inspections with infrared cameras. For instance, a case study in a suburban neighborhood revealed that homes undergoing infrared inspections identified hidden air leaks and insulation gaps. Time after time, thermal imaging catches things that other methods miss — and the fixes are often cheap and simple. Sealing a gap around a vent or adding insulation to a wall cavity doesn’t cost much, but the payoff on your energy bill is real and lasting.
Research backs this up too. In one study, householders who received a thermal image reduced their energy use at a 1-year follow-up, whereas householders who received a carbon footprint audit and a non-intervention control demonstrated no change. In a second study, householders were nearly 5 times more likely to install draught-proofing measures after seeing a thermal image.There’s something about actually seeing the heat leaking from your home that motivates you to act on it. Numbers on a report are easy to ignore. A glowing red streak showing warm air pouring out of your roof? That gets your attention.
So what exactly can a thermal camera find during a home energy audit? The list is longer than you might think.
The biggest one is poor insulation. Whether it’s missing, damaged, or just settled over time, bad insulation is a top cause of high energy bills. Poor insulation is a leading cause of high energy bills. Thermal imaging allows auditors to quickly spot inconsistencies in the thermal envelope — especially in attics, crawl spaces, and exterior walls — without disturbing the building materials.Blown-in insulation is especially prone to settling over the years, leaving cold spots that slowly drain your heating budget every winter.

Air leaks are another big one. Air leaks are one of the most common causes of energy loss in a home. Small gaps around windows, doors, vents, and ducts can allow warm or cool air to escape, forcing your HVAC system to work harder. These tiny gaps might seem harmless on their own, but add them all up and it’s like leaving a window open year-round. Addressing air leakage, which accounts for 25–40% of energy loss in typical homes, often delivers 10–20% savings in heating and cooling costs for a relatively modest investment of $300–$1,500.
Moisture problems are another thing thermal cameras catch. Thermal imagers are very effective tools for identifying moisture. Water has a high thermal capacitance, meaning that it efficiently absorbs and stores energy. The thermal capacitance of water or the effects of evaporative cooling (usually a 2°F to 5°F surface temperature difference) help reveal the extent of moisture damage, even when the surface feels dry to the touch. Left alone, moisture behind walls can lead to mold, rot, and even bigger repair bills down the road.
And then there’s your HVAC ductwork. Leaky ductwork causes the average home to lose 20–30% of its heating and cooling capacity. That’s a huge amount of energy you’re paying for but never getting. A thermal scan of your ducts can show exactly where the leaks are so you can seal them up.
Key findings thermal devices typically reveal during a home energy audit:
| Problem Detected | Common Locations | Typical Energy Loss | Average Fix Cost |
|---|---|---|---|
| Missing/settled insulation | Attics, walls, crawl spaces | 15–25% of heating/cooling | $500–$2,500 |
| Air leaks & drafts | Windows, doors, vents, outlets | 25–40% of total energy | $300–$1,500 |
| Ductwork leaks | Basement, attic, between floors | 20–30% of HVAC output | $300–$1,000 |
| Moisture intrusion | Behind walls, ceilings, basements | Reduces insulation R-value | $500–$3,000+ |
| Thermal bridging | Studs, lintels, slab edges | 5–15% of envelope loss | Varies |
Let’s talk dollars and cents — because at the end of the day, that’s what matters most.
The average homeowner saves $685 annually by implementing audit recommendations. It’s about having a clear roadmap for making your home better. At an average cost of $437 with payback in under 8 months, an audit is one of the smartest investments you can make in your home. That means you spend a few hundred dollars once, and you start saving every single month from that point forward.

The cost for home energy audits typically ranges from $300 to $600, with some advanced audits exceeding this range due to specialized tools and testing. The more detailed the audit — with blower door tests, infrared scanning, and full reporting — the higher the cost, but also the higher the payoff. And many utility companies and state programs offer discounts, rebates, or even free assessments to their customers, so your out-of-pocket cost could be a lot lower than you’d expect.
The return on investment here is hard to ignore. Acting on an audit typically cuts energy use 5–30%. On a $200/month bill, that’s about $120–$720 per year saved. With a $200–$700 audit, the fee often pays back within 1–3 years. And the savings keep coming year after year for as long as you live in the home. Unlike a lot of home improvement projects that are mostly about looks, an energy audit generates actual, measurable financial returns.
Not all thermal cameras are built the same, and when it comes to energy audits, the details in the device specs make a big difference. The most telling spec is NETD, which stands for Noise Equivalent Temperature Difference. It measures how sensitive the camera is to small changes in temperature. The lower the NETD value, the better the camera is at picking up subtle heat patterns — and subtle is exactly what you’re dealing with in a home energy audit, where a drafty window might only show a temperature shift of a few degrees.
At Pixfra, we build our thermal cameras with proprietary heat-detection technology. Our devices achieve NETD values of ≤18mK, which means they can pick up extremely small temperature differences with sharp clarity. That level of sensitivity is what separates a camera that gives you a blurry heat blob from one that shows you exactly where the problem is — down to the nail heads in your wall studs. As one home inspector put it: “the temperature differential does reveal what’s going on behind the wall” — and with the right device, those differentials are crystal clear.
Thermal sensitivity also plays a big role in detecting moisture, which is one of the sneakier issues thermal cameras can catch. Since wet materials cool down through evaporative cooling, the temperature difference is often just 2°F to 5°F compared to dry surfaces. A camera with poor NETD will miss that entirely. A camera with ≤18mK sensitivity will catch it every time. If you’re using a thermal device for any kind of home inspection or energy audit work, sensitivity should be at the top of your priority list — it’s the single spec that determines whether you find the real problems or just the obvious ones.
You’ve got two main options when it comes to thermal imaging for home energy audits: do it yourself or hire a pro.
Thermal imaging is available through professional services or DIY tools. Professional services use certified technicians with advanced equipment to conduct thorough energy audits and provide actionable insights. Affordable infrared cameras and smartphone attachments allow homeowners to conduct their own assessments. However, professional expertise is often necessary for accurate interpretation of results.

DIY thermal scans have gotten a lot more affordable in recent years. You can grab a smartphone-attached thermal camera for as little as $200, and it’ll give you a basic picture of where heat is escaping. It’s a great first step if you want to find obvious issues like major drafts around windows or completely missing insulation in your attic. But DIY has its limits. A DIY audit can show you that a window is drafty, but it can’t tell you the home’s total leakage rate or how it compares to building standards.
Professional audits, on the other hand, deliver the full picture. A certified energy auditor brings high-sensitivity thermal cameras, blower door equipment, and the know-how to read the results correctly. Energy auditors and weatherization professionals use thermal imaging because it provides a fast and easy way to pinpoint and document exact locations of problems. In an industry where speed and accuracy are vital, infrared allows for faster inspections and more detailed documentation. They’ll compile everything into a report with prioritized recommendations, so you know exactly what to fix first for the biggest savings. If you’re serious about cutting your energy bills, the professional route is worth every dollar.
Can thermal imaging really save money on energy bills?
Yes. Thermal imaging helps you find and fix hidden energy leaks that you’d never spot with your eyes alone. Once you seal air leaks, improve insulation, and fix ductwork issues, the savings show up on your energy bills right away. Homeowners who act on audit recommendations typically save 5–30% on their monthly energy costs, which adds up to hundreds of dollars every year.
What is the best time of year for a thermal energy audit?
Winter is usually the best time in most parts of the U.S. because the bigger the temperature gap between inside and outside, the easier it is for the thermal camera to pick up problems. However, you can get useful results in summer too — especially if you’re running the air conditioner. The key is having at least an 18°F difference between indoor and outdoor temperatures.
How much does a thermal imaging energy audit cost?
Most professional thermal energy audits cost between $300 and $700, depending on your home’s size and the level of detail involved. Many utility companies and state programs offer rebates or even free assessments. The average payback period is under 8 months, making it one of the best home investments you can make.
Can I do a thermal energy audit myself?
You can do a basic one with an affordable infrared camera or smartphone attachment. It’s good for spotting obvious drafts and insulation gaps. But for a full assessment with blower door testing, detailed thermographic analysis, and a written report with prioritized recommendations, hiring a certified professional is the way to go. Their equipment and training let them catch problems that DIY tools simply can’t.
What does a thermal camera actually show during a home energy audit?
A thermal camera picks up infrared radiation — heat energy — and displays it as a color-coded image on the screen. Warm areas show up as red, orange, or yellow, and cold areas appear as blue or purple. During an energy audit, this makes it easy to see where heat is leaking out of your home, where insulation is missing, and where cold air is getting in. It also picks up moisture intrusion and overheating electrical components.
Thermal imaging can help detect hidden moisture behind drywall because wet materials often appear cooler during evaporation or warmer when fed by an active hot-water leak. For detecting hidden moisture & mold risk behind drywall with thermal, treat the camera as a fast screening tool: it finds suspect areas, then a moisture meter confirms whether the wall is actually wet.
A thermal camera doesn’t see mold spores. It reads surface temperature. That distinction matters because a wet cavity can produce a clean thermal clue hours or days before staining, bubbling paint, or a musty odor becomes obvious. The camera gives you a map of where to test, not a lab result.
The mold part comes from moisture, time, and a food source. Drywall paper is food. A slow supply-line drip, roof leak, window flashing failure, AC condensate problem, or shower valve leak provides the water. The U.S. Environmental Protection Agency’s mold guide says moisture control is the core of mold control and recommends drying water-damaged areas within 24-48 hours to help prevent growth. That time window is why thermal scanning is useful: it can speed up the decision to open, meter, dry, or call a remediation pro.
No. Thermal cameras can’t identify mold species or confirm mold growth behind drywall. They can reveal temperature patterns that often come from wet gypsum, damp insulation, leaking pipes, or evaporation. If the pattern lines up with a water source, confirm it with a moisture meter before calling it mold risk.
The blunt answer to the Reddit version of this question is simple: thermal imaging sees the wet conditions that let mold grow. If someone points a camera at a wall and says, “that’s mold,” they’re skipping the proof step.
Wet drywall often looks cooler than surrounding drywall because evaporation pulls heat from the surface. Picture a bathroom wall behind a shower valve. The tile side looks fine. The hallway side has one soft blue-gray patch on the thermal display, starting at the valve height and feathering downward between studs. You touch it. It feels normal. The pinless meter says 28 percent wood moisture equivalent at the center and 10 percent two feet away. Now you have a target.
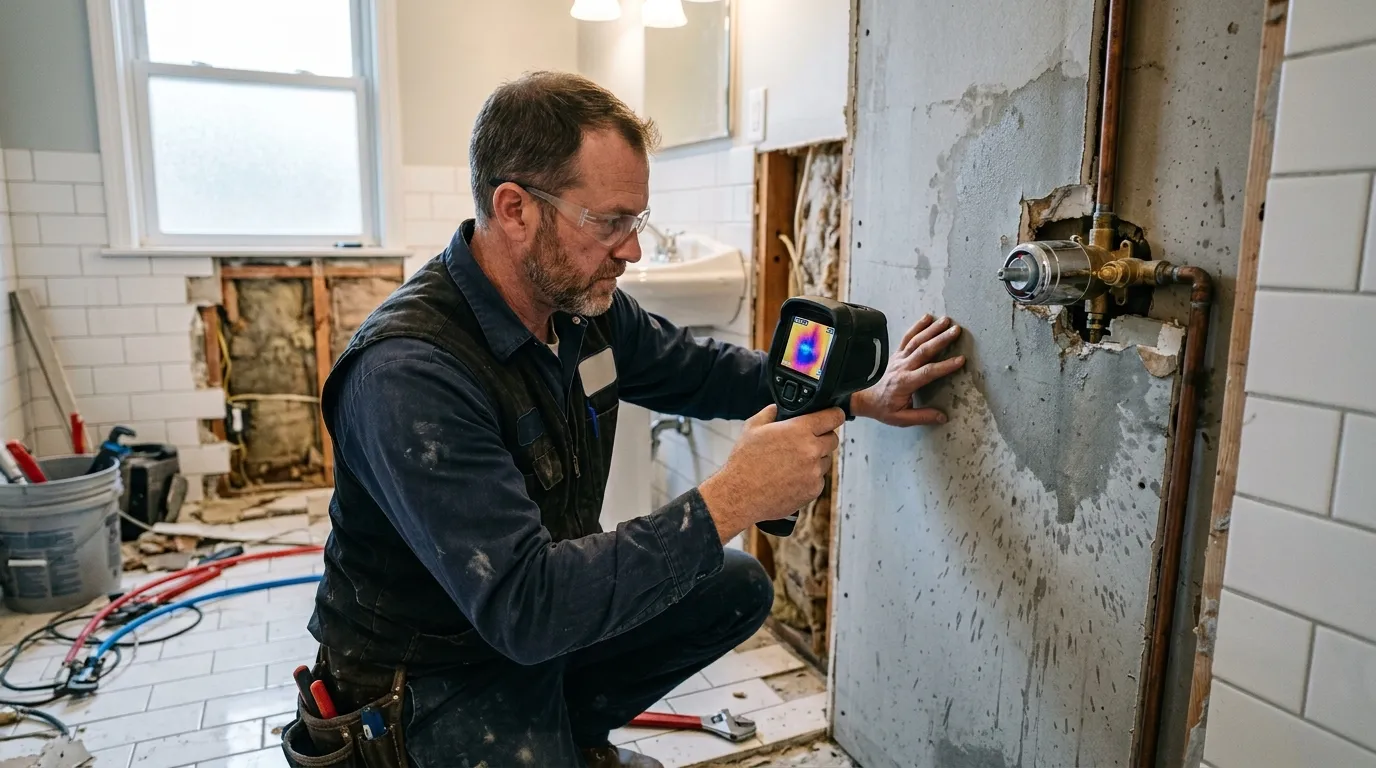
Hot-water leaks can flip the pattern. A leaking copper line behind 1/2-inch gypsum may show as a warm vertical stripe for 10 minutes after someone runs the shower. Once the flow stops, the same area can cool as damp materials evaporate. This is why one scan at 2 p.m. rarely tells the whole story. Run the suspected fixture, wait, scan, meter, then scan again.
| Thermal pattern | Common cause | Better next check |
|---|---|---|
| Cool blotch with soft edges | Evaporating wet drywall | Pinless meter grid |
| Warm line near floor | Hot-water pipe or radiant heat | Re-scan after fixture use |
| Cool vertical bay between studs | Wet insulation touching drywall | Pin probe or small inspection opening |
| Sharp straight stripe | Stud, corner bead, duct, or pipe | Compare with framing layout |
| Cool area at exterior corner | Air leak or missing insulation | Smoke pencil and humidity reading |
Wet drywall often looks cold because evaporation absorbs heat from the wall surface. The stronger the evaporation, the stronger the cooling pattern. High indoor humidity, vinyl wallpaper, low airflow, or a wall cavity packed with insulation can weaken that pattern, so thermal scans work best with meter confirmation.
The best readings usually happen when the room is stable and the wall has a temperature difference from its surroundings. In a U.S. home with air conditioning running, damp drywall near a plumbing leak may stand out by 2°F to 5°F. That isn’t a universal pass-fail number. A 2°F patch that repeats from three angles and matches a meter reading matters more than a 10°F reflection from a shiny picture frame.
Start with the story of the building. A one-story ranch in Phoenix with a flat roof fails differently from a 1998 Colonial in Ohio with upstairs bathrooms over a finished basement. Ask what changed: a new roof penetration, a frozen pipe last winter, a shower remodel, a dishwasher overflow, a musty closet after a humid week. Thermal imaging gets sharper when you already have a short suspect list.
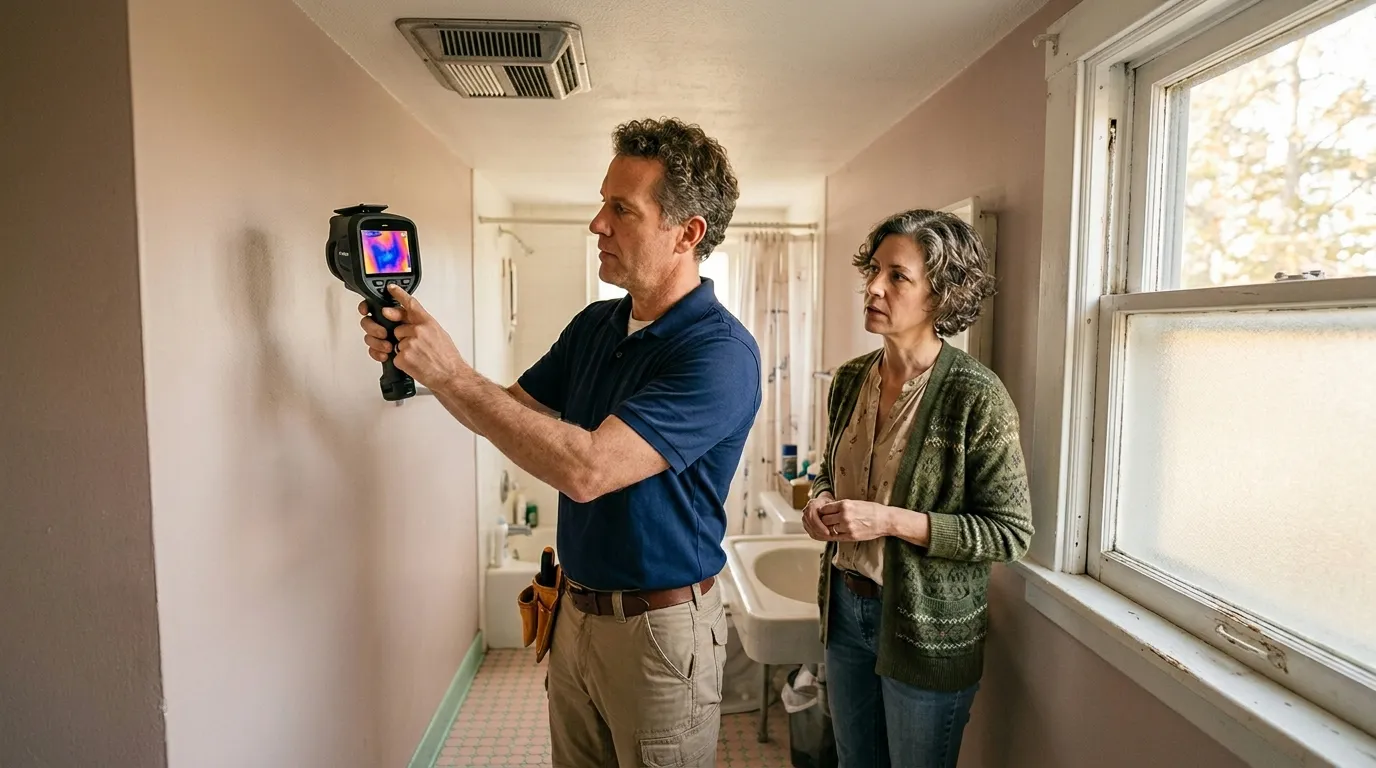
A practical scan works in passes. Stand back first, about 6 to 10 feet from the wall, so you can see the whole pattern. Then move closer for detail. Keep the camera perpendicular to the wall when possible. Avoid scanning across glossy tile, mirrors, stainless appliances, and glass because they reflect heat from your body, lights, and windows. If you’re using a Pixfra thermal device for a quick check, hold the view steady for a few seconds before calling the pattern real.
Use a simple field sequence:
If the cold pattern starts at the floor line or repeats along a hot-water run, the same logic used when plumbers locate slab leaks & radiant heating pipes with thermal applies: trace the heat path, confirm the wet zone, and avoid opening drywall until the pattern and meter reading agree.
Thermal can help trace active hot-water lines, radiant loops, and sometimes cold-water lines when the pipe temperature differs from the wall. It won’t map every pipe through drywall. Plastic PEX, deep cavities, insulation, and equalized wall temperatures can hide the line until water flow changes the temperature.
A moisture meter is still the closer. Pinless meters are faster and cleaner for painted drywall. Pin meters are better when you need depth clues or when the surface material is confusing the reading. For restoration work, a common pairing is a thermal scan plus a Protimeter Surveymaster, Tramex Moisture Encounter ME5, or Delmhorst BD-2100. The brand matters less than repeatable readings and a dry baseline.
False positives are common. Sun on an exterior wall can leave a warm rectangle that looks like a leak path. A supply register can chill a wall bay. A missing insulation batt can look like wet drywall because both create cold areas. Metal corner bead, screws, studs, and ductwork can create crisp thermal lines that don’t behave like moisture.

Reflections fool people fastest. A glossy painted wall can bounce the heat signature of your hand, a recessed light, or a sunny window behind you. Move left. Move right. If the “wet spot” moves with you, it’s reflection. Real wet drywall stays fixed to the wall geometry.
Field rule: a suspect moisture pattern should pass at least four checks before you treat it as real.
Thermal work also overlaps with pest inspections; when a warm wall patch moves, contains nesting material, or follows an attic entry point, this is closer to thermal imaging for pest control pros than a moisture call. Moisture patterns spread, wick downward, and follow absorbent materials. Animal heat behaves differently. So does a live electrical load.
Once you confirm moisture, the next question is risk. The Centers for Disease Control and Prevention’s mold page says mold can grow where moisture is present and notes that people with asthma, mold allergies, immune compromise, or chronic lung disease can have stronger health reactions. That doesn’t mean every cold patch is an emergency. It means you should match the response to the size, water source, occupant risk, and time wet.

Small, clean-water leaks caught early are usually a drying problem. A toilet overflow from a clean tank is one thing. Sewage, floodwater, long-term wall cavity moisture, or a musty odor with occupant symptoms is a different call. Don’t let a pretty thermal image soften that distinction.
| Situation | Thermal value | Best decision |
|---|---|---|
| Leak less than 24 hours old | Finds wet perimeter fast | Stop water and dry aggressively |
| Leak 2-7 days old | Maps likely mold-risk zone | Meter, open if readings stay high |
| Musty odor, no visible stain | Finds hidden suspect areas | Inspect cavities with care |
| Sewage or floodwater | Limited screening value | Call a qualified remediation pro |
| Mold over about 10 sq. ft. | Helps define spread | Follow professional cleanup guidance |
Open drywall when moisture readings stay high, the water source is confirmed, the wall smells musty, paint is soft, or the cavity contains contaminated water. Don’t open a wall just because a thermal image looks odd. Meter it, compare it, and document why that exact spot is the right cut.
Behind drywall, mold risk climbs when drying can’t reach the wet material. Closed cavities, vinyl wallpaper, wet fiberglass insulation, double drywall, and baseboards with trapped water slow evaporation. A dehumidifier in the room may make the surface look better while the paper backing stays wet. That’s one of the sneaky parts.
For homeowners, the line is usually safety and scale. A 12-inch patch under a small supply leak may be manageable if you stop the water fast and dry the wall. A 6-foot run behind kitchen cabinets with swelling baseboard is contractor territory. If anyone in the home has asthma or immune compromise, move sooner.
Good documentation turns thermal imaging from “I saw something weird” into a defensible moisture map. Take a normal photo and a thermal photo from the same position. Mark the wall. Note the date, room, fixture tested, indoor temperature, relative humidity, and meter readings. Use the same color palette for the job so the photos don’t exaggerate the change from room to room.
Don’t chase perfect images. Chase repeatable evidence. A slightly blurry thermal photo with a clear tape mark, meter number, and dry control reading beats a dramatic rainbow image with no context. Insurance adjusters, landlords, tenants, and restoration crews all need the same thing: where is wet, how wet is it, and what caused it?
For detecting hidden moisture & mold risk behind drywall with thermal, use this job note format:
Then come back. A drying job without follow-up is a guess. Re-scan after 24 hours and again when the meter reads close to the dry control area. If the thermal pattern shrinks and the meter drops, you’re moving in the right direction. If the surface looks dry but the meter stays high, the wall is still holding water.
No. Thermal imaging marks suspicious surface temperature patterns; a moisture meter, probe, or controlled inspection opening confirms wet drywall.
A 2°F to 5°F difference can matter when it follows a leak-shaped pattern and repeats from several angles. Single pixels or sharp stripes near studs are weak evidence.
Yes, flat or eggshell paint is usually fine. Gloss paint, foil wallpaper, tile, glass, and mirrors can reflect heat and distort results.
Usually no. CDC says if you see or smell mold, remove it and fix the moisture source; testing isn’t needed for most homes.
EPA recommends drying water-damaged areas within 24-48 hours to help prevent mold growth. Wet drywall left closed for days deserves a closer inspection.
Pixfra builds thermal devices for people who need to read heat patterns clearly, whether they’re outdoors at night or checking a suspicious wall inside a property. For detecting hidden moisture & mold risk behind drywall with thermal, the win is disciplined scanning: find the pattern, confirm the moisture, stop the water, and document the dry-out.
Net 30, deposits & payment terms in the optics trade usually mean one thing: established dealers may receive 30-day invoice terms, while new buyers often pay a deposit or full prepayment until trust, order history, and credit references are proven. In thermal imaging, night vision, riflescopes, binoculars, and rangefinding optics, payment terms are really a cash-flow agreement between two businesses that both carry expensive inventory.
Net 30 means the buyer pays the invoice within 30 calendar days after the invoice date; deposits reduce supplier risk before production or shipment. In the optics trade, new dealers commonly start with 30% to 50% deposits, prepaid first orders, or credit-card payment before graduating to Net 30 after several clean transactions.

A new retailer wants twelve thermal monoculars before deer season. The supplier wants to protect inventory that may cost hundreds or thousands of dollars per unit. Both sides are being reasonable. The tension starts when the retailer expects Net 30 on the first order and the supplier sees an untested account with no payment history.
Here’s a practical baseline:
| Buyer situation | Common payment term | Why suppliers use it |
|---|---|---|
| First order, small dealer | Prepay or 50% deposit | No trade history yet |
| Repeat dealer, clean record | Net 15 or Net 30 | Lower collection risk |
| Large distributor | Net 30 to Net 60 | Volume offsets risk |
| Custom OEM optics | 30% deposit, 70% before shipment | Production cash is tied up early |
| Private-label thermal device | Milestone payments | Tooling, firmware, packaging, and certification add risk |
Net 60 and Net 90 do exist, especially with large retailers and government-linked purchasing. Smaller optics dealers shouldn’t treat them as normal starting terms. A two-store outdoor retailer asking for Net 90 on a first $18,000 thermal order is asking the supplier to become a bank.
That’s the part buyers miss.
If your margin is 25%, one delayed payment can wipe out the profit from several clean orders. The supplier has paid for sensors, lenses, housings, freight, warehouse labor, and sometimes marketing support before your customer ever walks into the shop. Net 30, deposits & payment terms in the optics trade should be discussed as working capital, not just “standard paperwork.”
The better opening question is: “What first-order structure gets this moving while building toward Net 30?” That sentence lands better than “Everyone gives us terms.”
A deposit isn’t a lack of trust. It’s a way to share risk before inventory moves.

In thermal optics, inventory risk is sharper than in low-cost accessories. A 640×512 thermal monocular, a 384×288 clip-on, or a batch of branded handheld devices can tie up serious capital. If the buyer cancels late, the supplier may be holding a configuration that doesn’t fit the next customer’s price point, market, or packaging language.
For standard catalog products, a supplier may ask for full payment before shipping on the first order. For larger purchase orders, 30% upfront and 70% before shipment is common. For OEM or ODM work, deposits usually come earlier because production starts before there’s a finished unit to sell.
Think about a private-label thermal project. You may need sensor allocation, lens selection, firmware menus, carton artwork, FCC-related documentation, and sample testing. That is a different risk profile than ordering ten boxed binoculars from existing stock. Pixfra buyers who are comparing finished products with custom device programs should treat thermal core module integration as a separate payment conversation because engineering time and component planning begin long before the final invoice.
A simple deposit schedule can prevent awkward calls later:
| Project type | Deposit pattern | Payment trigger |
|---|---|---|
| Stock thermal monoculars | 100% prepay first order | Before shipment |
| Dealer reorder | Net 30 after approval | Invoice date |
| Custom packaging | 30% deposit | Before artwork or production |
| OEM thermal device | 30% / 40% / 30% | Kickoff, sample approval, shipment |
| Exclusive territory deal | Deposit plus quarterly minimums | Contract signing and reorder cycle |
Deposits work better when the supplier states exactly what the deposit covers. “30% deposit required” feels blunt. “30% deposit reserves inventory and starts packaging production” is easier to accept because the buyer sees the business reason.
There’s also a buyer-side protection angle. If you’re paying a deposit for a new optics supplier, ask for a pro forma invoice, company banking details, shipment terms, lead time, product model numbers, warranty terms, and written refund rules if the supplier can’t ship. The Federal Trade Commission’s Mail, Internet, or Telephone Order Merchandise Rule requires sellers to have a reasonable basis for advertised shipping claims and to handle shipping delays properly. FTC, 2024
That rule won’t solve every B2B dispute. Still, it gives US buyers a useful benchmark: shipping promises should be real, dated, and documented.
A supplier rarely grants Net 30 because a buyer asks nicely. The supplier grants Net 30 because the buyer looks collectible.

What does that mean in plain terms? Your company details match public records. Your trade references answer the phone. Your first order clears without drama. Your reorder timing makes sense for the category. Your buyer doesn’t disappear after asking for a pro forma invoice.
For a new optics dealer, the fastest path to Net 30 is boring, clean execution. Pay the first one or two orders upfront. Keep the order size realistic. Sell through the units. Reorder before peak season. Then ask for terms with numbers on the table.
A supplier may request:
The National Association of Credit Management teaches that trade credit decisions should consider payment history, credit capacity, financial condition, collateral, and character. NACM, 2023 That may sound formal, but optics suppliers use the same logic in everyday language: Can this account pay, will this account pay, and what happens if it doesn’t?
Cash-flow pressure is real for dealers. A retailer may need product on the shelf before a hunting expo, police procurement cycle, or fall promotion. Customers want to touch the device, compare image quality, and ask about detection range. You can’t sell an empty shelf.
Still, using supplier credit to fund uncertain retail demand is risky. If you order twenty thermal scopes on Net 30 and sell only six in the first month, the remaining units are inventory, not cash. Rent is due. Payroll is due. The invoice is due too.
A cleaner structure is to start smaller. Order eight units across two price tiers, maybe 384-resolution and 640-resolution thermal devices. Track sell-through by model. Reorder the faster mover. Then negotiate Net 30 based on real velocity rather than optimism.
Here’s a stronger ask:
> “We paid the first two Pixfra invoices upfront, totaling $14,600. Sell-through averaged 22 days. We’d like Net 30 on reorders up to $20,000, with prepayment above that limit until the next review.”
That sounds like a business case. It gives the credit manager something to approve.
Net 30 feels generous to the buyer until the calendar starts moving.
Day 1: units ship. Day 6: they arrive. Day 10: your team posts listings, trains staff, and adds demo batteries. Day 18: the first customer buys one. Day 31: the invoice is due.
If sell-through is slower than expected, Net 30 doesn’t create profit. It compresses the deadline. This is why optics buyers should model payment terms next to inventory turns, not just gross margin.
| Term | Buyer upside | Buyer risk | Supplier risk |
|---|---|---|---|
| Prepay | Often faster approval | Cash leaves before sale | Low |
| 30% deposit | Less cash upfront | Balance comes before shipment | Medium-low |
| Net 15 | Short breathing room | Tight resale window | Medium |
| Net 30 | Better retail cash cycle | Late fees if sell-through stalls | Medium-high |
| Net 60 | More time to sell | Can hide weak demand | High |
| Net 90 | Big cash-flow relief | Hard to get without scale | Very high |
A 25% margin changes the math. Suppose a dealer buys $12,000 in thermal optics and expects to sell them for $16,000. That looks like $4,000 gross profit before fees, returns, demos, freight, and card processing. If $6,000 of that inventory sits past the due date, the dealer may need cash from somewhere else to pay the supplier.
This is why Net 30, deposits & payment terms in the optics trade should be matched to sell-through speed. Hunting-season products may move quickly from August through November and then slow. Law enforcement demos may take months because one agency test can involve procurement staff, field officers, and budget approval. Outdoor e-commerce can spike after a YouTube review, then flatten for weeks.
Payment terms that work for one channel can hurt another.
For online sellers, prepaid or deposit terms may be safer until you know return rates and ad costs. For brick-and-mortar dealers, Net 30 can help cover the demo period if foot traffic is predictable. For distributors, Net 60 may work because orders are spread across many sub-dealers.
Don’t ignore currency and freight either. If you import optics, exchange-rate swings, duties, and air freight can change your landed cost before the customer ever sees the unit. US Customs and Border Protection reminds importers that classification, valuation, and duty liability sit with the importer of record. CBP, 2025
That matters for payment terms. A “good” Net 30 deal can become thin if you forgot duties, broker fees, lithium battery paperwork, or warranty reserve.
The invoice date is not a small detail. Neither is the shipping term.

If Net 30 starts on the invoice date, and the invoice is created three days before pickup, your payment window has already started before the cartons leave the warehouse. If Net 30 starts on delivery, that’s different. Put it in writing.
The same goes for Incoterms. EXW, FOB, CIF, DDP, and DAP change who pays freight, who carries risk, and where responsibility transfers. In cross-border optics deals, one word can move thousands of dollars in liability.
For US dealers, the key clauses are usually:
A supplier may reserve the right to pause shipments if an account is overdue. That’s normal. Buyers should read that clause before launching a promotion. Nothing is worse than selling through your starter stock, planning a weekend ad push, and learning your reorder is on hold because the previous invoice cleared two days late.
Returns deserve their own line. Thermal optics are not T-shirts. A unit opened for demo may need inspection before resale. A device with a scratched lens, missing cable, or modified firmware can’t simply go back into stock. Clear RMA rules protect both sides.
Warranty credits are another common friction point. If a customer returns a thermal monocular with a real defect, does the supplier replace it, repair it, issue account credit, or ship parts? Who pays inbound freight? What happens if the product tests normal? These questions feel minor until a $1,999 unit sits on your counter and the customer wants an answer by Friday.
One practical clause: define “business day.” Net 30 calendar days is different from 30 business days. Suppliers usually mean calendar days unless stated otherwise. Buyers sometimes assume business days. That gap creates needless resentment.
Bank details also need care. Wire fraud in B2B trade is ugly and fast. Confirm bank changes by phone using a known contact, not the email thread where the change appeared. For first deposits, ask the supplier to send the banking information on a signed pro forma invoice and verify the company name matches the account beneficiary.
Ask for terms after you’ve reduced the supplier’s risk.
That’s the whole negotiation.
If you’re a new dealer, don’t lead with “Can we get Net 30?” Lead with the plan: product mix, channel, launch date, expected reorder cycle, and payment record. Then offer a structure that moves both sides forward.
Better opening lines:
Notice the pattern. You’re not asking the supplier to carry unlimited risk. You’re setting a path.
Large buyers have more room to negotiate because they can offer volume, forecasting, retail placement, content production, or access to a defined channel. Even then, longer terms usually come with tighter contracts. Net 60 might require a credit check, personal guarantee, shorter dispute windows, or strict purchase minimums.
Smaller buyers can still negotiate. The best tool is specificity. Instead of “We expect strong demand,” say “We sold nine 384-resolution thermal monoculars in 27 days last October at $1,299 to $1,699.” Instead of “We have a big audience,” say “Our email list has 8,400 subscribers, and last fall’s optics promo produced $32,000 in tracked revenue.”
Suppliers listen to numbers.
There are times to walk away. If a supplier demands a large deposit but won’t provide a pro forma invoice, model list, legal entity, shipping date, warranty terms, or refund rule, slow down. If a buyer demands Net 90 on a first order and refuses a credit application, the supplier should slow down too.
For Pixfra partners, the healthiest payment conversation is direct: match the term to the order type, sales channel, and proof of sell-through. Thermal imaging is a technical category with higher unit values than ordinary outdoor accessories, so vague promises aren’t enough. A clean first order is often worth more than a stretched first credit line.
Yes, Net 30 is common for established optics dealers, distributors, and repeat buyers with clean payment history. New buyers often start with prepayment, deposits, or Net 15 before receiving Net 30.
For stock optics, first orders may require full prepayment. For larger or custom thermal imaging orders, 30% to 50% deposits are common, with the balance due before shipment or at a milestone.
Usually not on the first order. Net 60 is more realistic for larger distributors, long-standing accounts, or buyers with strong credit references and predictable order volume.
Invoices should state whether payment timing starts on invoice date, shipment date, or delivery date. If the document only says “Net 30,” assume calendar days from the invoice date unless the supplier confirms otherwise.
Only if the invoice or contract says so. Custom packaging, OEM thermal devices, and reserved inventory often have non-refundable portions because the supplier has already spent money on production or allocation.
If you’re planning dealer orders, private-label thermal imaging products, or a first wholesale purchase, Pixfra can help you structure the product mix and payment path around real sell-through, not guesswork. Start with a clear order size, a realistic channel plan, and terms that both sides can defend on paper.
If you run a farm or ranch in the U.S., you already know that losses don’t just happen during the day. Predators, sick livestock, broken fences, and trespassers do their worst after dark. A thermal monocular puts eyes on your entire operation at night — and the return on that one purchase can be staggering. We built this case study at Pixfra to show you the actual numbers.
Let’s start with what’s eating into your bottom line right now. Feral hogs alone are a persistent and costly threat to U.S. crop and livestock production, inflicting over $1.6 billion in damages annually. That’s not some abstract government number — it’s real money disappearing from farms across the South and West every single year. In Texas alone, the cost of feral hog-related agricultural damage exceeded $871 million in a single year. And hogs are just part of the picture. Collectively, predator attacks — led by coyotes — cost ranchers about $232 million per year in lost animals, with coyotes responsible for well over half of all livestock losses to predators nationwide. If you’re running cattle, sheep, or goats, something out there is costing you money every night you can’t see what’s happening on your land.

The damage goes beyond dead animals. Feral hogs caused an estimated $375 million in property damage in 2020 alone across 13 states, including damage to fencing, waterers, feed and hay storage, pasture roads, erosion infrastructure, and working facilities. In 2021, producers spent $474 million and over 17 million labor hours on hog control. That’s time you’re not spending on production, breeding, or anything else that actually grows your revenue. And here’s the kicker: it’s estimated that a single feral hog can cause $500 worth of damage to fields and pastures. Multiply that by a sounder of 15 or 20 hogs, and you’re looking at a five-figure hit from one bad night.
Then there’s the livestock health side. Infrared imaging can identify sick animals early by detecting fever, changes in circulation, or inflammation. Without thermal, a cow running a fever at 2 AM looks the same as every other cow in the pasture — you won’t know until she’s off feed the next morning, and by then, the problem may have spread. Thermal imaging saves farmers between $21,546 and $64,638 annually in mastitis-related costs alone for mid-sized dairy operations. Whether you’re running beef cattle, a dairy herd, or a sheep operation, the losses you can’t see in the dark are the ones that hurt most. Getting ahead of those losses is where a thermal monocular earns its keep. If you want to understand the top 6 features needed in the best thermal device in 2026, we put together a full breakdown that covers sensor specs, battery life, durability, and more — all the stuff that actually matters when you’re picking gear for real farm conditions.
Here’s where the thermal monocular ROI for farmers gets real. The math isn’t complicated. A quality handheld thermal monocular from Pixfra — something like our Arc LRF or Mile 2 series — sits in a mid-range price tier that most working farms can justify in a single season. Our devices deliver NETD values of ≤18mK, which means you can pick out a coyote against a warm field background or spot a feverish calf from across the pasture. You don’t need a $10,000 system to start seeing real savings. With system costs ranging from $500 for basic devices to $25,000+ for advanced setups, ROI is typically achieved within 12-18 months through prevented equipment failures ($5,000-$20,000 saved annually) and improved herd health outcomes. For most farms using a handheld thermal monocular, the payback window is even shorter because the upfront cost is lower.
The USDA’s predation management program data shows that for every dollar spent on predation management, $3 worth of livestock were saved. Think about that ratio applied to your operation. If you lose even two calves a year to coyotes or feral hogs — and at today’s beef prices, each calf is worth $800 to $1,200 — that’s $1,600 to $2,400 gone. A thermal monocular that lets you spot and deal with those predators before they hit your herd can pay for itself with a single saved animal. Farmers and ranchers have dozens of uses for thermal monoculars that save time and prevent losses — check on animals at night without disturbing the herd, spot a cow that’s separated from the group, and identify sick animals by detecting fever, since elevated body temperature shows up instantly on thermal displays. Every one of those use cases has a dollar value attached to it, and they stack up fast.
The indirect savings are just as real. You can cover large pastures quickly without driving out to every corner of your property, and thermal imaging also helps with predator control — coyotes, feral hogs, or other animals threatening livestock show up clearly, even from long distances. That means fewer midnight truck trips burning diesel, less wear on your ATV, and less time physically walking fence lines in the dark. One scan from a hilltop with a Pixfra monocular can cover ground that would take you 45 minutes by truck. Over a season, those hours and fuel costs add up. When you factor in predator deterrence, early health detection, faster head counts, calving-season monitoring, and property security, the ROI from a single thermal monocular covers a lot of ground — literally and financially.
Estimated Annual ROI Breakdown for a Mid-Size Cattle Operation (200 head)
| Loss Category | Estimated Annual Cost Without Thermal | Potential Savings With Thermal |
|---|---|---|
| Calf losses to predators (2-3 head/year) | $2,000 – $3,600 | $1,500 – $3,000 |
| Late disease detection & vet bills | $3,000 – $8,000 | $1,500 – $5,000 |
| Feral hog crop/pasture damage | $2,500 – $10,000 | $1,000 – $6,000 |
| Fence/infrastructure repair (hog damage) | $1,500 – $5,000 | $500 – $2,500 |
| Fuel, labor, and patrol time | $1,200 – $3,000 | $600 – $1,500 |
| Total estimated | $10,200 – $29,600 | $5,100 – $18,000 |
These figures are conservative, built from USDA damage data and typical livestock values. Your mileage will vary depending on your location, herd size, and local predator pressure — but even at the low end, a thermal monocular that costs under $2,000 can pay for itself in the first year.
Let’s put this into a real scenario. Picture a 600-acre cattle operation in east Texas — a region where feral hog damage exceeded $871 million in a single year statewide and coyote pressure is constant. The rancher runs about 150 cow-calf pairs. Before thermal, he was losing an average of three calves per year to predators — two to coyotes, one to hogs. At 2025 calf prices, that’s roughly $3,000 gone. Add in the pasture damage from a recurring hog sounder — torn-up hay meadows, damaged waterers, rutted-out feed roads — and the annual hit was pushing $8,000 to $12,000. He was spending an extra 10 hours a week during peak predator season driving the ranch roads at night with a spotlight, burning diesel and losing sleep.

After picking up a Pixfra thermal monocular, the picture changed fast. With our 12μm pixel pitch sensor and ≤18mK NETD, he could scan his entire calving pasture from one elevated point in under five minutes. Some ranchers use thermal monoculars during calving season to check pregnant cows overnight without spooking them with lights or vehicle noise, and coyotes, feral hogs, or other animals threatening livestock show up clearly, even from long distances. Within the first three months, he’d identified a coyote pair working the south pasture and a sounder of hogs bedding in a creek bottom he’d never checked before. He dealt with both problems before losing a single calf that season. That alone saved $2,000 to $3,000. The hog damage to his hay ground dropped by over 60% because he could now locate and trap them before they tore up acreage, saving another $3,000 to $4,000 in reseeding and repair costs.
He also started using the monocular for nightly health checks. Illness, injury, and infection often manifest as a change in surface temperature — a “hot spot” or “cold spot” — and a thermal monocular can flag a potential issue like mastitis, lameness, or fever in an animal from a distance. He caught a heifer with early respiratory illness on a thermal sweep one night — her head and chest were noticeably warmer than the rest of the group. By treating her the next morning before she went off feed, he avoided what likely would’ve been a $500+ vet bill and potential spread through the pen. His total first-year savings? Conservatively, $7,000 to $10,000 — from a device that cost a fraction of that. The thermal monocular ROI wasn’t a multi-year projection. It was a single-season reality.
Not every thermal monocular on the shelf is built for farm work. You need something that can handle dust, rain, cold mornings, and getting tossed on the truck seat. At Pixfra, we build every device with IP67-rated housing — that means full dust sealing and protection against water submersion. That’s non-negotiable for any device you’ll use outdoors in real conditions. You also need a sensor that can tell a coyote from a fence post at 300 yards on a warm night, and that comes down to NETD and resolution. Our devices hit ≤18mK NETD and pair that with 12μm pixel pitch sensors across the lineup, from the Draco for everyday farm use to the Sirius HD for large-property scanning at ranges out to 3,600 meters.

Battery life is another deal-breaker for farm use. If your thermal monocular dies at midnight and you’re mid-calving season, it’s a very expensive flashlight. Our Pixfra devices range from about 4.5 to 15 hours depending on the model, and many use standard 18650 batteries you can swap in seconds. That’s a deliberate design choice — when you need to pop in a fresh battery at 3 AM, proprietary charging setups are the last thing you want. For all-night predator patrols or multi-day backcountry work, swappable batteries beat built-in rechargeables every time. Cold weather can also slash battery performance by 30-50%, so carry spares in an inside pocket and you’ll never get caught dead in the dark.
Thermal optics are widely used for livestock protection and farm patrol. If you manage cattle, sheep, or poultry, predators like coyotes, hogs, or stray dogs can cause serious losses overnight. Waiting until daylight often means the damage is already done. Thermal devices allow you to detect movement across open land, fence lines, and tree cover without relying on floodlights. If your farm doubles as a place where you need to monitor for trespassers, check equipment sheds, or keep an eye on remote outbuildings, a thermal monocular with Wi-Fi streaming and video recording — like our models with the Pixfra Outdoor App — gives you documentation and real-time awareness in one tool. You’re not buying a gadget. You’re buying a farm management tool that works 24/7, handles rough conditions, and pays you back every time it prevents a loss you’d otherwise never see coming.
How fast will a thermal monocular pay for itself on a farm?
For most livestock operations, a thermal monocular can pay for itself within one season — sometimes in a single event. If you prevent even one calf loss to predators at today’s beef prices ($800-$1,200 per head) or catch a hog sounder before it destroys a hay meadow, you’ve covered the cost of a mid-range device. For operations using thermal imaging more broadly for herd health and equipment monitoring, ROI is typically achieved within 12-18 months. The faster you use the device, the faster it pays back.
Can a thermal monocular really detect sick livestock?
Yes. By monitoring the body temperature of animals, farmers can detect signs of illness, stress, or discomfort early, allowing for timely interventions that improve animal welfare and productivity. Fever, inflammation, and circulation changes all show up as hot spots on a thermal display. You can scan a group of cattle from a distance without disturbing them and flag the animal that looks warmer than the rest — all without getting close enough to stress the herd.
Do I need an expensive thermal monocular for farm use?
No. Most farmers initially think of thermal as a tool for predator control, but with a decent sub-$1,000 thermal, you have an entire spectrum of non-visible light opened up — you can monitor livestock without disturbing them and detect disease and injury earlier. Entry-level devices work well for short-range pasture checks and basic predator scanning. If you need longer detection ranges for larger properties — say, 1,000+ meters — a mid-range model like the Pixfra Arc LRF or Mile 2 hits the sweet spot between performance and price.
Is a thermal monocular better than trail cameras for farm security?
For active monitoring, yes. Trail cameras only capture what walks past them, and they need you to check the footage later. A single thermal device can detect a human-sized heat signature at over a mile, compared to a few hundred feet for a standard security camera. A thermal monocular gives you real-time, full-area scanning — you step outside, power it up, and you know exactly what’s on your property right now. For passive, 24/7 recording, trail cams still have their place, but when it comes to stopping a threat in real time, thermal wins every time.
What’s the best thermal monocular for a working farm or ranch?
It depends on your acreage and primary use. For smaller operations doing nightly livestock checks and close-range predator work, our Pixfra Draco provides solid performance at a reasonable price point. For mid-to-large ranches where you need to scan long distances — and especially if you’re dealing with feral hogs or coyotes — models like the Arc LRF (with a built-in laser rangefinder) or the Mile 2 series give you the detection range, battery life, and durability to handle serious farm use. Every Pixfra device is built to IP67 standards, runs a 50Hz refresh rate for smooth imaging, and works with our Outdoor App for firmware updates and image transfer.
Shooting past 300 yards in total darkness is a different game. You need a thermal scope that can detect, identify, and help you hit targets at distance — not just show you a glowing blob. At Pixfra, we build thermal imaging devices used by hunters across 30+ countries, and we know what separates a real long-range thermal scope from a spec-sheet wonder.
Not every thermal scope can handle long-range work. A scope that performs well at 100 yards might turn into a blurry mess at 400. If you plan to reach out past 300 yards at night — whether you’re hunting coyotes across open fields, running hog eradication on ranch land, or just want confidence at distance — you need to pay attention to a few specific things before you spend a dime.

The first thing to look at is sensor resolution. This is the number of pixels your thermal sensor uses to build the image you see through the eyepiece. If your shots stay within 100–150 meters, a 384×288 sensor will often suffice. If you’re shooting 250+ meters, go for a higher-resolution sensor (640×480 or 1024×768) and better thermal sensitivity (<20 mK NETD). A higher pixel count means the animal you’re looking at is rendered by more pixels on the screen, which lets you see ears, legs, body posture, and movement — all details you need for positive target ID before pulling the trigger. If you look at a coyote at 400 yards through a 256-resolution sensor, the animal might only be rendered by 4 or 5 pixels — it will look like a blurry Lego brick. With a 640×512 sensor, that same coyote is rendered by dozens of pixels. That’s a night-and-day difference when it comes to making an ethical shot.
Second, your long-range thermal scope needs a laser rangefinder (LRF) and a ballistic calculator — period. A laser rangefinder integrated with a ballistic calculator eliminates guesswork on longer shots by automatically adjusting your reticle for range and angle. This is particularly valuable for ethical hunting in low-visibility conditions where distance estimation is difficult. At night, you can’t judge distance by landmarks the way you can during the day. An integrated LRF gives you exact yardage in a fraction of a second, and when that feeds into a ballistic calculator, your reticle adjusts automatically for bullet drop. If you want a deeper look at what features set a great thermal device apart, we put together a guide on the top features needed in the best thermal device in 2026 that covers this in detail. Finally, don’t overlook build quality, refresh rate, and battery life. A scope with a 50Hz refresh rate tracks moving animals smoothly, while anything below 30Hz creates lag that can cost you a clean shot. And a battery that dies four hours into a night hunt is a deal-breaker — look for 7+ hours of runtime or swappable 18650 batteries so you can keep going.
After testing, field feedback, and engineering-level analysis of what performs at distance, here are our top seven picks for long-range thermal shooting in 2026. We’ve pulled from our own Pixfra lineup because we know these devices inside and out — and because they’re built to perform in exactly these conditions. Each model below brings something different to the table depending on your shooting style, terrain, and budget.
1. Pixfra Pegasus 2 LRF — Our flagship thermal scope for long-range precision. The Pegasus 2 LRF is built around the tagline “Make Precision Target Locking Effortless,” and it delivers. It features an integrated laser rangefinder, a high-sensitivity thermal sensor with NETD ≤18mK, and detection range that stretches well past what most hunters will ever need. The LRF feeds distance data directly to the scope, taking the guesswork out of holdovers at 300+ yards. If you want one scope that does everything for long-range thermal hunting, this is the one.

2. Pixfra Chiron LRF — Designed with one purpose: “Lock-On, Readiness, Fire.” The Chiron LRF pairs its integrated laser rangefinder with a built-in ballistic calculator, giving you real-time adjusted aiming points for different ranges and angles. This is the thermal rifle scope you want if you’re running predator control across big open ground. It computes bullet drop, angle compensation, and other ballistic factors so your reticle is already where it needs to be when you’re ready to squeeze the trigger.
3. Pixfra Pegasus Pro Series — When the slogan says “Shoot in a Pro Way,” it’s talking about features that matter to serious shooters. The Pegasus Pro is a thermal scope built for hunters who want a step up in optical performance and target clarity without the added weight and cost of full LRF integration. It offers excellent thermal imaging, smooth magnification, and a sensor that punches above its class for target identification at mid-to-long range.
4. Pixfra Taurus T650 LRF — This is a thermal front attachment, which means it clips onto the front of your existing daytime scope and turns it into a thermal imaging system. Why does that matter for long-range shooters? Because you get to keep using the high-quality glass optic you already trust for daylight work. The T650 LRF adds thermal detection with an integrated laser rangefinder and a ballistic calculator. Its zeroing precision sits at an ultra-fine 0.9cm@100m click value — that’s seriously tight for a thermal front attachment.
5. Pixfra Taurus T450 LRF — Similar DNA to the T650 but in a slightly different configuration, the T450 LRF gives you thermal front attachment capability with LRF and ballistic support. It’s ideal for shooters running mid-range optics on bolt-action rifles or AR platforms who want thermal capability at distance without re-zeroing or swapping their entire scope setup. Both Taurus LRF models are built for fast mounting and solid zero retention — key when you need to switch between day and night shooting.
6. Pixfra Volans Series — “See Beyond Time” isn’t just a marketing line. The Volans is a digital day-and-night vision scope with an adjustable aperture (F1.2–F3.0) that adapts to different lighting conditions. This gives you an all-day scope that handles bright daylight, low light, and total darkness without swapping optics. For hunters who don’t want to carry separate day and night rigs, the Volans solves that problem. LRF-equipped models also include a ballistic calculator for accurate targeting at distance.
7. Pixfra Draco — Lightweight design meets multi-functional performance. The Draco stands out as a thermal front attachment that keeps your rifle balanced and maneuverable, even on long stalks. While it’s not as feature-loaded as the Taurus LRF models, the Draco delivers reliable thermal imaging, solid detection range, and a compact form factor that won’t throw off your shooting position. It’s a smart entry into thermal front-attachment shooting for hunters who want thermal capability without the bulk.
Here’s a quick side-by-side comparison to help you see how these stack up:
| Model | Type | LRF | Ballistic Calculator | Best For |
|---|---|---|---|---|
| Pegasus 2 LRF | Thermal Scope | Yes | Yes | All-around long-range precision |
| Chiron LRF | Thermal Scope | Yes | Yes | Predator control, open terrain |
| Pegasus Pro | Thermal Scope | No | No | Mid-to-long range, value |
| Taurus T650 LRF | Front Attachment | Yes | Yes | Pairing with existing optics |
| Taurus T450 LRF | Front Attachment | Yes | Yes | Versatile clip-on thermal |
| Volans | Day/Night Scope | Available | Available | 24-hour all-day shooting |
| Draco | Front Attachment | No | No | Lightweight, portable thermal |
Key stat: Detection ranges across the Pixfra lineup run from around 500m on entry-level devices up to 3,600m on premium models like the Sirius HD series. For long-range shooting, our LRF models provide accurate ranging out to 1,000m — which covers virtually every realistic hunting scenario in North America.
This is the single biggest source of confusion in thermal scopes, and it trips up both new buyers and experienced hunters. When shopping for thermal optics, you will often see specs like “Detection Range: 2,500 yards.” Do not mistake detection for identification. Detection means the scope can sense a heat source — at 1,500 yards, a cow and a truck engine might look exactly the same, just a white dot. Identification means you can clearly see the animal’s shape, legs, and gait. This is the absolute maximum range at which you can ethically shoot. This is the point we want to drive home: your detection range is always going to be much farther than the range at which you can positively ID a target and take a responsible shot.

For thermal scopes, anything past 250 yards starts to become “long range.” Hitting a target at 500+ yards with a thermal scope requires a perfect storm of environmental conditions, high-end sensor resolution, and a very large objective lens. That’s why we build our Pixfra thermal scopes and front attachments with high-resolution sensors and wide germanium objective lenses. A larger lens collects more infrared radiation, which directly translates to a cleaner image at distance. When paired with a sensor that has NETD values as low as ≤18mK, you get exceptional target separation in conditions that wash out cheaper thermals — high humidity, fog, or low temperature contrast between animals and their environment. Our Taurus LRF series, for example, offers that ultra-fine 0.9cm@100m click value for zeroing, which gives you the precision to actually use those long identification ranges for shot placement, not just spotting.
If you’re shopping for a thermal scope specifically for long-range shooting, here are the specs you should zero in on. First, sensor resolution — we’ve already covered why 640×480 or higher is the sweet spot for long-range work. A 384×288 sensor works fine for close-to-mid range hog hunting inside 200 yards. If you’re pushing past 300 yards or targeting smaller game like coyotes, step up to a 640×480 or 640×512 sensor for cleaner target ID. If your budget limits you to a 384 sensor, you can still get decent performance at moderate distances, but you’ll hit a ceiling faster when you zoom in digitally.

NETD (Noise Equivalent Temperature Difference) is the second spec to watch. NETD measures how sensitive your thermal sensor is to tiny temperature differences. Lower numbers are better. Our Pixfra devices hit ≤18mK, which means the sensor can pick up extremely subtle heat variations — like the difference between a coyote’s warm body and the cooling ground around it on a mild evening. Premium models from top-tier brands typically range from 15mK to 25mK. Anything above 30mK is going to struggle in low-contrast conditions, and those are exactly the conditions where long-range shots are hardest. Temperature differentials shrink as the night goes on, and a sensitive sensor is what keeps your image sharp when conditions get tough.
Magnification is where a lot of buyers get tricked. Digital zoom simply enlarges the pixels you already have. If you want to shoot at 400 yards, you need a scope with a higher optical base magnification (like 3x or 4x), so you don’t have to rely heavily on digital zoom. A scope advertising 16x magnification sounds impressive, but if that’s achieved through 2x base mag and 8x digital zoom, your image quality at high zoom will be soft. For long-range thermal work, look for a base optical magnification of at least 3x to 5x, and treat digital zoom as a bonus — not the foundation of your long-range plan. Our Pegasus 2 LRF and Chiron LRF are engineered with this philosophy: strong base magnification so you get real optical clarity where it counts.
Choosing a thermal rifle scope for long-range shooting comes down to three things: where you hunt, what you hunt, and how you hunt. Open fields or farmland require a scope with a long detection and identification range, typically a 50–60mm lens and 640+ resolution sensor. Woodland or brush calls for wide field of view, compact form, and fast handling — 35mm lenses and lighter builds are ideal. Mixed terrain means a balanced scope with a mid-range lens (50mm), moderate magnification, and decent FOV. If you’re sitting in a blind over a Texas grain field waiting for hogs, the Pegasus 2 LRF gives you maximum detection and precision. If you’re walking fence lines looking for coyotes, the lighter Draco front attachment keeps your rifle from wearing you out over miles.
Budget matters too. Thermal units range in price from around $1,000 for basic thermal viewers to over $7,000 for the most sophisticated rangefinding scopes. Thermal scopes depend on a rare-earth element called germanium, which supplies temperature-sensitive glass for thermal units. Generally speaking, the best combination of attributes, capability, and overall utility of thermal units will set you back around $3,000. Don’t chase the highest-specced scope if your shots never go past 200 yards. A mid-range Pixfra thermal scope or front attachment will serve you better than an overbuilt unit that’s too heavy for your style. On the flip side, if you’re seriously working open country at 400+ yards, invest in LRF integration and a ballistic calculator — those features pay for themselves in first-round hits and ethical shots. Our Chiron LRF and Taurus LRF both include ballistic calculators that compute factors like bullet drop and angle for accurate targeting at different distances, making them a solid pick for anyone who wants long-range confidence without external accessories.
How far can you actually shoot with a thermal scope?
It depends on the scope and the target, but here’s the honest answer: most thermal scopes let you detect heat signatures well beyond 1,000 yards. However, your actual shooting range — the distance at which you can positively identify the target and make an ethical shot — is usually limited to 400–600 yards with a high-end 640-class sensor and a 50mm+ lens. Our Pixfra thermal scopes with NETD ≤18mK push that identification range further by delivering sharper thermal contrast, but we always recommend knowing your identification limits before taking any shot.
Is a 640 sensor worth the extra money over 384?
If you’re shooting past 200 yards regularly, yes — it’s absolutely worth it. A 640×480 or 640×512 sensor puts significantly more pixels on your target at distance, which translates directly into better target identification. At 400 yards, the difference between a 384 and a 640 sensor is the difference between guessing and knowing what you’re aiming at. For close-range work under 200 yards, a 384 sensor handles the job, but for long-range thermal shooting, the 640 is the baseline we recommend.
Do I need a built-in laser rangefinder on my thermal scope?
For long-range shooting — yes. At night, your ability to judge distance drops off a cliff compared to daylight. An integrated LRF gives you accurate yardage in under a second, and when it’s paired with a ballistic calculator (like on our Chiron LRF and Taurus LRF), it adjusts your aiming point automatically. You range, you aim, you shoot. No fumbling for a separate rangefinder, no breaking your eye from the scope. If you mostly shoot under 150 yards from a fixed position where you already know the distances, you can skip the LRF. But for anything past 200 yards in unfamiliar terrain, it’s a game-changer.
Can I use a thermal scope during the day?
Yes. Thermal scopes detect heat, not light, so they work in daylight, total darkness, fog, smoke, and glaring light. Our Pixfra Volans Series takes this a step further with an adjustable aperture (F1.2–F3.0) that adapts to different lighting conditions, giving you true all-day vision capability. You won’t get the same color image as a traditional daylight optic, but you’ll see heat signatures that you’d miss with regular glass — like a bedded deer in tall grass or a coyote tucked into a shady tree line.
What NETD rating should I look for in a long-range thermal scope?
Lower is better. NETD stands for Noise Equivalent Temperature Difference, and it measures how small of a temperature change the sensor can detect. For long-range work, look for anything ≤25mK. Premium scopes sit around 15–18mK, which is where our Pixfra lineup lands. At ≤18mK, you get clear thermal contrast even in tough conditions like high humidity or when ambient temperatures are close to your target’s body temperature. Anything above 35mK will struggle at distance and in challenging weather.
