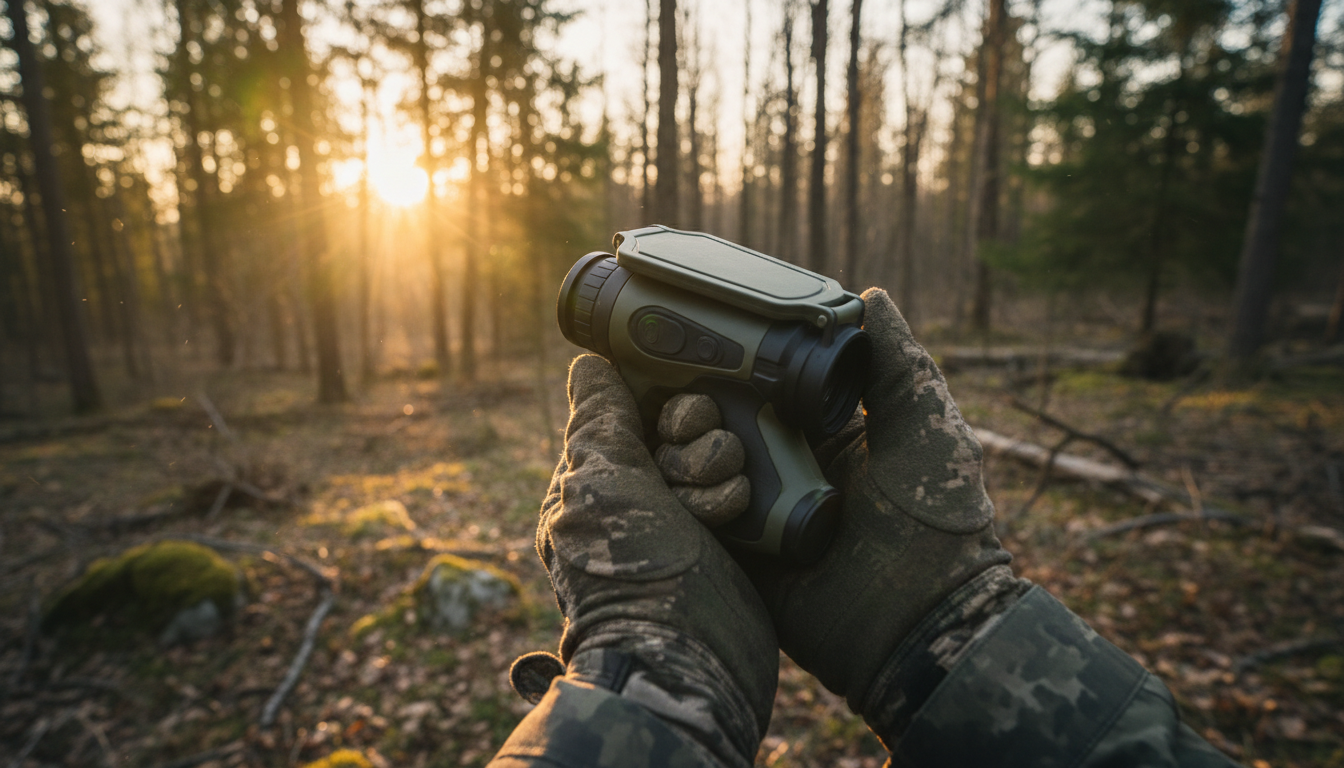
Your thermal monocular is more than just a piece of gear—it’s a serious investment in your outdoor adventures. Whether you’re scanning for game before dawn, tracking heat signatures through fog, or keeping watch in complete darkness, you need that device working flawlessly when it counts. But here’s the thing: thermal imaging tech isn’t indestructible. Dust, moisture, temperature swings, and rough handling can quietly degrade performance until you’re left squinting at blurry images right when you need clarity most.
We’ve put together this guide to help you protect your investment and maximize your thermal monocular’s lifespan. From lens cleaning techniques that won’t scratch coatings to battery habits that prevent field failures, we’ll walk you through the maintenance routines that actually make a difference. Most of these practices take just minutes but can add years to your device’s service life. Let’s get into it.
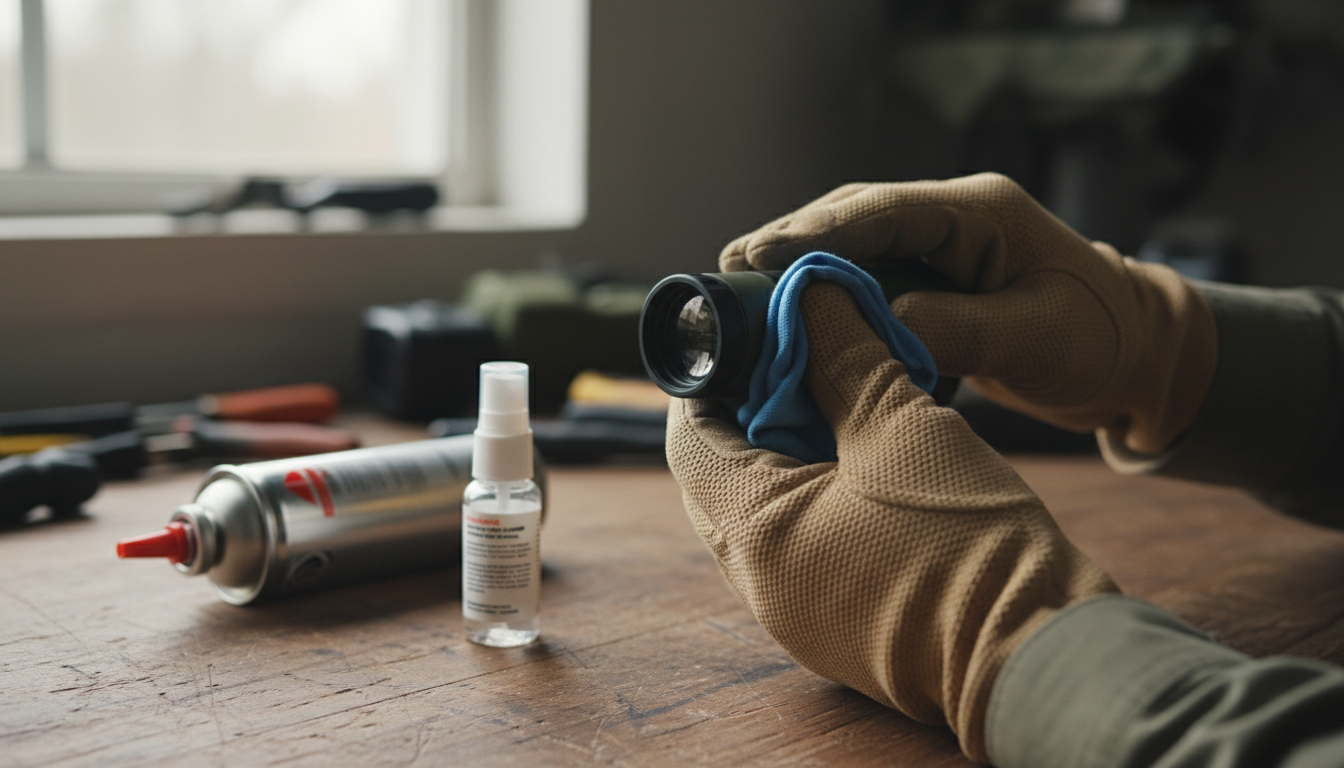
Your lens is the gateway to clear thermal images, and it’s also the most vulnerable part of your monocular. One wrong move with the wrong cloth and you’ve got permanent scratches on expensive optics.
Start by removing loose dust before you touch the lens surface. Use a soft air brush or compressed air to blow away particles—this prevents you from dragging grit across the glass when you wipe. Never use your shirt, paper towels, or anything rough. Those materials act like sandpaper on specialized coatings.
For actual cleaning, reach for a microfiber cloth designed for optics. If you’ve got stubborn smudges or fingerprints, add a small amount of lens cleaning solution specifically made for optical surfaces. Skip household glass cleaners—they contain chemicals that damage the anti-reflective coatings on thermal lenses. Apply the cleaner to your cloth, not directly to the lens, then wipe gently from the center outward using a rolling motion.
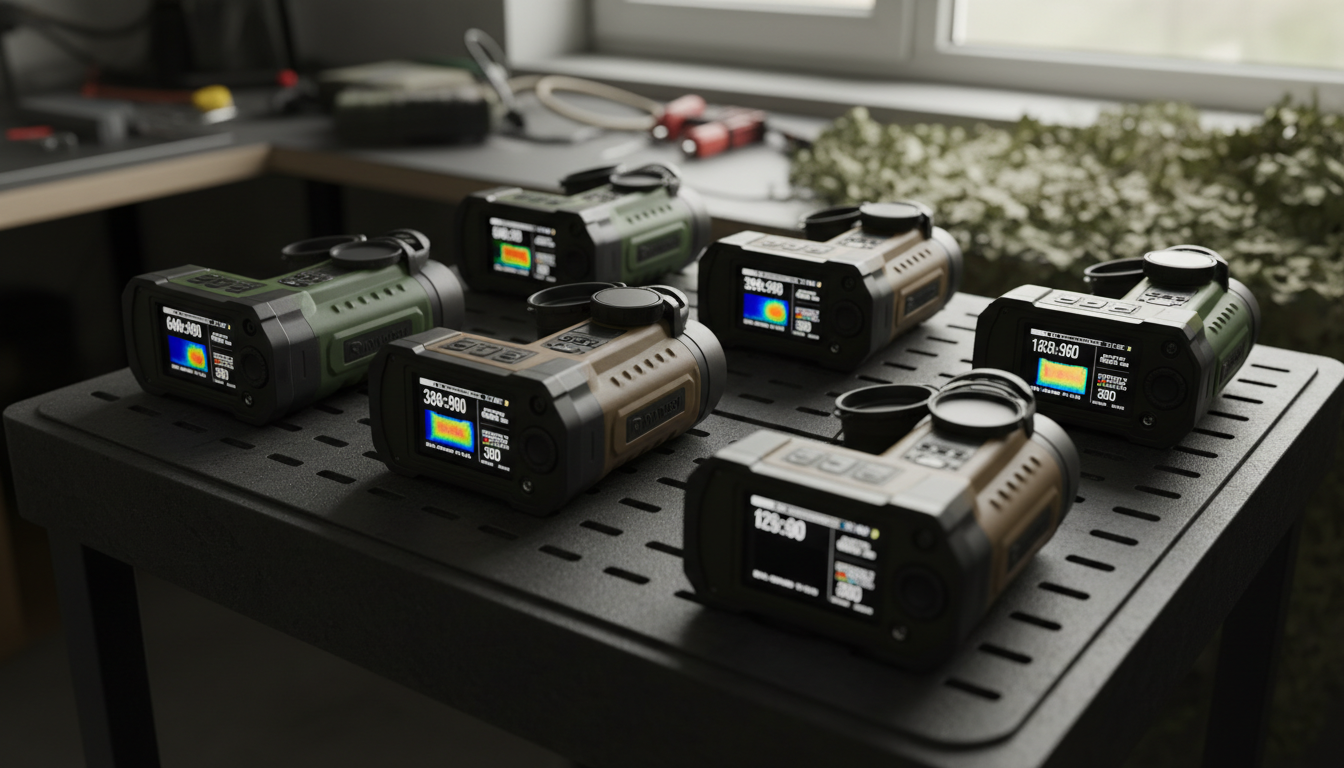
If you’re dealing with mud or heavy debris, rinse the lens with water first before wiping. This simple step prevents scratching when you clean. And always keep your lens caps on when the monocular isn’t actively in use. It sounds basic, but lens caps are your first line of defense against scratches, dust, and accidental impacts. Check out our Sirius HD and Pegasus 2 LRF models—both feature durable lens protection systems designed for field use.
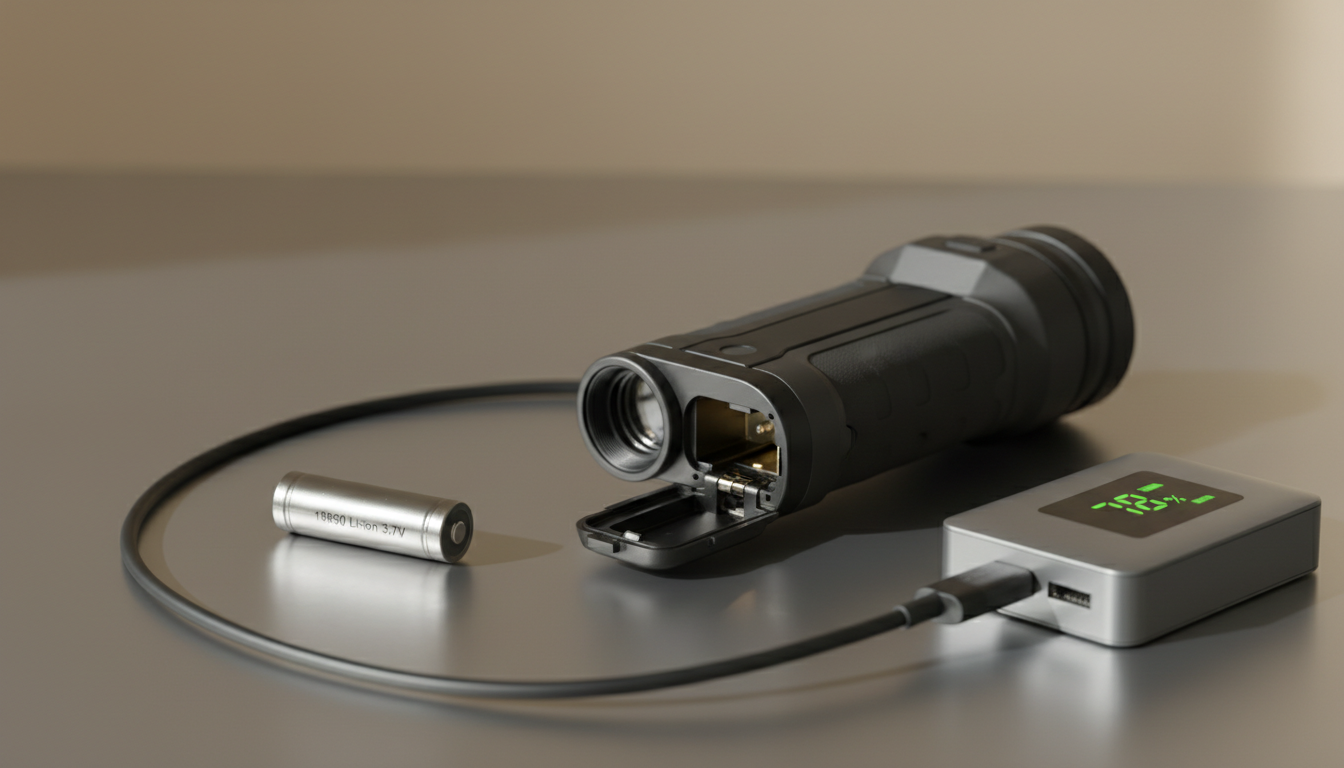
Battery issues will end your hunt faster than anything else. Dead power means dead device, no matter how good your thermal sensor is.
Most thermal monoculars run on rechargeable lithium-ion batteries. These batteries perform best when you follow a few simple habits. First, use only the charger that came with your device or one specified by the manufacturer. Generic chargers might work, but they can degrade battery health over time or even create safety risks.
Don’t let your battery drain completely if you can avoid it. Deep discharges shorten lifespan. Instead, try to keep your charge between 50-80% for everyday storage. If you’re storing your monocular for months during off-season, charge the battery to about 50% before putting it away. This preserves battery chemistry better than storing it fully charged or fully drained.
Temperature matters more than you might think. Never charge your battery when it’s freezing cold—below 32°F can damage cells permanently. Similarly, avoid leaving your monocular in hot vehicles or direct sunlight for extended periods. Heat accelerates battery degradation and can affect calibration of the thermal sensor itself.
Remove batteries if you’re storing the device for several months. This prevents potential leakage that could corrode internal electronics. Store those batteries separately in a cool, dry place, and check them periodically to make sure they’re holding their charge.
How you store your thermal monocular between uses directly impacts its longevity. Temperature and humidity are your biggest concerns here.
Find a cool, dry location away from direct sunlight. Extreme temperatures—whether hot or cold—can mess with sensitive electronics and throw off sensor calibration. High humidity creates condensation inside the device, which can short circuits or promote corrosion and mold growth on internal components.
Consider adding silica gel packets to your storage case to absorb excess moisture. These inexpensive desiccant packs can prevent a lot of humidity-related problems. If you live in a particularly humid climate, you might even want to use a dehumidifier in your storage area.
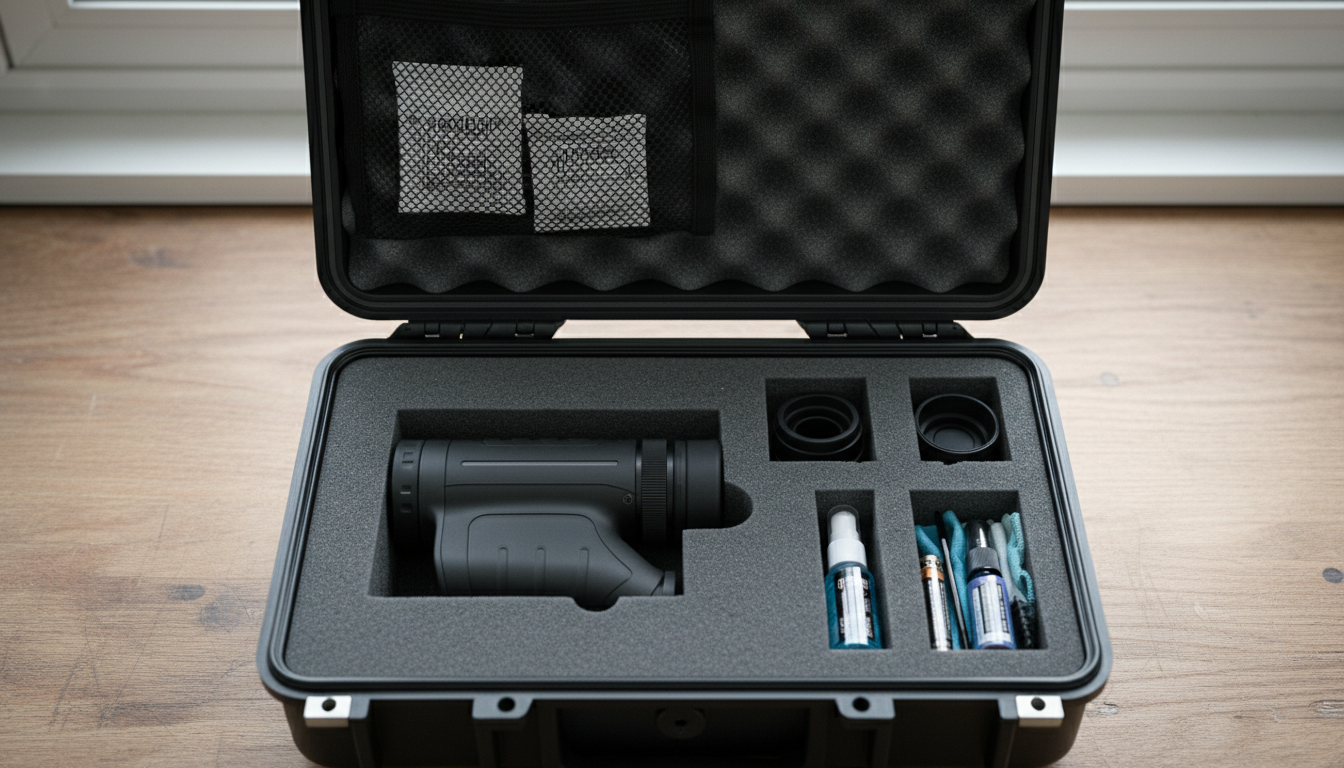
Always use a protective case—preferably the original case with foam inserts, or a hard case with padding. This protects against accidental drops and impacts that could damage the lens or internal components. Your case should have separate compartments for accessories like cables, spare batteries, and cleaning tools. Keeping these items separate prevents scratches and pressure damage to the monocular body.
After using your device in wet conditions, dry it completely before storage. Inspect all seals and ports to make sure water hasn’t penetrated. Even if your monocular is rated for water resistance, it’s smart to keep it as dry as possible during storage to maintain those seals over time.
Software updates aren’t just about new features—they often include bug fixes, performance improvements, and better image processing algorithms. Manufacturers release firmware updates based on real-world testing and user feedback, and these updates can genuinely improve your device’s performance.
Check your manufacturer’s website every few months for firmware updates. The process usually involves connecting your monocular to a computer via USB and running the update software. Follow the instructions carefully and don’t disconnect during an update.
Calibration is equally important. Your thermal sensor needs periodic calibration to maintain image accuracy. Many modern thermal monoculars have automatic calibration features that run when needed, but some situations call for manual calibration. If you notice image quality degrading, temperature readings seeming off, or strange artifacts in your thermal view, run a calibration cycle.
Most devices include a calibration function in their menu system—it typically takes just seconds. The monocular will briefly shutter the sensor or perform an internal reference check to recalibrate the detector. This quick process can dramatically improve image clarity.
Before hunting season starts, perform a complete check at least a month ahead. Test battery health, update firmware, and run calibration to avoid surprises on opening morning. You don’t want to discover problems when you’re already in the field.
Thermal monoculars are built tough, but they’re still precision instruments. A few smart handling practices go a long way toward preventing damage.
Avoid sudden temperature changes when possible. If you’re moving from a warm vehicle into freezing outdoor temperatures, give your device a few minutes to acclimate gradually. Rapid temperature swings can affect sensor accuracy and create condensation inside the unit.
Keep your monocular away from magnetic interference and don’t subject it to physical shocks. Even though most models can handle typical field conditions, hard drops onto rocks or concrete can damage internal electronics or misalign optical components. Use the wrist strap that came with your device—it’s there for a reason.
If you get mud or debris on the exterior body, wipe it gently with a soft, slightly damp cloth. For stubborn dirt on the housing, you can use a bit of synthetic detergent, but keep moisture away from ports and seals. Never immerse your monocular in water unless it’s specifically rated for full submersion.
Transport your device in its protective case whenever you’re moving between locations. Whether you’re driving to your hunting spot or hiking through rough terrain, that padded case absorbs impacts that would otherwise reach your monocular.
Even with perfect maintenance, you might encounter occasional problems. Knowing how to troubleshoot can save you time and frustration.
Blurry or unclear images: First, clean the lens—fingerprints and dust are the usual culprits. If that doesn’t help, check your focus adjustment to make sure it’s set correctly for your viewing distance. Still blurry? The issue might be internal, requiring manufacturer service or recalibration.
Battery drains too fast: Replace old batteries with fresh ones. Lithium-ion batteries typically need replacement after 2-3 years of heavy use. Also check your settings—high brightness, maximum refresh rates, and features like Wi-Fi or video recording drain power quickly. Adjust these settings to balance performance with battery life.
Device won’t power on: Make sure the battery is charged and properly installed. Try a different battery if you have one. Check that battery contacts are clean and free of corrosion. If the device still won’t turn on, you’ll likely need professional service.
Image quality degraded over time: Run a calibration cycle. Thermal sensors can drift slightly over time, and recalibration often restores optimal performance. If calibration doesn’t help, consult your user manual or contact the manufacturer.
Quality thermal monoculars typically last 5-10 years with proper care. The microbolometer sensors are rated for thousands of operating hours. Your biggest longevity factors are protecting against hard impacts, keeping moisture out, and storing properly during off-season.
Think of maintenance as preventive medicine. A few minutes after each outing to clean your lens, check seals, and properly store your device will prevent problems that could cost hundreds to repair. Regular inspection catches wear early, before small issues become major failures.
Buy quality accessories that protect your gear. Invest in a good case, quality batteries, and proper cleaning supplies. These relatively small expenses protect a much larger investment. And when it comes time to upgrade, well-maintained gear holds its resale value significantly better than neglected equipment.
At Pixfra, we design our thermal imaging products—like the Draco and Arc LRF models—with durability in mind. But even the toughest gear benefits from smart maintenance practices. Treat your equipment right, and it’ll deliver reliable performance season after season.
Maintaining your thermal monocular isn’t complicated—it just takes consistency. Clean your lenses carefully with the right materials, manage your batteries properly, store in controlled conditions, keep firmware updated, and handle with reasonable care. These habits take minimal time but can literally add years to your device’s lifespan while maintaining peak performance.
Your thermal monocular gives you capabilities in the field that were military-only technology just a few years ago. Return the favor by giving it the basic care it needs. A few minutes of maintenance after each outing beats days without your gear while it’s off getting repaired—or worse, shopping for an expensive replacement.
Start building these habits now. Your future self, glassing heat signatures through pre-dawn darkness with crystal-clear optics, will thank you.
How often should I clean my thermal monocular lens? Clean your lens after each use, especially if you’ve been in dusty or dirty conditions. For light use in clean environments, a quick inspection and cleaning every few outings is fine. Always remove visible dust or fingerprints before your next outing to maintain optimal image quality. Use proper lens cleaning materials—never rough fabrics or household cleaners.
Can I use regular glass cleaner on my thermal monocular? No. Household glass cleaners contain chemicals that can damage the specialized anti-reflective coatings on thermal lenses. These coatings are what make your thermal imaging work properly, and damaging them can cause permanent image degradation. Always use lens cleaning solutions specifically designed for optical instruments, or plain isopropyl alcohol at 90%+ concentration applied to a microfiber cloth.
What’s the best temperature for storing my thermal monocular? Store your device in a cool, dry environment with stable temperatures between 50-70°F if possible. Avoid locations with extreme heat or cold, direct sunlight, or high humidity. If you’re storing for several months, keep the battery at around 50% charge and remove it from the device to prevent potential leakage. Temperature stability matters more than hitting an exact number.
Why does my thermal monocular battery seem to drain faster than it used to? Lithium-ion batteries naturally degrade over time, typically needing replacement after 2-3 years of regular use. Battery drain can also increase if you’re using high brightness settings, maximum refresh rates, or power-hungry features like Wi-Fi and video recording. Try lowering brightness, adjusting settings, and replacing the battery if it’s more than two years old.
How long should a quality thermal monocular last? With proper maintenance, quality thermal monoculars typically last 5-10 years or longer. The microbolometer sensors are rated for thousands of operating hours. The biggest factors affecting longevity are protection from physical impacts, keeping the device dry, proper storage during off-season, and basic maintenance like lens cleaning and battery care. Well-maintained devices often outlast their owners’ need for upgrades.
When you’re shopping for a thermal monocular, you’ll see specs like “640×480 resolution” and “50Hz refresh rate” plastered everywhere. But what do these numbers actually mean for your hunting trips or property scanning? And more importantly, which ones should you care about?
We’ve tested thermal devices in field conditions and talked to users who’ve spent thousands on gear. Here’s what you need to know about resolution and Hertz before making that investment.
Here’s where it gets tricky. Your thermal monocular actually has two different resolutions, and manufacturers sometimes blur the line between them.
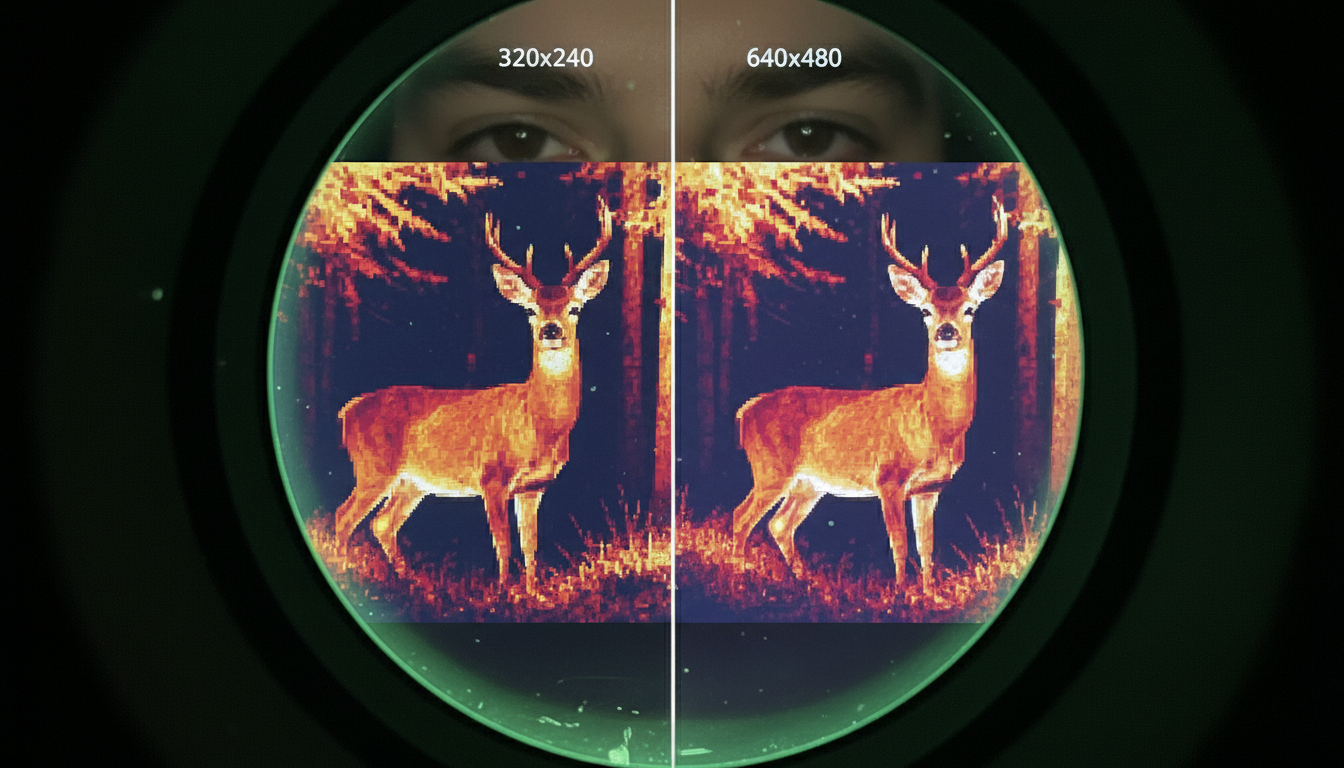
The sensor resolution is what captures heat information. Think of it as the camera itself—common sizes are 256×192, 384×288, or 640×480 pixels. A 384×288 sensor has 110,592 individual pixels detecting temperature differences in front of you.
The display resolution is the screen you look through. This number is often higher than the sensor resolution. You might see a monocular with a 384×288 sensor but a 1280×960 display. That doesn’t mean you’re getting more thermal information—it just means the display is upscaling what the sensor captures.
Your image quality is limited by the sensor, not the display. A high-resolution screen won’t fix a low-resolution sensor, but it can make the thermal image sharper and easier on your eyes during long scanning sessions.
Budget devices with 256×192 sensors work fine for close-range scanning under 300 yards. We’ve used them on smaller properties where most activity happens within that range.
For properties over 100 acres, we recommend at least 384×288 resolution. This gives you clear recognition to 400-500 yards and handles most hunting scenarios. You’ll see enough detail to identify species and count animals.
If you’re scanning open terrain beyond 500 yards regularly, 640×480 resolution delivers better identification capability. Models like the Draco and Arc LRF from Pixfra offer reliable scanning at this level without jumping to premium pricing.
High-end 1280×1024 sensors provide exceptional detail even at full zoom, but they come with premium price tags. Unless you’re working at extreme distances or need professional-grade performance, you’ll get solid results from the mid-range options.

Hertz (Hz) tells you how many times per second your thermal monocular updates the image. A 30Hz device refreshes 30 times per second, while a 60Hz model does it twice as fast.
Standard thermal monoculars run at 30Hz or 50Hz. For most scanning work, 30Hz feels smooth enough. You can track moving deer, scan for hogs, and navigate terrain without noticeable lag.
Higher refresh rates like 50Hz or 60Hz provide smoother images when you’re moving fast or tracking quick targets. The difference becomes obvious when you’re panning across open fields or following running animals. Your eye picks up less blur and you can make faster identification decisions.
Low-end devices sometimes use 9Hz refresh rates to meet export regulations or cut costs. These create choppy images that make scanning frustrating. Movement appears stuttered, and you’ll struggle to track anything that’s not standing still.
Resolution and refresh rate affect different aspects of your thermal image. Resolution determines detail and clarity—how well you can identify what you’re seeing. Refresh rate affects smoothness and motion tracking—how well you follow moving targets.
A 384×288 sensor at 50Hz gives you decent detail with smooth motion tracking. That combination handles most hunting and property management tasks. You get clear thermal signatures without the choppy feel of low refresh rates.
A 640×480 sensor at 30Hz flips the priority. You see more detail in each frame but might notice slight motion blur when panning quickly. For stationary observation or methodical scanning, this works well.
The sweet spot for active scanning? Combine at least 384×288 resolution with 50Hz refresh. Products like the Sirius HD offer this balance, letting you cover ground quickly while maintaining image quality.
Pixel pitch measures the distance between sensor pixels, listed in micrometers (µm). You’ll typically see 12µm or 17µm ratings.
Smaller pixel pitch (12µm) packs pixels tighter together, creating sharper images at longer distances. This helps when you need to spot small targets far away. But here’s the catch—tighter spacing means each pixel collects less heat information per measurement.
Larger pixel pitch (17µm) captures more thermal data per pixel, which improves performance in challenging weather conditions like fog or rain. You’ll see better contrast when everything’s close to the same temperature.
If you hunt in varied conditions and different distances, 17µm with good thermal sensitivity often outperforms 12µm sensors. The extra thermal information helps more than the slight resolution advantage in real-world use.
256×192 (49,152 pixels): Entry-level units good for 200-300 yards. Works for small properties, close-range wildlife observation, and getting familiar with thermal technology. Budget-friendly but limited zoom capability.
384×288 (110,592 pixels): The middle ground that balances performance and cost. Handles medium-range scanning to 500 yards, provides useful digital zoom, and covers most hunting scenarios. Our Pegasus 2 LRF operates in this range.
640×480 (307,200 pixels): Professional-grade imaging with extended range beyond 800 yards. Three times the pixels of 256×192 means significantly better detail and comfortable digital zooming. Good for large properties and long-range identification.
1280×1024 (1,310,720 pixels): Premium territory with maximum detail even at full zoom. These sensors excel at extreme distances and challenging conditions, but cost reflects their capabilities.
The display type affects your viewing experience as much as pixel count. AMOLED displays provide brighter contrast, more vivid thermal color palettes, and faster response times than standard LCD screens.
Display resolution should match or exceed sensor resolution. A 640×480 sensor paired with a 1920×1080 display gives you sharp, easy-to-read thermal images. The extra display pixels help render overlay graphics like reticles, rangefinder readings, and menu systems clearly.
Higher display resolution also reduces eye strain during extended observation sessions. When you’re scanning for hours, a crisp display makes a real difference in comfort and effectiveness.
We’ve seen people spend thousands on 640×480 sensors with 60Hz refresh rates, then use them for tasks where a 384×288 at 30Hz would work fine. And we’ve seen hunters with budget units struggle because they genuinely needed more capability.
For property scanning under 300 yards, perimeter security, or learning whether thermal works for you, 256×192 at 30Hz handles the job. You’re not missing much by starting here.
Wildlife observation and hunting on properties up to 200 acres benefits from 384×288 resolution at 50Hz. This combination gives you enough detail to identify species and smooth enough motion to track movement patterns. Our IR Torch pairs well with devices in this range for situations requiring illumination alongside thermal detection.
Search and rescue, large property management, or serious hunting applications justify stepping up to 640×480 at 50Hz or higher. You’re covering more ground, working at greater distances, and need reliable performance in challenging conditions.
NETD (Noise Equivalent Temperature Difference) measures how small a temperature difference your sensor can detect. It’s expressed in millikelvins (mK). Lower numbers mean better performance.
A sensor with <25mK NETD sees smaller temperature variations than one rated at 40mK. This matters most in fog, humidity, or when everything’s close to the same temperature—like summer mornings when the ground and animals haven’t separated thermally yet.
NETD affects image quality differently than resolution. High resolution with poor NETD gives you detailed but low-contrast images where everything looks similar. Good NETD with moderate resolution provides clear thermal contrast, making targets pop against backgrounds.
Look for devices that balance both. A 384×288 sensor with <25mK NETD often outperforms a 640×480 sensor with 40mK NETD in real hunting conditions.
You’ll notice some thermal devices are limited to 9Hz refresh rates despite having high-resolution sensors. This relates to export regulations that restrict thermal technology.
Devices with 640×480 or higher resolution combined with refresh rates above 9Hz often face export restrictions. Manufacturers create 9Hz versions to comply with international regulations, making those models available in more markets.
For domestic use in hunting and property management, you want at least 30Hz if possible. The choppy 9Hz image makes tracking difficult and reduces your overall effectiveness. Spend your money on a 30Hz or higher device unless regulations in your area require otherwise.
Entry-level thermal monoculars ($800-$1,500) typically offer 256×192 resolution with 30Hz refresh rates. They work for close-range needs and help you figure out if thermal technology fits your activities.
Mid-range devices ($1,500-$3,500) step up to 384×288 or 640×480 resolution with 50Hz refresh rates. This tier delivers the best value for serious use. You get professional-grade performance without extreme pricing.
Premium monoculars ($3,500+) feature 640×480 or higher resolution, 50-60Hz refresh, integrated laser rangefinders, and advanced image processing. These make sense when your activities depend on equipment performance or you’re covering extreme distances.
Don’t chase maximum detection range numbers that exceed your realistic needs. Focus on recognition range that matches your property size, refresh rate that supports your scanning style, and resolution that provides enough detail for confident identification.
We’ve run thermal monoculars in rain, fog, freezing temperatures, and summer heat. Here’s what actually matters in the field:
Resolution helps most when you need to identify targets at your maximum working distance. If you rarely scan beyond 400 yards, paying premium prices for 1280×1024 sensors doesn’t improve your results.
Refresh rate becomes obvious when you’re actively moving. Stationary observation works fine at 30Hz. Active scanning, vehicle-mounted use, or tracking fast animals benefits noticeably from 50Hz or higher.
Thermal sensitivity (NETD) affects every scan you make. Good NETD performs in varied weather and lighting conditions. Poor NETD only works well in ideal thermal contrast situations.
Resolution and Hertz work together to define your thermal monocular’s performance. Resolution determines how much detail you see, while Hertz controls how smoothly you see it.
For most hunters and property managers, 384×288 resolution at 50Hz provides the sweet spot between performance and cost. This combination delivers clear identification to 500 yards with smooth motion tracking.
Budget-conscious users can start with 256×192 at 30Hz for close-range work. Those needing extreme performance should look at 640×480 at 50Hz or higher, but expect to pay significantly more.
Match your specs to your actual use case, not marketing hype. The right thermal monocular enhances how you work in the field—it’s about practical performance, not impressive spec sheets.
What’s more important in a thermal monocular: resolution or refresh rate?
Both matter, but for different reasons. Resolution affects detail and identification range—how clearly you see targets. Refresh rate affects motion smoothness and tracking capability. For stationary observation, prioritize resolution. For active scanning or moving platforms, refresh rate becomes equally important. Most users benefit from balancing both with at least 384×288 resolution at 50Hz.
Can a high display resolution make up for a low sensor resolution?
No. The display only shows what the sensor captures. A 256×192 sensor displayed on a 1920×1080 screen still provides 256×192 worth of thermal information. The high-res display makes the image sharper and easier to view, but it can’t create thermal detail that the sensor didn’t capture. Always check sensor resolution first.
Why do some thermal monoculars have 9Hz refresh rates?
Export regulations restrict high-performance thermal technology. Devices with 640×480 or higher resolution combined with refresh rates above 9Hz face export limitations. Manufacturers create 9Hz versions to comply with international regulations. For domestic hunting and scanning, avoid 9Hz if possible—the choppy image makes tracking difficult.
How much resolution do I need for hunting at 300-500 yards?
For consistent identification at 300-500 yards, we recommend at least 384×288 resolution. This provides enough pixels to distinguish species, count animals, and judge size. Budget 256×192 sensors struggle beyond 300 yards. If you regularly work at the 500-yard end, consider stepping up to 640×480 for better detail and comfortable digital zooming.
Does higher resolution always mean better thermal images?
Not necessarily. Resolution combines with other factors like thermal sensitivity (NETD), pixel pitch, and lens quality to create your final image. A 384×288 sensor with excellent NETD and good optics can outperform a 640×480 sensor with poor thermal sensitivity in challenging conditions like fog or low-contrast environments. Look at the complete package, not just resolution numbers.

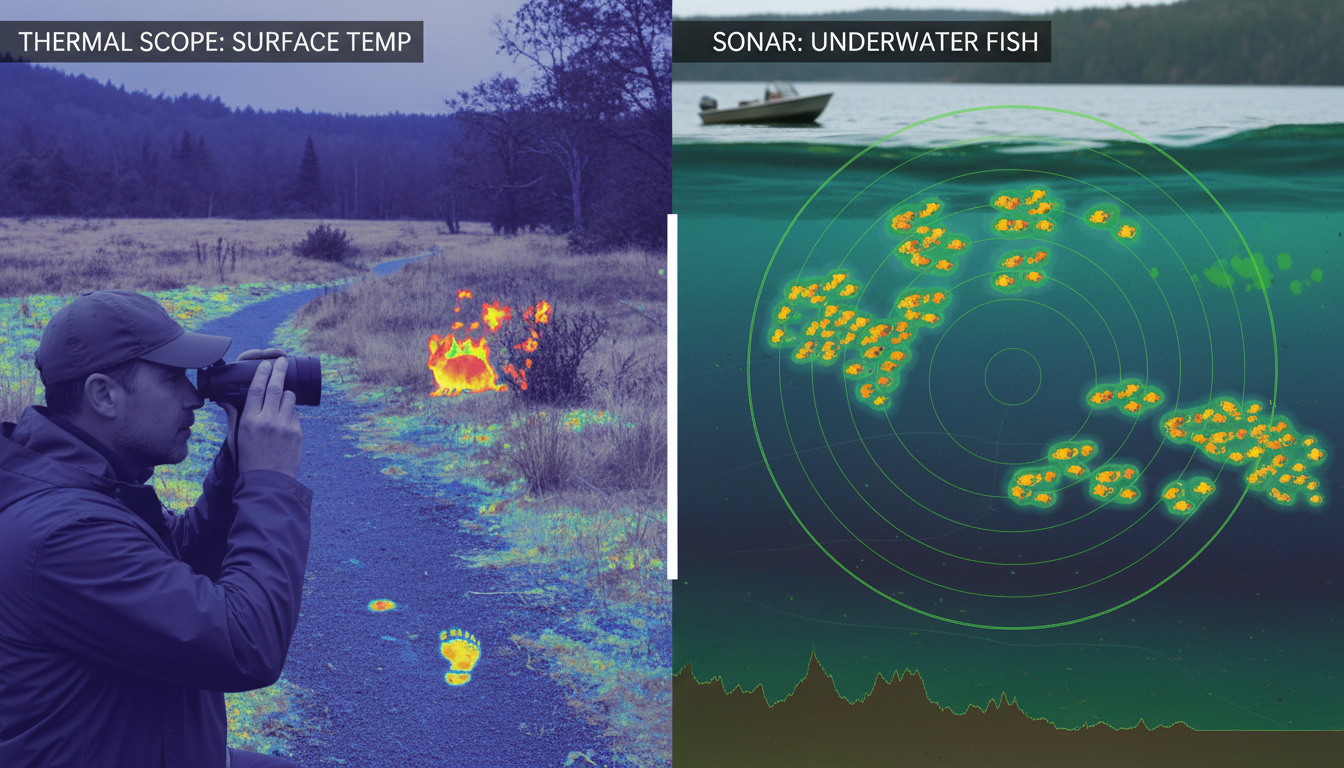
You’ve probably heard anglers talking about thermal scopes and wondered if they’re the secret weapon for finding fish. The short answer? Not quite the way you’d think. Fish are cold-blooded creatures whose temperature is not constant and depends on the water temperature, which makes them really hard to spot with thermal technology. But that doesn’t mean thermal scopes are useless for fishing—you just need to know what they can and can’t do.
We’re going to walk you through how thermal imaging actually works around water, why you won’t see fish swimming below the surface, and the surprising ways thermal scopes can still help you catch more fish. If you’re interested in exploring different thermal imaging options, check out our range of outdoor thermal devices designed for various applications.
Here’s the deal: water absorbs infrared radiation, which reduces the effectiveness of thermal imaging, and infrared radiation does not penetrate water well. Think of water as a thick blanket that blocks the heat signatures thermal scopes need to create an image.
But there’s another problem. A thermal imaging camera displays a contrasting temperature background of the objects you are observing, and it will not show fish with the same body temperature as the water. Most fish sit at roughly the same temperature as their surroundings, so even if the infrared radiation could get through the water (which it can’t), there’d be almost no temperature difference to detect.
The primary limitation of thermal imaging underwater is the poor penetration of infrared radiation, and thermal cameras are limited to detecting heat on or very near the surface. Sound familiar if you’ve ever tried using one near a lake or river? That’s why.
Before you write off thermal imaging for fishing completely, there’s good news. Schools of fish change the characteristics of the water’s surface, and that’s what you can see with thermal imaging. When fish are active near the surface—feeding, breaking, or moving in large schools—they create tiny temperature changes and disturbances that show up on a thermal scope.
Thermal-imaging cameras are sensitive enough to see temperature breaks — areas that tend to attract schools of baitfish and predators, as long as the water temperature changes rapidly within a few meters. This works particularly well in saltwater where you’re looking for temperature gradients offshore, or at night when you’re trying to spot baitfish dimpling the surface.
For those serious about nighttime observation and fishing applications, our Pegasus 2 LRF offers long-range detection capabilities that work well in low-light marine conditions.
Thermal cameras can register a temperature anomaly as small as a tenth of a degree, and that difference becomes more pronounced offshore when the camera’s field of view fills with mostly water and sky. This is where thermal imaging really shines for fishing.
You can spot weed lines, kelp paddies, and floating debris that hold fish—even in complete darkness. These objects absorb heat differently than open water, making them stand out like beacons on your thermal display. Anglers say they’ve hooked tuna after finding breaking fish before daylight by using a thermal-imaging camera, and can spot schools of baitfish dimpling the surface in the dark.
While infrared radiation is absorbed by water, it is possible to detect temperature differences on the water’s surface, and fish swimming close to the surface can create disturbances and thermal anomalies. Look, it’s not x-ray vision, but it beats staring into pitch darkness hoping to stumble onto fish.
Honestly, thermal imaging does way more for fishing safety and navigation than direct fish finding. Thermal cameras cannot see through water, but they’re still the best tool for professional and recreational marine use when you need to see in total darkness.
Infrared thermal imaging cameras can reliably deliver clear thermal images even in extremely low-visibility conditions such as nighttime, heavy fog, rain, or snow, and provide all-weather identification of key targets including other vessels, buoys, shorelines, and floating debris. You’ll avoid hitting debris, spot other boats, and navigate safely—which matters more than finding fish when you’re miles offshore in the dark.
During winter fishing, thermal imaging can identify weak spots in ice, cracks, and thin areas that could be dangerous. It’s a safety tool first, fishing aid second. Our thermal monocular technology article explains more about how these devices work if you’re curious about the technical side.
Sonar technology, which uses sound waves to detect objects underwater, is widely used for fish finding and can penetrate water effectively and provide detailed information about the location, size, and movement of fish schools. If you want to see what’s actually below your boat, sonar is your answer—not thermal.
Underwater cameras, often coupled with lighting systems, can capture visual images of fish and other marine life and are commonly used in marine biology, underwater research, and recreational diving. These give you actual video of what’s down there, which is pretty cool if you’re trying to figure out what fish are doing around your bait.
Thermal scopes work great for spotting surface activity and navigating at night, but they’re not replacements for traditional fish finders. Use them together and you’ll have a much better setup than relying on just one technology.
So can you see fish with a thermal scope? Not underwater—physics just doesn’t work that way. Water blocks infrared radiation and fish match the water temperature too closely to show up as heat signatures. But thermal scopes aren’t worthless for fishing. They’ll help you spot surface activity, temperature breaks, floating structure, and navigate safely in conditions where regular vision fails.
The best approach? Use thermal imaging for what it does well—surface observation, safety, and navigation—and stick with sonar for finding fish below the surface. Thermal technology has its place in your fishing toolkit, just not as an underwater fish camera. If you’re ready to explore thermal imaging for your outdoor adventures, visit our main product page to see our full lineup of thermal devices.
Can thermal scopes see through water to detect fish?
No, thermal scopes cannot see through water. Water absorbs infrared radiation that thermal imaging relies on, blocking heat signatures from penetrating more than a few millimeters below the surface. Fish swimming underwater remain invisible to thermal technology.
What can thermal imaging actually help with when fishing?
Thermal imaging excels at detecting surface activity like baitfish schools dimpling the water, temperature breaks that attract fish, weed lines, floating debris, and other surface features. It’s also excellent for safe navigation in darkness, fog, or low-visibility conditions on the water.
Why don’t fish show up on thermal cameras?
Fish are cold-blooded animals that maintain body temperatures nearly identical to the surrounding water. Thermal cameras detect temperature differences, and since fish don’t create enough contrast against the water temperature, they remain undetectable even if water penetration wasn’t an issue.
Is thermal imaging or sonar better for finding fish?
Sonar is better for directly locating fish underwater. It uses sound waves that penetrate water effectively and can show exact fish locations, depths, and school sizes. Thermal imaging works best for surface observation and navigation, while sonar handles underwater detection.
Can you see fish breaking the surface with a thermal scope at night?
Yes, you can detect fish activity at the surface with thermal imaging. When fish break the surface, create disturbances, or move in schools near the top, they change the water surface characteristics enough to show up as thermal patterns—particularly useful for spotting feeding activity before dawn.
If you’ve been looking into thermal monoculars for hunting, wildlife observation, or outdoor activities, you’ve probably wondered about the connection between thermal technology and infrared. The short answer? Yes, a thermal monocular is absolutely an infrared device—but there’s more to the story. Let’s break down how these technologies relate and why it matters for your next adventure.
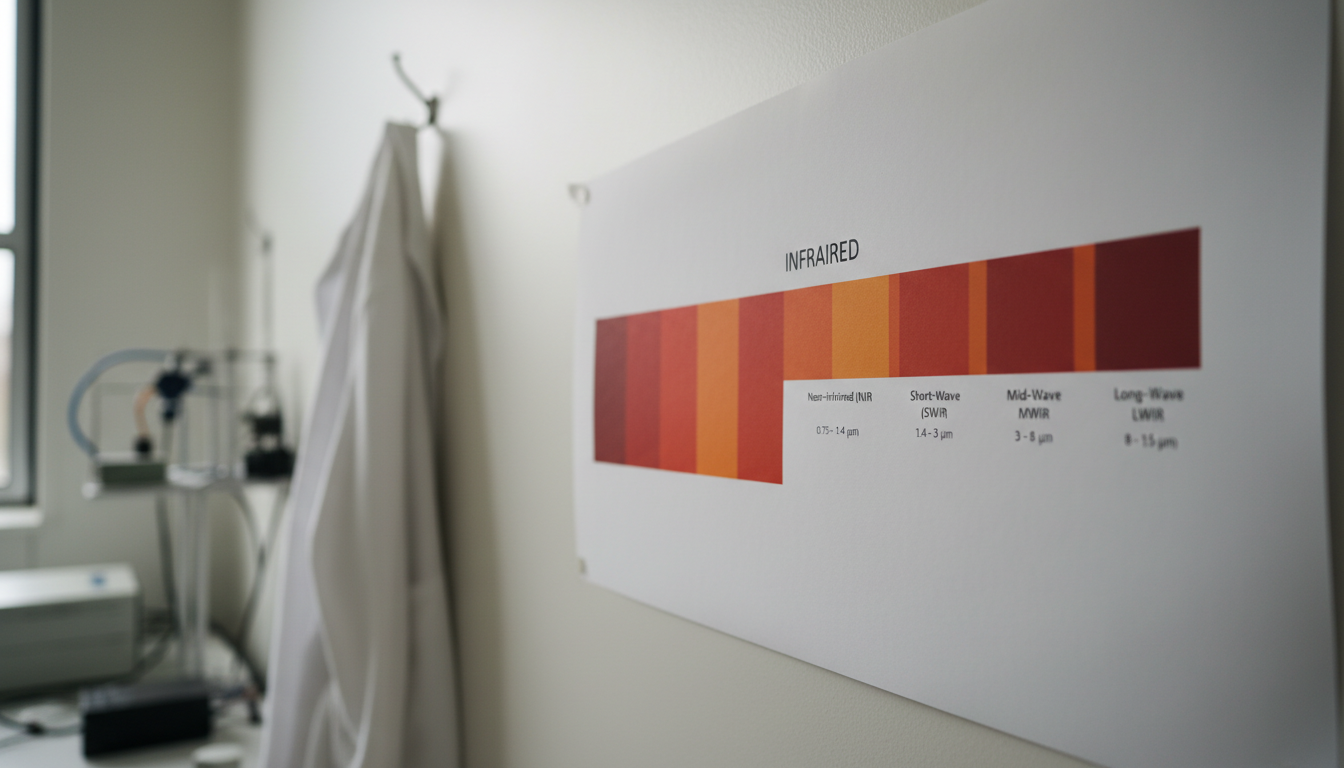
Infrared radiation sits between visible light and microwaves on the electromagnetic spectrum, with wavelengths ranging from around 780 nanometers to 1 millimeter. But here’s the thing: infrared isn’t just one thing. The infrared spectrum includes multiple sub-bands: near-infrared (NIR) from 0.7-1.4 μm, short-wavelength infrared (SWIR) from 1.4-3 μm, mid-wavelength infrared (MWIR) from 3-8 μm, and long-wavelength infrared (LWIR) from 8-15 μm.
Think of it like radio stations—they’re all radio waves, but each frequency gives you different content. Same deal with infrared wavelengths. Each band has different properties and applications, which is why understanding where thermal imaging fits in matters.
A thermal monocular is an infrared device that operates by detecting infrared radiation (heat) from objects and then translating those differences into visual images. Thermal cameras most commonly operate in the long-wave infrared (LWIR) range (7–14 μm), with some systems designed for the mid-wave infrared (MWIR) range (3–5 μm).
We love thermal monoculars at Pixfra because they work differently than your eyes or regular cameras. All objects emit infrared radiation (heat), which is invisible to the naked eye, and the amount of infrared radiation emitted by an object increases with its temperature. Thermal vision monoculars work by detecting and capturing infrared light, which is not visible to the human eye but can be felt as heat.
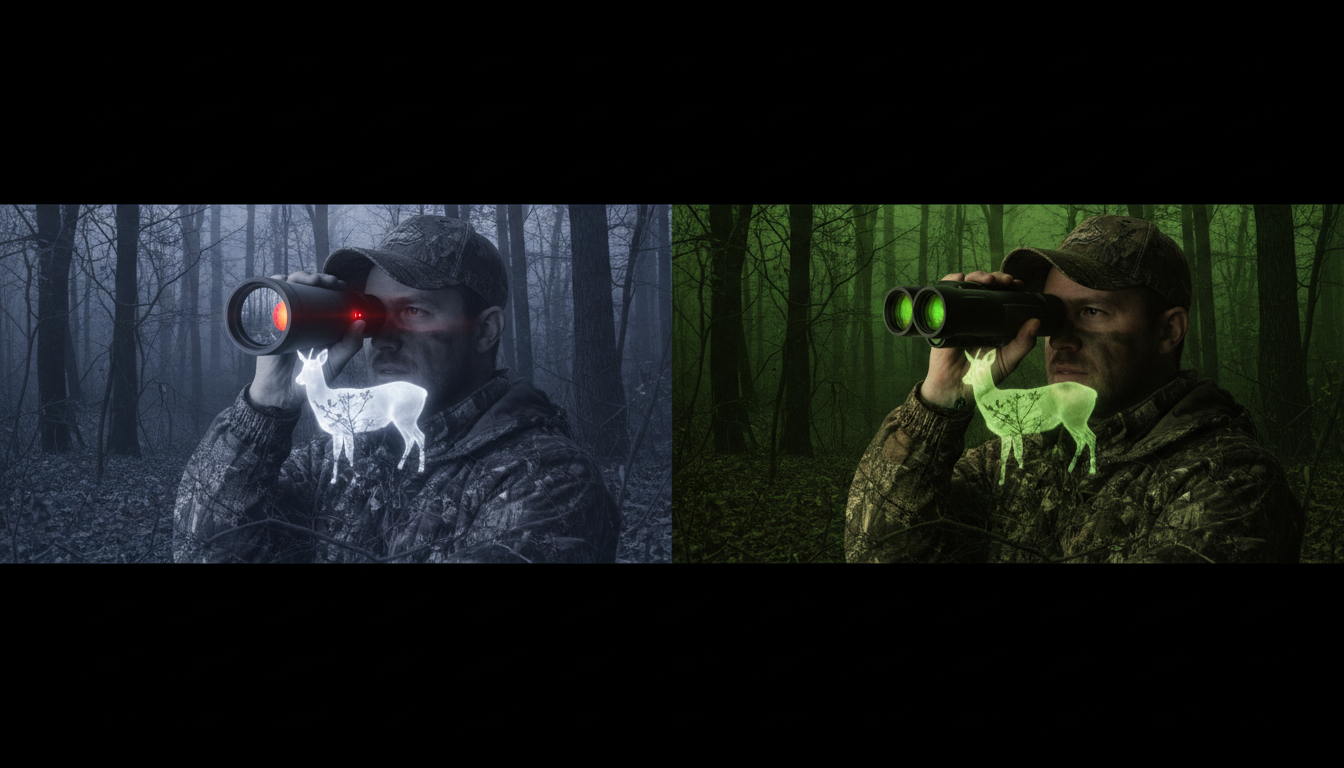
Here’s where things get interesting. Not all infrared devices are the same. Infrared imaging uses heat to produce images, while conventional night vision uses light. Traditional night vision devices amplify near-infrared light (around 0.85 micrometers), giving you that classic green-tinted image. They need some ambient light to work.
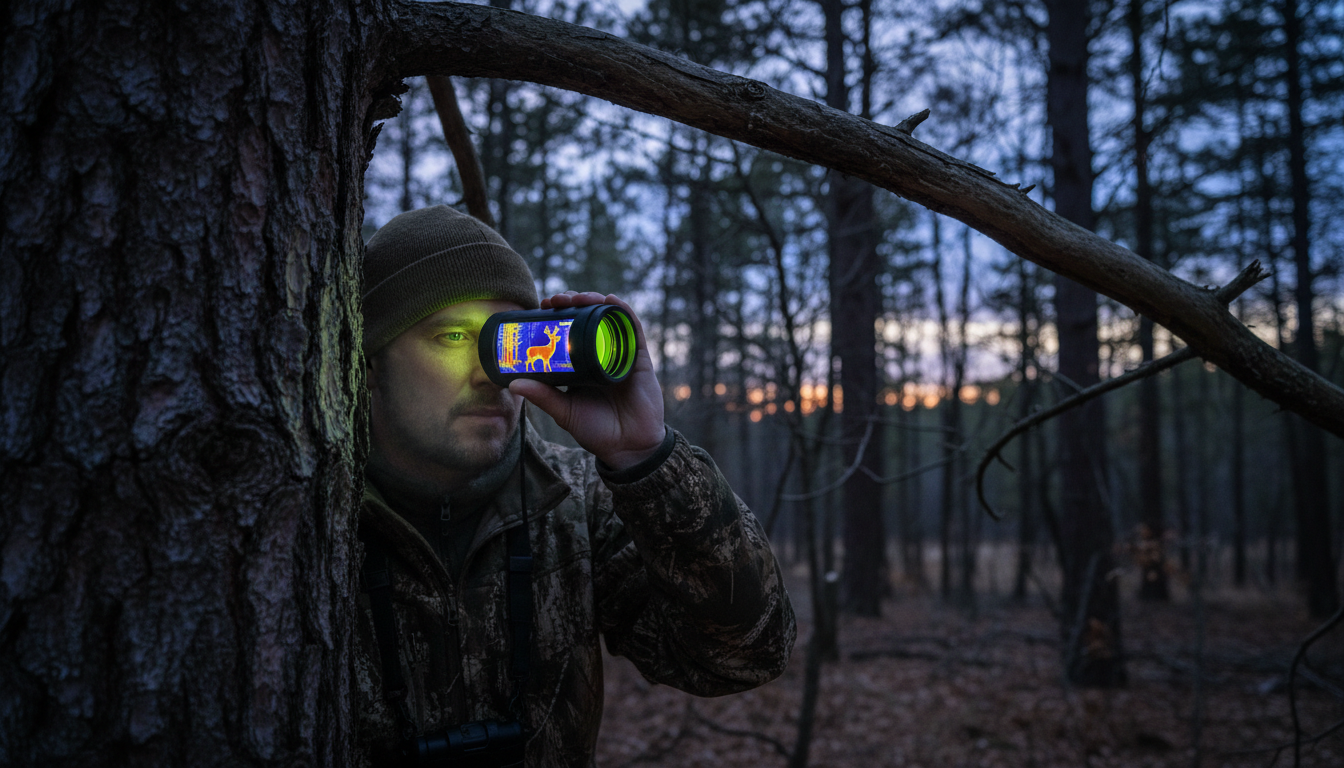
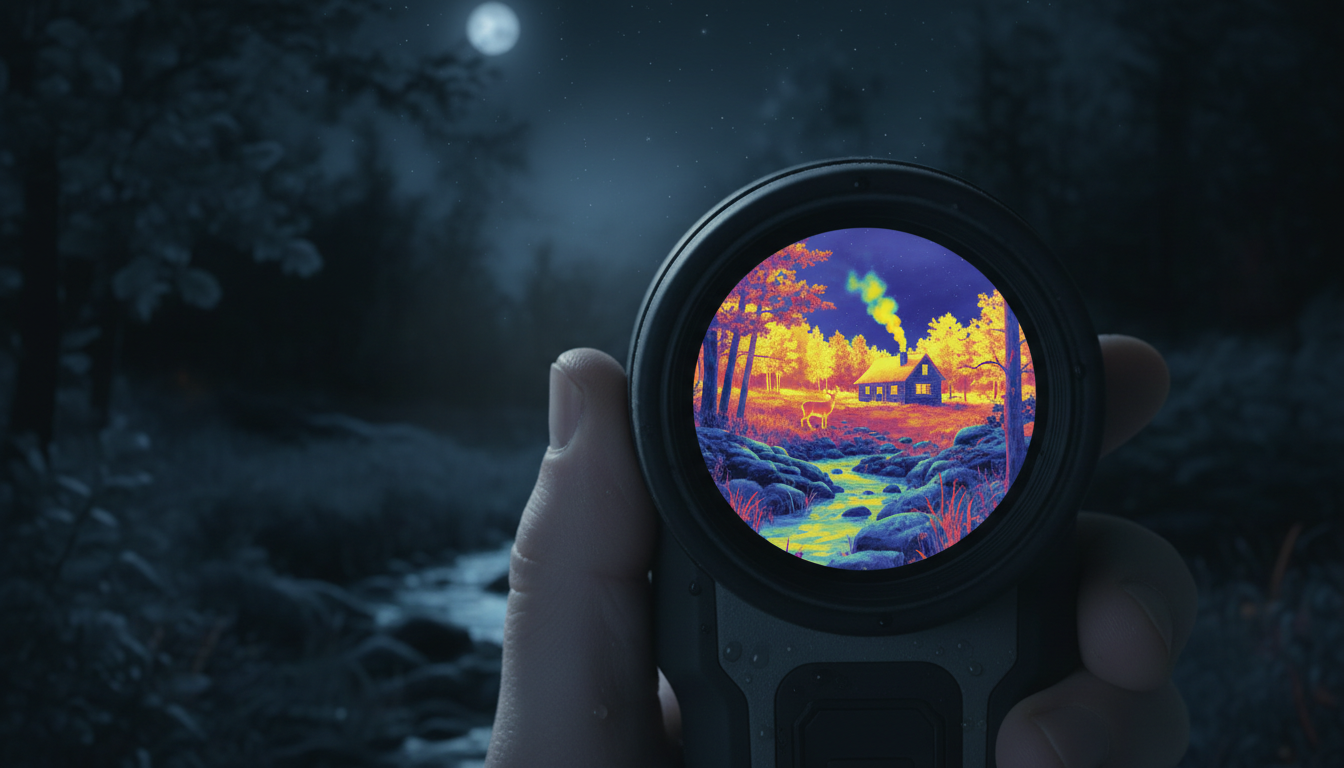
Thermal monoculars? They’re playing a completely different game. Thermal imaging monoculars do not require any ambient light to function effectively, as they detect temperature differences instead, allowing them to create images based on heat signatures emitted by objects. This means our thermal imaging devices work in total darkness, through fog, and even light vegetation.
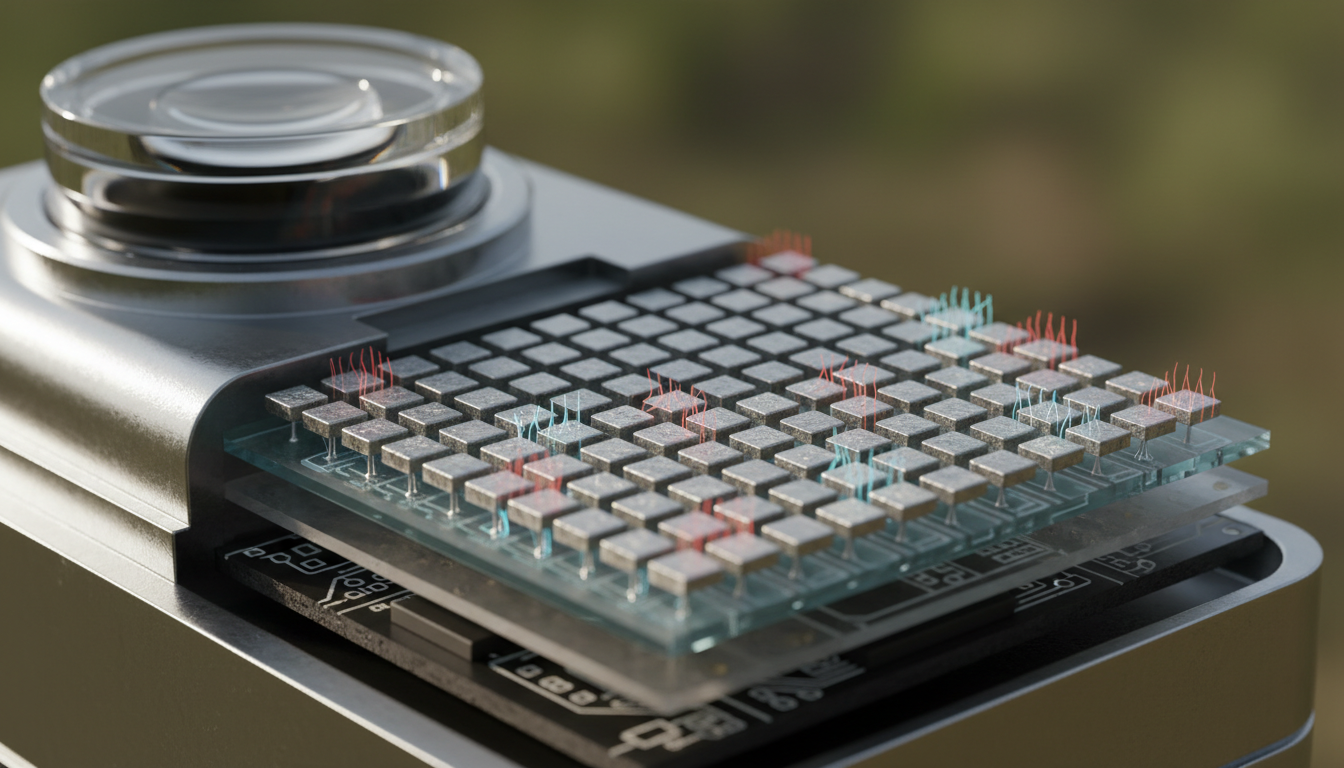
At the core of a modern thermal scope’s ability to detect infrared radiation is the microbolometer sensor technology, which consists of arrays of microscopic detector elements made from materials (typically vanadium oxide or amorphous silicon) that change electrical resistance when exposed to infrared radiation, and these minute resistance changes are measured, processed, and converted into a visible thermal image.
The Pixfra Sirius HD and other premium thermal devices use advanced sensors that can detect temperature differences as small as 18 millikelvin. That’s incredibly sensitive—we’re talking about spotting the faintest heat signatures at serious distances.
Most thermal monoculars operate in the Long Wave Infrared (LWIR) spectrum from 8-14 micrometers, which is optimal for detecting body heat and general thermal signatures. This wavelength range has a practical advantage: Earth’s surface materials (like soil, water, and vegetation) emit radiation in the LWIR region at their ambient temperature.
What does this mean for you? Whether you’re scanning for deer with the Pegasus 2 LRF or checking your property line at night, your thermal monocular is tuned to the exact wavelength that living creatures and warm objects naturally emit. It’s not about artificial illumination—it’s about reading the thermal signature of your environment.
Infrared is the radiation type, while thermal imaging is the visualization technique. So when someone asks if thermal is infrared, the answer is yes—but it’s a specific application of infrared technology. The terms thermal imaging camera and infrared camera are often used interchangeably, as thermal imaging sensors detect infrared radiation and then express each heat value (or wavelength) through a set of corresponding colors that is viewable on a screen.
All thermal monoculars are infrared devices, but not all infrared devices are thermal. Night vision goggles use near-infrared. Remote controls use near-infrared. But thermal monoculars specifically use the mid- to long-wave infrared bands where heat signatures live. That’s the key distinction that makes products like the Draco and Arc LRF so effective for outdoor applications.
Understanding that thermal monoculars operate in the infrared spectrum helps explain why they excel in specific situations. Thermal imaging technology allows you to see what the human eye cannot by detecting the heat energy emitted by objects, creating a clear picture even in total darkness, dense fog, or heavy vegetation.
We’ve seen hunters use thermal monoculars to spot game that’s completely hidden in brush. Law enforcement uses them for search and rescue in zero-visibility conditions. Firefighters rely on them to see through smoke. All of this works because these devices tap into the long-wave infrared spectrum—the part of the electromagnetic spectrum where thermal energy lives.
So, is a thermal monocular considered infrared? Absolutely. Thermal monoculars are specialized infrared devices that operate in the LWIR spectrum (8-14 micrometers), detecting heat rather than reflected light. This makes them fundamentally different from night vision devices, which use near-infrared amplification. Understanding this distinction helps you appreciate why thermal technology works in conditions where nothing else will—complete darkness, fog, smoke, and camouflage mean nothing when you’re detecting infrared heat signatures. Whether you’re hunting, conducting security patrols, or exploring the outdoors, thermal monoculars give you access to an invisible world of thermal energy that regular optics simply can’t see.
Can thermal monoculars detect all types of infrared radiation?
No, thermal monoculars are specifically designed to detect mid-wave and long-wave infrared radiation (typically 8-14 micrometers). They cannot detect near-infrared radiation used by night vision devices or the infrared signals from TV remotes. Each infrared device is tuned to specific wavelength bands based on its intended purpose.
Do thermal monoculars work better than night vision devices?
It depends on your needs. Thermal monoculars excel at detecting heat signatures in total darkness, fog, and smoke without any light source. Night vision provides more detailed images with better facial recognition but requires some ambient light. Many professionals use both technologies for different situations. Thermal is better for detection and scanning, while night vision offers clearer identification.
Why do thermal monoculars show different colors if they detect infrared?
The colors you see on a thermal display are artificial—they’re created by the device’s processor to help your brain interpret temperature differences. Hotter objects appear in brighter colors (often white or red), while cooler objects show up in darker tones (black or blue). These color palettes make it easier to spot heat signatures quickly compared to viewing raw infrared data.
Can thermal monoculars see through walls?
No, thermal monoculars cannot see through walls like in movies. Walls are thick and insulated, blocking infrared radiation from passing through. What thermal devices can detect is heat on the surface of walls—for example, if there’s a fire or hot water pipe inside, you might see a warm spot on the wall’s surface, but you’re not seeing through the wall itself.
Does weather affect thermal monocular performance?
Thermal monoculars handle most weather conditions better than conventional optics. They work well in fog, light rain, and darkness. However, heavy rain can reduce detection range because water droplets can scatter infrared radiation. Extreme cold or heat can also affect performance by reducing temperature contrast between objects and their surroundings. Still, they outperform regular optics in nearly all low-visibility conditions.
Temperature plays a surprisingly complex role in thermal imaging performance. If you’ve ever wondered why your thermal device produces sharper images in certain conditions than others, you’re not alone. The relationship between temperature and image sharpness in thermal devices involves multiple factors—from how the detector itself responds to heat, to the temperature differences in the scene you’re viewing.
We’ll break down exactly how temperature influences what you see through your thermal imager, and what you can do to get the clearest results possible.

A thermal camera’s sensitivity will directly impact the image clarity and sharpness that the camera can produce. The detector inside your thermal device has a specification called NETD (Noise Equivalent Temperature Difference), measured in milliKelvins (mK). The lower the number, the more sensitive the detector. Thermal sensitivity describes the smallest temperature difference observed when using a thermal device.
Better sensitivity translates to sharper images, especially when you’re scanning scenes with subtle temperature variations. Increased sensitivity makes thermal imagers more effective at seeing smaller temperature differences, which is especially important in scenes with low thermal contrast and when operating in challenging environmental conditions like fog, smoke, and dust. Think of it like this—a device with 50 mK sensitivity can pick up temperature changes half the size of one rated at 100 mK.
For outdoor activities like hunting or surveillance, we recommend devices with NETD below 40 mK. Our thermal imaging products are designed to deliver sharp, detailed imagery even in challenging conditions.
The surrounding temperature also influences the actual temperature of the measured target, which in turn affects measurement accuracy. In high-temperature environments, the target may heat up, causing readings to appear higher than the real value. Conversely, in low-temperature environments, the measured value may be underestimated.
Ambient temperature doesn’t just affect accuracy—it impacts how your detector performs. The stability of the detector response with the ambient temperature was studied showing that some cameras present a stable response with a negligible dependence on room temperature. Conversely, lower-end models exhibited errors up to 4 °C and 15 °C, respectively. The detector itself needs to maintain stable operating conditions, and extreme ambient temperatures can introduce noise or drift in the readings.
Modern thermal devices include temperature compensation mechanisms to address these issues. But understanding that your device works best within its specified operating range helps you plan better for field use. Weather conditions matter more than most people think—weather affects thermal imaging in ways beyond just visibility.
Every thermal device has a specified operating temperature range, typically from -20°C to 50°C for consumer models. Operating outside this range doesn’t just risk damage—it degrades performance. Temperature variations in the optics or objects near the sensor, including the camera case, modify the level and distribution of unwanted irradiation in the focal plane, and temperature variations in the focal plane array influence its responsivity.
When you’re using thermal gear in extreme cold or heat, give your device time to acclimate. Rapid temperature swings force the internal calibration system to work harder, which can temporarily reduce image quality. Some higher-end units like the Sirius HD include advanced thermal stabilization to maintain consistent performance across wider temperature ranges.
The detector’s own temperature matters too. A cooled thermal imaging camera has an imaging sensor that is integrated with a cryocooler, which lowers the sensor temperature to cryogenic temperatures. This reduction in sensor temperature is necessary to reduce thermally-induced noise to a level below that of the signal from the scene being imaged. Most consumer devices use uncooled detectors, which are lighter and more affordable but require proper thermal management for optimal sharpness.
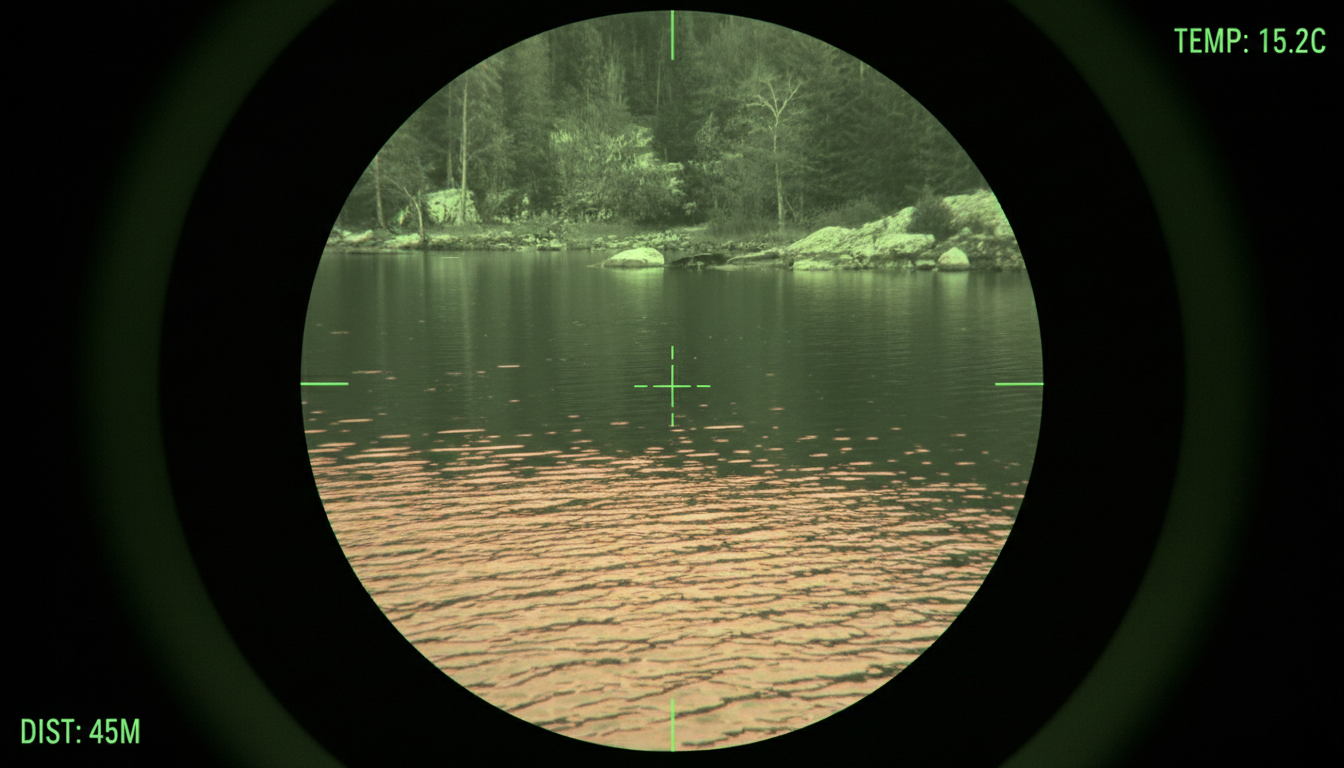
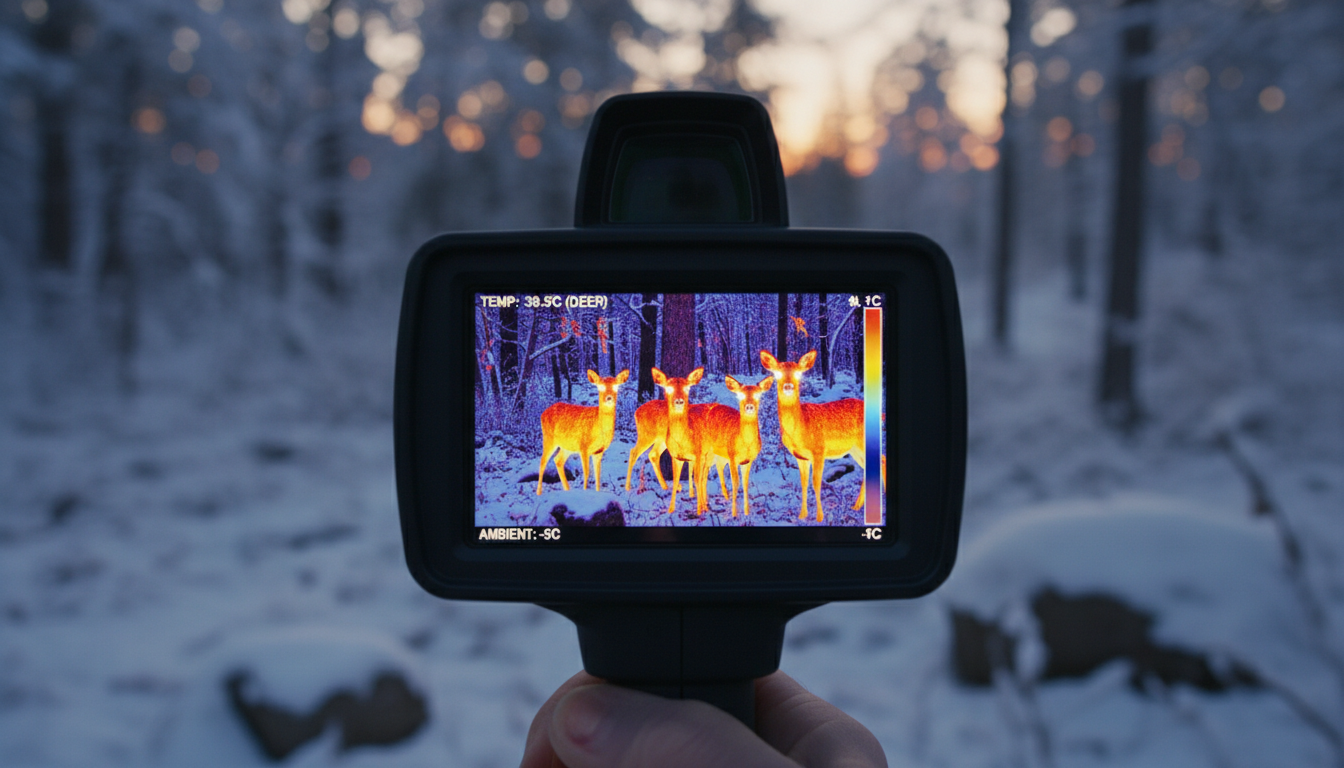
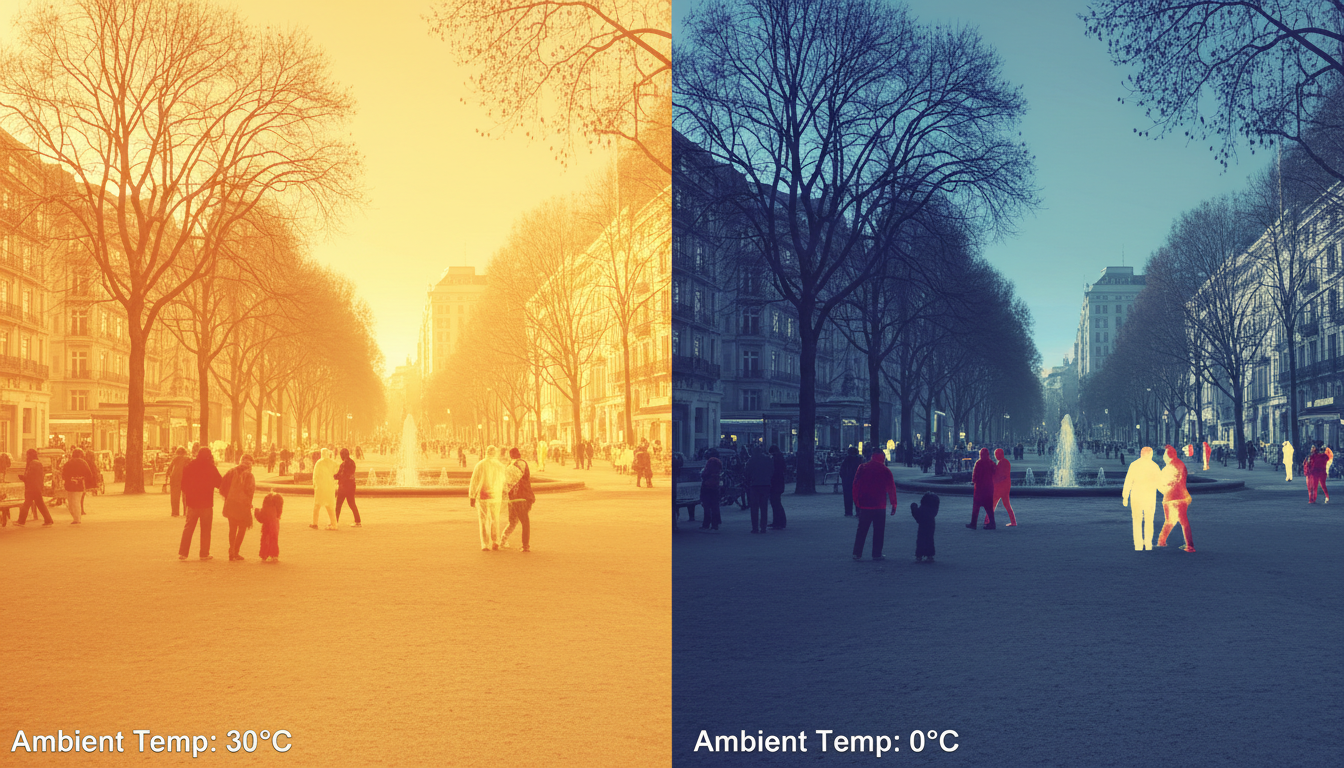
The greater the temperature difference between an object and its surroundings, the clearer the thermal images will be. This is where temperature’s impact on sharpness becomes most obvious. If you’re trying to spot wildlife on a cold morning, the thermal contrast between a warm-blooded animal and the cold background creates a sharp, clear image. But on a hot summer afternoon when ambient temperatures approach body temperature, that contrast drops—and so does apparent sharpness.
Low thermal contrast applications include building diagnosis where the camera is imaging interior walls with very little temperature variations and issues like moisture can only be visualized by increasing the contrast to the point where the cameras thermal sensitivity limits the useful temperature span settings. When thermal contrast is low, even minor temperature differences in your environment or detector can introduce noise that masks fine details.
You can work around low-contrast situations by adjusting your device’s temperature span settings. Narrowing the temperature range displayed increases apparent contrast, but this only works if your detector has good sensitivity to begin with. Devices with better NETD ratings handle low-contrast scenarios more gracefully.
Getting sharp thermal images isn’t just about buying the best gear—it’s about using it right. The focus position directly affects image clarity and measurement accuracy. The thermal camera’s focus can be adjusted manually or electronically to ensure that the target is sharply visible. Many operators overlook focus, assuming thermal devices are always in focus. They’re not.
Here are practical steps we recommend:
Let your device stabilize. After powering on or moving between temperature zones, wait 2-3 minutes for internal calibration to complete.
Check your focus. Don’t assume autofocus got it right, especially at longer ranges. Manual focus often produces sharper results.
Adjust your temperature span. Match the displayed temperature range to your scene. Too wide a range and you lose detail; too narrow and you might miss targets.
Consider environmental parameters. Accurate measurement depends on correctly setting key parameters such as emissivity, reflected temperature, target distance, atmospheric transmittance, and ambient temperature. While these primarily affect temperature measurement accuracy, they also influence image processing.
Products like the Pegasus 2 LRF and Draco incorporate sophisticated algorithms that automatically adjust for many of these variables, helping you maintain sharp imagery across changing conditions.
Temperature affects thermal imaging sharpness in multiple ways: through detector sensitivity (NETD), ambient temperature effects on detector stability, the device’s operating temperature range, and most visibly, through thermal contrast in the scene itself. Understanding these relationships helps you choose the right equipment and use it more effectively.
The best thermal images come from devices with low NETD values (good sensitivity), operated within their specified temperature ranges, on scenes with adequate thermal contrast. When conditions aren’t ideal, proper focus, span adjustment, and allowing time for thermal stabilization can make the difference between a usable image and a blurry mess.
If you want to explore how different conditions impact thermal performance, check out our article on privacy risks with thermal imaging devices.
What is NETD and why does it matter for sharpness?
NETD (Noise Equivalent Temperature Difference) measures the smallest temperature difference a thermal detector can distinguish, expressed in milliKelvins. Lower NETD means better sensitivity, which directly translates to sharper images with more detail, especially in low-contrast scenes. A device with 40 mK NETD will produce noticeably sharper images than one rated at 100 mK when viewing scenes with subtle temperature variations.
Can cold weather damage my thermal device or reduce sharpness?
Operating within the manufacturer’s specified temperature range (typically -20°C to 50°C) won’t damage your device, but extreme cold can temporarily affect sharpness until the device stabilizes. Cold weather can cause detector drift and affect optics. Give your thermal device 2-3 minutes to acclimate after powering on in very cold conditions for optimal image quality.
Why do my thermal images look blurry on hot days?
On hot days, the temperature difference between your target and background decreases, reducing thermal contrast. This makes edges appear less sharp even though your detector is working fine. It’s not actually blurriness—it’s low contrast. You can improve this by narrowing your temperature span setting to focus on the specific temperature range of your target.
Does ambient temperature affect all thermal devices equally?
No. Higher-quality thermal devices include better temperature compensation and stabilization mechanisms. Budget models can show temperature drift of 4-15°C as ambient temperature changes, while professional-grade devices maintain stable performance. The detector material, thermal management design, and built-in calibration systems all affect how ambient temperature impacts image quality.
How often should I calibrate my thermal device for temperature changes?
Most modern thermal devices perform automatic calibration (often called NUC – Non-Uniformity Correction) periodically or when the device detects significant temperature changes. You’ll sometimes hear a shutter click—that’s the calibration happening. Manual calibration is rarely needed, but if you move between drastically different temperatures (like from a heated vehicle to freezing outdoors), manually triggering calibration can restore optimal sharpness faster.
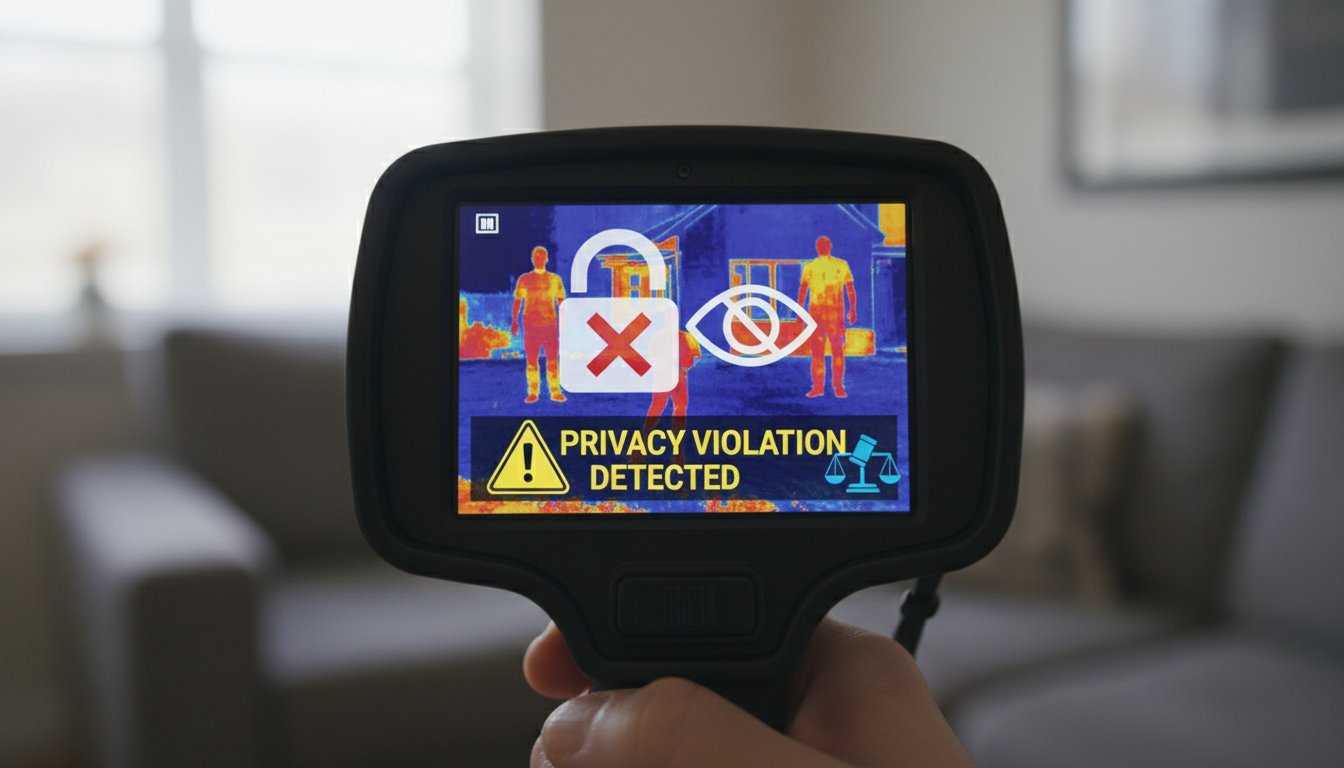
Thermal imaging devices have become more accessible than ever. They’re used for everything from hunting to home inspections. But as these cameras get cheaper and easier to buy, we’re facing a real question: can they be misused?
The short answer is yes. While thermal cameras serve legitimate purposes, they also open the door to privacy violations, neighbor disputes, and questionable surveillance practices. We’ve seen cases of people worried about neighbors watching them through walls, law enforcement pushing legal boundaries, and companies selling fever-detection cameras that don’t actually work as promised.
Let’s look at how thermal imaging can be abused, what the laws say, and what you can do to protect yourself.
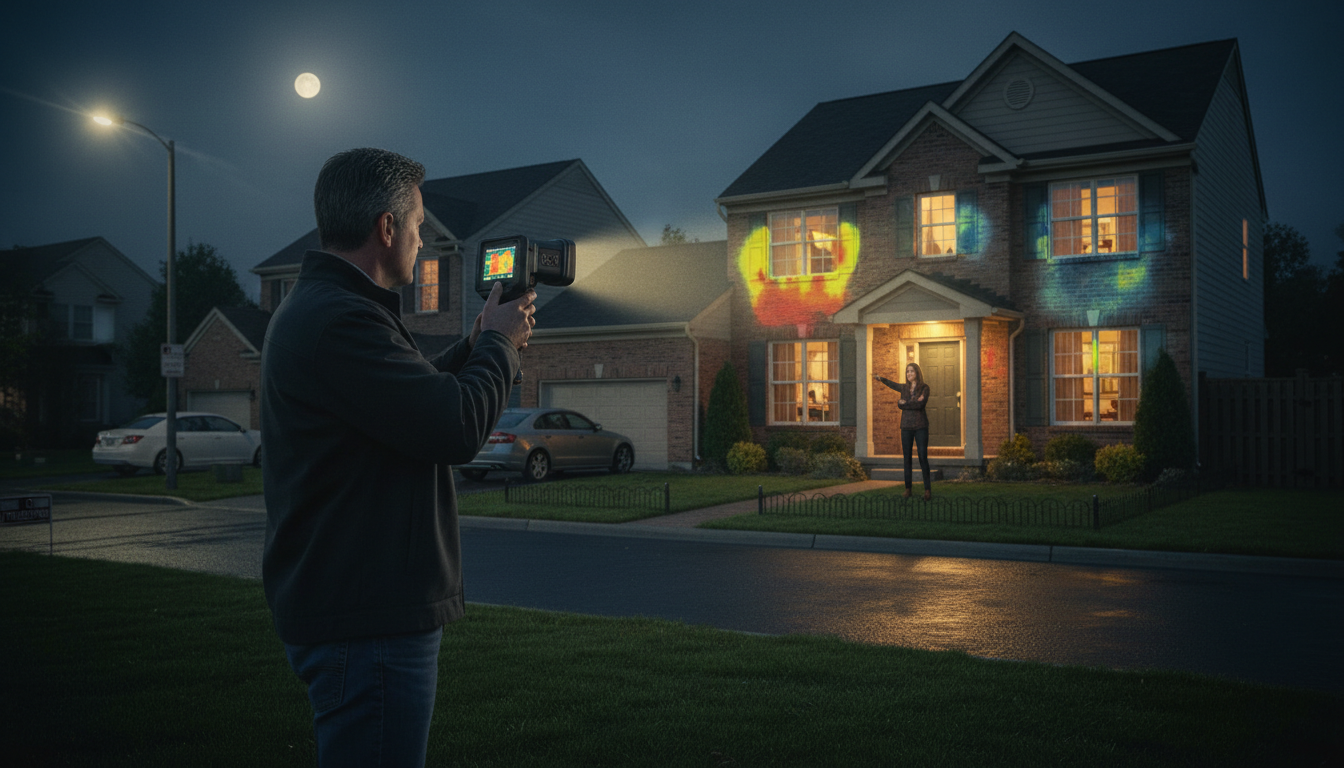
One of the most common concerns involves neighbors using thermal cameras to monitor people inside their homes. While thermal cameras can’t actually see through walls despite what movies show, they detect surface heat—but that hasn’t stopped people from feeling violated when they discover someone pointing a thermal device at their property.
Legal experts recommend documenting incidents and checking local privacy laws if you suspect unauthorized thermal camera use. The reality is that proving someone is using thermal imaging to spy on you can be difficult without clear evidence. But the fact that people are asking these questions shows how the technology creates new privacy concerns.
If you’re interested in legitimate outdoor uses for thermal devices, check out our Sirius HD or Pegasus 2 LRF models designed for hunting and wildlife observation.
The Supreme Court ruled in Kyllo v. United States that using thermal imaging devices to monitor heat radiation in or around a person’s home without a warrant is unconstitutional, as it explores details that would previously have been unknowable without physical intrusion.
This case set an important precedent. Justice Scalia noted the surveillance powers that could be abused by police with technologies that are “not in general public use”. The ruling recognized that as thermal technology improves, the potential for abuse grows.
The technology aids the fight against drugs, but the potential for abuse is great and may destroy basic Fourth Amendment rights. Some courts had previously ruled that thermal imaging didn’t require a warrant, arguing that people have no reasonable expectation of privacy in heat escaping from their homes. The Supreme Court disagreed.

Thermal cameras threaten to build a future where public squares and sidewalks are filled with constant video surveillance, and spending money to install infrastructure like “fever detection” cameras increases the likelihood that the hardware will long outlive its usefulness during public health crises.
During the COVID-19 pandemic, many businesses rushed to install thermal cameras for temperature screening. Many thermal cameras are being combined with facial recognition capabilities, which is particularly problematic as facial recognition technology relies on the capture, extraction, storage, or sharing of people’s biometric facial data—often in absence of explicit consent or prior notice.
This combination creates a perfect storm for privacy invasion. You’re not just having your temperature taken—you’re potentially being identified, tracked, and monitored without your knowledge.
Thermal imaging can disclose privacy information from individuals, as residual thermal radiation transferred from users to objects can disclose gender characteristics. Thermal attacks have been successfully used to steal passwords and PIN codes at ATMs by examining residual thermal radiation in keypads.
These aren’t theoretical concerns. Attackers have actually used thermal imaging to compromise security in real-world scenarios. The heat signature your fingers leave on a keypad can reveal the numbers you just pressed.
Thermal imaging can be beneficial for attackers as it can identify locations where surveillance devices are unlikely to be observed, such as finding spots where a camera can blend with the background near a heating source.
For those looking for legitimate thermal imaging tools, our Draco and Arc LRF models offer reliable performance for outdoor activities.
Using infrared light to take someone’s temperature works well as long as you don’t want it to be particularly precise, but that’s exactly what’s expected of thermal cameras. Experts have concluded that thermal imaging from a distance—including camera systems that claim to detect fevers—may not be effective.
The camera and its environment must be tightly controlled—temperature, humidity, air currents, reflective surfaces, and heat sources all affect readings, and the camera must be warmed up for 30 minutes while the person being scanned must not have washed their face or exercised in the 15-30 minutes before being scanned.
Despite these limitations, businesses installed thousands of these systems and made decisions about who could enter based on potentially inaccurate readings. That’s a form of abuse—selling and using technology that doesn’t actually work as advertised.
It is unlawful to observe, photograph, or record someone without their knowledge or consent in areas where they expect privacy. It is illegal to use, install, or permit the installation of imaging devices to capture or record visual images of a person’s private areas without their knowledge and consent, especially in situations where individuals have a reasonable expectation of privacy, including intentions of video voyeurism.
State laws vary, but most protect against surveillance in private spaces. State laws often build on Fourth Amendment foundations, providing additional protections against private intrusions and prohibiting surveillance without consent.
If you believe you’re being monitored, reporting to law enforcement is a necessary step—start with the local police department, presenting all documented evidence including recordings, photographs, and logs.
So what can you do? First, understand what thermal cameras actually can and can’t do. They don’t have X-ray vision. They can’t see you undressing through a brick wall. But they can detect heat patterns that reveal where people are in outdoor spaces or detect warm spots on surfaces.
Documenting unauthorized surveillance is essential—gather concrete evidence such as recordings of unusual sounds, photographs of suspicious devices, or detailed logs of suspicious activities to create a timeline that can be critical in legal proceedings.
If you’re using thermal devices yourself—whether for home security, hunting, or professional work—be mindful of where you point them. Just because the technology is legal to own doesn’t mean every use of it is legal or ethical. Our thermal imaging products at Pixfra are designed for legitimate outdoor applications, and we encourage responsible use.
Yes, thermal imaging devices can be abused. From neighbor disputes to law enforcement overreach, from password theft to ineffective health screening, the technology creates real privacy risks. The Supreme Court has provided some protection against government abuse, but private misuse is harder to police. State laws offer some recourse, but proving thermal surveillance is difficult.
The best defense is awareness. Know your rights, understand the technology’s limitations, and document any suspicious activity. As thermal cameras become more common, we’ll need to keep having conversations about where the line is between legitimate use and privacy invasion. The technology itself isn’t good or bad—it’s how people choose to use it that matters.
Can my neighbor legally point a thermal camera at my house?
It depends on your state laws and how the camera is being used. While owning a thermal camera is legal, using it to monitor someone in areas where they have a reasonable expectation of privacy—like inside their home—typically violates privacy laws. Document the activity and consult local law enforcement or an attorney about your specific situation.
Can thermal cameras actually see through walls?
No, despite what you see in movies. Thermal cameras only detect surface heat. They can’t see people behind walls or reveal what’s happening in the next room. They might show warm spots on a wall caused by heating ducts or poor insulation behind it, but they’re not seeing through the wall itself—just temperature patterns on the surface.
Do police need a warrant to use thermal imaging on my home?
Yes. The Supreme Court ruled in Kyllo v. United States that law enforcement must obtain a search warrant before using thermal imaging devices to monitor a private residence. Using such technology without a warrant violates the Fourth Amendment’s protection against unreasonable searches.
Are thermal cameras effective for COVID temperature screening?
Not really. Experts have found that thermal imaging from a distance is often inaccurate for fever detection. The cameras require highly controlled environments, proper calibration, and specific protocols to work correctly. Many systems installed during the pandemic didn’t meet these requirements and provided unreliable readings.
What should I do if I suspect thermal surveillance?
Document everything—dates, times, suspicious behavior, and any evidence you can safely gather. Check your state’s privacy and surveillance laws. File a police report with all your documentation. You may also want to consult an attorney about civil remedies like restraining orders or privacy violation lawsuits, depending on the severity of the situation.
